

Megatower 2 MY24
2023 - 2024
EXTREME TRAILS ERFORDERN EXTREME MASSNAHMEN
Das Megatower wurde für maximale Geschwindigkeit und minimale Fahrfehler konzipiert und beeindruckt gleichzeitig durch seine Pedalier-Effizienz. Die Fähigkeiten des Megatowers auf dem Trail bestätigen seinen Ruf als Enduro-Spezialist, der bereit ist für die anspruchsvollsten Stages und viele Höhenmeter.
Carbon
C/CC
Federweg vorne (mm)
170
Federweg hinten (mm)
165
Laufradgröße
29
Rahmen-Spezifikationen
| Federungssystem | VPP |
|---|---|
| Umwerfer-Aufnahme vorne | No compatibility |
| Steuersatz | Integrated (IS41/52) |
| Sattelstützen-Durchmesser | 31.6mm |
| Sattelklemmung | 36.4mm |
| Dämpfer-Einbauänge | 230mm |
| Dämpferhub | 62.5mm |
| Innenlager-Schale | 73mm Threaded |
| Maximale Reifenfreiheit | 2.5" |
| Maximale Kettenblattgröße | 36t |
| Flaschenhalteraufnahmen | 1 |
| Dämpfer-Einbaumaß vorne | 30x8 |
| Dämpfer-Einbaumaß hinten | 30x8 |
| Gabel-Offset | 44mm |
| Hintere Bremsaufnahme | 200mm PM |
Ausstattungsvarianten
Wähle eine Ausstattungsvariante
| Gewicht | 34.57 lbs / 15.68 kg |
|---|---|
| Material | Carbon C |
| Federweg | 165mm |
| Laufradgröße | 29 |
| Dämpfer | RockShox Super Deluxe Select, 230x62.5 |
| Gabel | RockShox Zeb Base, 170mm |
| Schaltwerk | SRAM NX Eagle, 12spd |
| Schalthebel | SRAM NX Eagle, 12spd |
| Kassette | SRAM PG1230, 12spd, 11-50t |
| Kette | SRAM NX Eagle, 12spd |
| Kettenführung | E.13 TRS Race SL, ISCG05 |
| Tretlager | SRAM DUB 68/73mm Threaded BB |
| Steuersatz | FSA IS-2/47/42 ACB or Cane Creek 10 IS Integrated |
| Hinterreifen | Maxxis Minion DHR II 29"x2.4"WT, 3C MaxxTerra, EXO+ |
| Vorderreifen | Maxxis Assegai 29"x2.5", 3C, MaxxGrip, EXO+ |
| Nabe vorne | SRAM MTH 716, 15x110, Torque Cap, 6-Bolt 32h |
| Felge vorne | RaceFace AR Offset 30, 29" |
| Nabe hinten | SRAM MTH 746, 12x148, HG, 6-Bolt, 32h |
| Felge hinten | RaceFace AR Offset 30, 29" |
| Bremsscheibe vorne | Avid Centerline, 200mm |
| Bremsscheibe hinten | Avid Centerline, 200mm |
| Bremsen | SRAM G2 RE |
| Kurbelgarnitur | SRAM Descendant Eagle 148 DUB 32t |
| Lenker | e13 TRS Base |
| Vorbau | e.13 Base |
| Sattel | WTB Silverado, CroMo |
| Sattelstütze | SDG Tellis Dropper, 31.6 |
| Griffe | Santa Cruz Bicycles House Grips |
| Gewicht | 34.08 lbs / 15.46 kg |
|---|---|
| Material | Carbon C |
| Federweg | 165mm |
| Laufradgröße | 29 |
| Dämpfer | RockShox Super Deluxe Select+, 230x62.5 |
| Gabel | FOX 38 Float Performance, 170mm |
| Schaltwerk | SRAM GX Eagle, 12spd |
| Schalthebel | SRAM GX Eagle, 12spd |
| Kassette | SRAM XG1275 Eagle, 12spd, 10-50t |
| Kette | SRAM GX Eagle, 12spd |
| Kettenführung | OneUp Bash Guide |
| Tretlager | SRAM DUB 68/73mm Threaded BB |
| Steuersatz | Cane Creek 40 IS Integrated Headset |
| Hinterreifen | Maxxis Minion DHR II 29"x2.4"WT, 3C MaxxTerra, EXO+ |
| Vorderreifen | Maxxis Assegai 29"x2.5", 3C, MaxxGrip, EXO+ |
| Nabe vorne | DT Swiss 370, 15x110, 6-Bolt, 28h |
| Felge vorne | RaceFace AR Offset 30, 29" |
| Nabe hinten | DT Swis 370, 12x148, XD, 6-Bolt, 36t, 28h |
| Felge hinten | RaceFace AR Offset 30, 29" |
| Bremsscheibe vorne | Avid Centerline, 200mm |
| Bremsscheibe hinten | Avid Centerline, 200mm |
| Bremsen | SRAM Code R |
| Kurbelgarnitur | SRAM GX Eagle 148 DUB 32t |
| Lenker | Burgtec RideWide Alloy |
| Vorbau | Burgtec Enduro MK3, 42mm |
| Sattel | WTB Silverado, CroMo |
| Sattelstütze | OneUp V2 Dropper Post, 31.6 or RockShox Reverb, 31.6 |
| Griffe | Santa Cruz Bicycles House Grips |
| Gewicht | 34.11 lbs / 15.47 kg |
|---|---|
| Material | Carbon C |
| Federweg | 165mm |
| Laufradgröße | 29 |
| Dämpfer | RockShox Super Deluxe Select+ 230x62.5 |
| Gabel | FOX 38 Float Performance Elite, 170mm |
| Schaltwerk | SRAM GX AXS Eagle, 12spd |
| Schalthebel | GX AXS Controller |
| Kassette | SRAM XG1275 Eagle, 12spd, 10-50t |
| Kette | SRAM GX Eagle, 12spd |
| Kettenführung | OneUp Bash Guide |
| Tretlager | SRAM DUB 68/73mm Threaded BB |
| Steuersatz | Cane Creek 40 IS Integrated Headset |
| Hinterreifen | Maxxis Minion DHR II 29"x2.4"WT, 3C MaxxTerra, EXO+, TR |
| Vorderreifen | Maxxis Assegai 29"x2.5" 3C MaxxGrip, EXO+, TR |
| Nabe vorne | i9 1/1, 15x110, 28h |
| Felge vorne | RaceFace ARC Offset 30 29" |
| Nabe hinten | i9 1/1, 12x148, XD, 28h |
| Felge hinten | RaceFace ARC Offset 30 29" |
| Bremsscheibe vorne | Avid Centerline 200mm |
| Bremsscheibe hinten | Avid Centerline 200mm |
| Bremsen | SRAM Code RS |
| Kurbelgarnitur | SRAM GX Eagle 148 DUB, 32t |
| Lenker | Santa Cruz 35 Carbon Bar, 800mm |
| Vorbau | Burgtec Enduro MK3, 42mm |
| Sattel | WTB Silverado Medium CroMo |
| Sattelstütze | RockShox Reverb Stealth, 31.6 |
| Griffe | Santa Cruz Bicycles House Grips |
| Ladegerät | SRAM eTap Powerpack 1 Battery |
| Gewicht | 33.79 lbs / 15.33 kg |
|---|---|
| Material | Carbon C |
| Federweg | 165mm |
| Laufradgröße | 29 |
| Dämpfer | RockShox Super Deluxe Select+ 230x62.5 |
| Gabel | FOX 38 Float Performance Elite, 170mm |
| Schaltwerk | SRAM GX AXS Eagle, 12spd |
| Schalthebel | GX AXS Controller |
| Kassette | SRAM XG1275 Eagle, 12spd, 10-50t |
| Kette | SRAM GX Eagle, 12spd |
| Kettenführung | OneUp Bash Guide |
| Tretlager | SRAM DUB 68/73mm Threaded BB |
| Steuersatz | Cane Creek 40 IS Integrated Headset |
| Hinterreifen | Maxxis Minion DHR II 29"x2.4"WT, 3C MaxxTerra, EXO+, TR |
| Vorderreifen | Maxxis Assegai 29"x2.5" 3C MaxxGrip, EXO+, TR |
| Nabe vorne | i9 1/1, 15x110, 28h |
| Felge vorne | Reserve 30|HD 29", 28h |
| Nabe hinten | i9 1/1, 12x148, XD, 28h |
| Felge hinten | Reserve 30|HD 29", 28h |
| Bremsscheibe vorne | Avid Centerline 200mm |
| Bremsscheibe hinten | Avid Centerline 200mm |
| Bremsen | SRAM Code RS |
| Kurbelgarnitur | SRAM GX Eagle 148 DUB, 32t |
| Lenker | Santa Cruz 35 Carbon Bar, 800mm |
| Vorbau | Burgtec Enduro MK3, 42mm |
| Sattel | WTB Silverado Medium CroMo |
| Sattelstütze | RockShox Reverb Stealth, 31.6 |
| Griffe | Santa Cruz Bicycles House Grips |
| Ladegerät | SRAM eTap Powerpack 1 Battery |
| Gewicht | 35.94 lbs / 16.3 kg |
|---|---|
| Material | Carbon C |
| Federweg | 165mm |
| Laufradgröße | 29 |
| Dämpfer | RockShox Super Deluxe Select+ Coil 230x62.5 |
| Gabel | FOX 38 Float Performance Elite, 170mm |
| Schaltwerk | SRAM GX AXS Eagle, 12spd |
| Schalthebel | GX AXS Controller |
| Kassette | SRAM XG1275 Eagle, 12spd, 10-50t |
| Kette | SRAM GX Eagle, 12spd |
| Kettenführung | OneUp Bash Guide |
| Tretlager | SRAM DUB 68/73mm Threaded BB |
| Steuersatz | Cane Creek 40 IS Integrated Headset |
| Hinterreifen | Maxxis Minion DHR II 29"x2.4", 3C MaxxGrip, Double Down, TR |
| Vorderreifen | Maxxis Assegai 29"x2.5", 3C MaxxGrip, Double Down, TR |
| Nabe vorne | i9 1/1, 15x110, 28h |
| Felge vorne | RaceFace ARC Offset 30 29" |
| Nabe hinten | i9 1/1, 12x148, XD, 28h |
| Felge hinten | RaceFace ARC Offset 30 29" |
| Bremsscheibe vorne | Avid Centerline 200mm |
| Bremsscheibe hinten | Avid Centerline 200mm |
| Bremsen | SRAM Code RS |
| Kurbelgarnitur | SRAM GX Eagle 148 DUB, 32t |
| Lenker | Santa Cruz 35 Carbon Bar, 800mm |
| Vorbau | Burgtec Enduro MK3, 42mm |
| Sattel | WTB Silverado Medium CroMo |
| Sattelstütze | RockShox Reverb Stealth, 31.6 |
| Griffe | Santa Cruz Bicycles House Grips |
| Ladegerät | SRAM eTap Powerpack 1 Battery |
| Gewicht | 35.94 lbs / 16.3 kg |
|---|---|
| Material | Carbon C |
| Federweg | 165mm |
| Laufradgröße | 29 |
| Dämpfer | RockShox Super Deluxe Select+ Coil 230x62.5 |
| Gabel | FOX 38 Float Performance Elite, 170mm |
| Schaltwerk | SRAM GX AXS Eagle, 12spd |
| Schalthebel | GX AXS Controller |
| Kassette | SRAM XG1275 Eagle, 12spd, 10-50t |
| Kette | SRAM GX Eagle, 12spd |
| Kettenführung | OneUp Bash Guide |
| Tretlager | SRAM DUB 68/73mm Threaded BB |
| Steuersatz | Cane Creek 40 IS Integrated Headset |
| Hinterreifen | Maxxis Minion DHR II 29"x2.4", 3C MaxxGrip, Double Down, TR |
| Vorderreifen | Maxxis Assegai 29"x2.5", 3C MaxxGrip, Double Down, TR |
| Nabe vorne | i9 1/1, 15x110, 28h |
| Felge vorne | Reserve 30|HD 29", 28h |
| Nabe hinten | i9 1/1, 12x148, XD, 28h |
| Felge hinten | Reserve 30|HD 29", 28h |
| Bremsscheibe vorne | Avid Centerline 200mm |
| Bremsscheibe hinten | Avid Centerline 200mm |
| Bremsen | SRAM Code RS |
| Kurbelgarnitur | SRAM GX Eagle 148 DUB, 32t |
| Lenker | Santa Cruz 35 Carbon Bar, 800mm |
| Vorbau | Burgtec Enduro MK3, 42mm |
| Sattel | WTB Silverado Medium CroMo |
| Sattelstütze | RockShox Reverb Stealth, 31.6 |
| Griffe | Santa Cruz Bicycles House Grips |
| Ladegerät | SRAM eTap Powerpack 1 Battery |
| Gewicht | 33.67 lbs / 15.27 kg |
|---|---|
| Material | Carbon CC |
| Federweg | 165mm |
| Laufradgröße | 29 |
| Dämpfer | FOX Float X2 Factory, 230x62.5 |
| Gabel | RockShox Zeb Ultimate, 170mm -or- Fox 38 Float Factory |
| Schaltwerk | SRAM X01 Eagle, 12spd |
| Schalthebel | SRAM X01 Eagle, 12spd |
| Kassette | SRAM XG1275 Eagle, 12spd, 10-50t |
| Kette | SRAM GX Eagle, 12spd |
| Kettenführung | OneUp Bash Guide |
| Tretlager | SRAM DUB 73mm MTB Wide BB |
| Steuersatz | Cane Creek 40 IS Integrated Headset |
| Hinterreifen | Maxxis Minion DHR II 29"x2.4"WT, 3C MaxxTerra, EXO+ |
| Vorderreifen | Maxxis Assegai 29"x2.5", 3C, MaxxGrip, EXO+ |
| Nabe vorne | Industry Nine 1/1, 15x110, Torque Cap, 6-Bolt, 28h -OR- DT Swiss 350, 15x110, 6-Bolt, 28h |
| Felge vorne | RaceFace ARC Offset 30 29" |
| Nabe hinten | Industry Nine 1/1, 12x148, XD, 6-Bolt, 28h -OR- DT Swiss 350, 12x148, 6-Bolt, 28h |
| Felge hinten | RaceFace ARC Offset 30 29" |
| Bremsscheibe vorne | SRAM HS2 200mm |
| Bremsscheibe hinten | SRAM HS2 200mm |
| Bremsen | SRAM Code RSC |
| Kurbelgarnitur | SRAM X1 Eagle Carbon 148 DUB |
| Lenker | Santa Cruz 35 Carbon Bar, 800mm |
| Vorbau | Burgtec Enduro MK3, 42mm |
| Sattel | WTB Silverado Medium, Ti |
| Sattelstütze | OneUp V2 Dropper Post, 31.6 -or- RockShox Reverb Stealth -or- Fox Transfer |
| Griffe | Santa Cruz Bicycles House Grips |
| Ladegerät | SRAM eTap Powerpack 1 Battery |
| Gewicht | 35.27 lbs / 16 kg |
|---|---|
| Material | Carbon CC |
| Federweg | 165mm |
| Laufradgröße | 29 |
| Dämpfer | RockShox Super Deluxe Ultimate Coil, 230x62.5 -or- FOX DHX2 Factory |
| Gabel | RockShox Zeb Ultimate, 170mm -or- Fox 38 Float Factory |
| Schaltwerk | SRAM X01 Eagle, 12spd |
| Schalthebel | SRAM X01 Eagle, 12spd |
| Kassette | SRAM XG1275 Eagle, 12spd, 10-50t |
| Kette | SRAM GX Eagle, 12spd |
| Kettenführung | OneUp Bash Guide |
| Tretlager | SRAM DUB 73mm MTB Wide BB |
| Steuersatz | Cane Creek 40 IS Integrated Headset |
| Hinterreifen | Maxxis Minion DHR II 29"x2.4", 3C MaxxGrip, Double Down |
| Vorderreifen | Maxxis Assegai 29"x2.5", 3C, MaxxGrip, Double Down |
| Nabe vorne | Industry Nine 1/1, 15x110, Torque Cap, 6-Bolt, 28h -OR- DT Swiss 350, 15x110, 6-Bolt, 28h |
| Felge vorne | RaceFace ARC Offset 30 29" |
| Nabe hinten | Industry Nine 1/1, 12x148, XD, 6-Bolt, 28h -OR- DT Swiss 350, 12x148, 6-Bolt, 28h |
| Felge hinten | RaceFace ARC Offset 30 29" |
| Bremsscheibe vorne | SRAM HS2 200mm |
| Bremsscheibe hinten | SRAM HS2 200mm |
| Bremsen | SRAM Code RSC |
| Kurbelgarnitur | SRAM X1 Eagle Carbon 148 DUB |
| Lenker | Santa Cruz 35 Carbon Bar, 800mm |
| Vorbau | Burgtec Enduro MK3, 42mm |
| Sattel | WTB Silverado Medium, Ti |
| Sattelstütze | OneUp V2 Dropper Post, 31.6 -or- RockShox Reverb Stealth -or- Fox Transfer |
| Griffe | Santa Cruz Bicycles House Grips |
| Ladegerät | SRAM eTap Powerpack 1 Battery |
| Gewicht | 33.67 lbs / 15.27 kg |
|---|---|
| Material | Carbon CC |
| Federweg | 165mm |
| Laufradgröße | 29 |
| Dämpfer | FOX Float X2 Factory, 230x62.5 |
| Gabel | RockShox Zeb Ultimate, 170mm -or- Fox 38 Float Factory |
| Schaltwerk | SRAM X0 Eagle AXS T-Type, 12spd |
| Schalthebel | SRAM AXS Pod Bridge |
| Kassette | SRAM X0 Eagle T-Type, 10-52t |
| Kette | SRAM X0 Eagle T-Type, Flattop, 12spd |
| Kettenführung | OneUp Bash Guide |
| Tretlager | SRAM DUB 73mm MTB Wide BB |
| Steuersatz | Cane Creek 40 IS Integrated Headset |
| Hinterreifen | Maxxis Minion DHR II 29"x2.4"WT, 3C MaxxTerra, EXO+ |
| Vorderreifen | Maxxis Assegai 29"x2.5", 3C, MaxxGrip, EXO+ |
| Nabe vorne | Industry Nine 1/1, 15x110, Torque Cap, 6-Bolt, 28h -OR- DT Swiss 350, 15x110, 6-Bolt, 28h |
| Felge vorne | RaceFace ARC Offset 30 29" |
| Nabe hinten | Industry Nine 1/1, 12x148, XD, 6-Bolt, 28h -OR- DT Swiss 350, 12x148, 6-Bolt, 28h |
| Felge hinten | RaceFace ARC Offset 30 29" |
| Bremsscheibe vorne | SRAM HS2 200mm |
| Bremsscheibe hinten | SRAM HS2 200mm |
| Bremsen | SRAM Code Silver Stealth |
| Kurbelgarnitur | SRAM X0 Eagle DUB T-Type Crankset, 32t |
| Lenker | Santa Cruz 35 Carbon Bar, 800mm |
| Vorbau | Burgtec Enduro MK3, 42mm |
| Sattel | WTB Silverado Medium, Ti |
| Sattelstütze | OneUp V2 Dropper Post, 31.6 -or- RockShox Reverb Stealth -or- Fox Transfer |
| Griffe | Santa Cruz Bicycles House Grips |
| Ladegerät | SRAM eTap Powerpack 1 Battery |
| Gewicht | 35.27 lbs / 16 kg |
|---|---|
| Material | Carbon CC |
| Federweg | 165mm |
| Laufradgröße | 29 |
| Dämpfer | RockShox Super Deluxe Ultimate Coil, 230x62.5 -or- FOX DHX2 Factory |
| Gabel | RockShox Zeb Ultimate, 170mm -or- Fox 38 Float Factory |
| Schaltwerk | SRAM X0 Eagle AXS T-Type, 12spd |
| Schalthebel | SRAM AXS Pod Bridge |
| Kassette | SRAM X0 Eagle T-Type, 10-52t |
| Kette | SRAM X0 Eagle T-Type, Flattop, 12spd |
| Kettenführung | OneUp Bash Guide |
| Tretlager | SRAM DUB 73mm MTB Wide BB |
| Steuersatz | Cane Creek 40 IS Integrated Headset |
| Hinterreifen | Maxxis Minion DHR II 29"x2.4", 3C MaxxGrip, Double Down |
| Vorderreifen | Maxxis Assegai 29"x2.5", 3C, MaxxGrip, Double Down |
| Nabe vorne | Industry Nine 1/1, 15x110, Torque Cap, 6-Bolt, 28h -OR- DT Swiss 350, 15x110, 6-Bolt, 28h |
| Felge vorne | RaceFace ARC Offset 30 29" |
| Nabe hinten | Industry Nine 1/1, 12x148, XD, 6-Bolt, 28h -OR- DT Swiss 350, 12x148, 6-Bolt, 28h |
| Felge hinten | RaceFace ARC Offset 30 29" |
| Bremsscheibe vorne | SRAM HS2 200mm |
| Bremsscheibe hinten | SRAM HS2 200mm |
| Bremsen | SRAM Code Silver Stealth |
| Kurbelgarnitur | SRAM X0 Eagle DUB T-Type Crankset, 32t |
| Lenker | Santa Cruz 35 Carbon Bar, 800mm |
| Vorbau | Burgtec Enduro MK3, 42mm |
| Sattel | WTB Silverado Medium, Ti |
| Sattelstütze | OneUp V2 Dropper Post, 31.6 -or- RockShox Reverb Stealth -or- Fox Transfer |
| Griffe | Santa Cruz Bicycles House Grips |
| Ladegerät | SRAM eTap Powerpack 1 Battery |
| Gewicht | 33.57 lbs / 15.23 kg |
|---|---|
| Material | Carbon CC |
| Federweg | 165mm |
| Laufradgröße | 29 |
| Dämpfer | FOX Float X2 Factory, 230x62.5 |
| Gabel | RockShox Zeb Ultimate, 170mm -or- Fox 38 Float Factory |
| Schaltwerk | SRAM X01 Eagle AXS, 12spd |
| Schalthebel | SRAM GX Eagle AXS Controller 2 Button |
| Kassette | SRAM XG1275 Eagle, 12spd, 10-50t |
| Kette | SRAM GX Eagle, 12spd |
| Kettenführung | OneUp Bash Guide |
| Tretlager | SRAM DUB 73mm MTB Wide BB |
| Steuersatz | Cane Creek 40 IS Integrated Headset |
| Hinterreifen | Maxxis Minion DHR II 29"x2.4"WT, 3C MaxxTerra, EXO+ |
| Vorderreifen | Maxxis Assegai 29"x2.5", 3C, MaxxGrip, EXO+ |
| Nabe vorne | Industry Nine 1/1, 15x110, Torque Cap, 6-Bolt, 28h -OR- DT Swiss 350, 15x110, 6-Bolt, 28h |
| Felge vorne | Reserve 30|HD 29" |
| Nabe hinten | Industry Nine 1/1, 12x148, XD, 6-Bolt, 28h -OR- DT Swiss 350, 12x148, 6-Bolt, 28h |
| Felge hinten | Reserve 30|HD 29" |
| Bremsscheibe vorne | SRAM HS2 200mm |
| Bremsscheibe hinten | SRAM HS2 200mm |
| Bremsen | SRAM Code RSC |
| Kurbelgarnitur | SRAM X1 Eagle Carbon 148 DUB |
| Lenker | Santa Cruz 35 Carbon Bar, 800mm |
| Vorbau | Burgtec Enduro MK3, 42mm |
| Sattel | WTB Silverado Medium, Ti |
| Sattelstütze | OneUp V2 Dropper Post, 31.6 -or- RockShox Reverb Stealth -or- Fox Transfer |
| Griffe | Santa Cruz Bicycles House Grips |
| Ladegerät | SRAM eTap Powerpack 1 Battery |
| Gewicht | 35.27 lbs / 16 kg |
|---|---|
| Material | Carbon CC |
| Federweg | 165mm |
| Laufradgröße | 29 |
| Dämpfer | RockShox Super Deluxe Ultimate Coil, 230x62.5 -or- FOX DHX2 Factory |
| Gabel | RockShox Zeb Ultimate, 170mm -or- Fox 38 Float Factory |
| Schaltwerk | SRAM X01 Eagle AXS, 12spd |
| Schalthebel | SRAM GX Eagle AXS Controller 2 Button |
| Kassette | SRAM XG1275 Eagle, 12spd, 10-50t |
| Kette | SRAM GX Eagle, 12spd |
| Kettenführung | OneUp Bash Guide |
| Tretlager | SRAM DUB 73mm MTB Wide BB |
| Steuersatz | Cane Creek 40 IS Integrated Headset |
| Hinterreifen | Maxxis Minion DHR II 29"x2.4", 3C MaxxGrip, Double Down |
| Vorderreifen | Maxxis Assegai 29"x2.5", 3C, MaxxGrip, Double Down |
| Nabe vorne | Industry Nine 1/1, 15x110, Torque Cap, 6-Bolt, 28h -OR- DT Swiss 350, 15x110, 6-Bolt, 28h |
| Felge vorne | Reserve 30|HD 29" |
| Nabe hinten | Industry Nine 1/1, 12x148, XD, 6-Bolt, 28h -OR- DT Swiss 350, 12x148, 6-Bolt, 28h |
| Felge hinten | Reserve 30|HD 29" |
| Bremsscheibe vorne | SRAM HS2 200mm |
| Bremsscheibe hinten | SRAM HS2 200mm |
| Bremsen | SRAM Code RSC |
| Kurbelgarnitur | SRAM X1 Eagle Carbon 148 DUB |
| Lenker | Santa Cruz 35 Carbon Bar, 800mm |
| Vorbau | Burgtec Enduro MK3, 42mm |
| Sattel | WTB Silverado Medium, Ti |
| Sattelstütze | OneUp V2 Dropper Post, 31.6 -or- RockShox Reverb Stealth -or- Fox Transfer |
| Griffe | Santa Cruz Bicycles House Grips |
| Ladegerät | SRAM eTap Powerpack 1 Battery |
| Gewicht | 33.57 lbs / 15.23 kg |
|---|---|
| Material | Carbon CC |
| Federweg | 165mm |
| Laufradgröße | 29 |
| Dämpfer | FOX Float X2 Factory, 230x62.5 |
| Gabel | RockShox Zeb Ultimate, 170mm -or- Fox 38 Float Factory |
| Schaltwerk | SRAM X0 Eagle AXS T-Type, 12spd |
| Schalthebel | SRAM AXS Pod Bridge |
| Kassette | SRAM X0 Eagle T-Type, 10-52t |
| Kette | SRAM X0 Eagle T-Type, Flattop, 12spd |
| Kettenführung | OneUp Bash Guide |
| Tretlager | SRAM DUB 73mm MTB Wide BB |
| Steuersatz | Cane Creek 40 IS Integrated Headset |
| Hinterreifen | Maxxis Minion DHR II 29"x2.4"WT, 3C MaxxTerra, EXO+ |
| Vorderreifen | Maxxis Assegai 29"x2.5", 3C, MaxxGrip, EXO+ |
| Nabe vorne | Industry Nine 1/1, 15x110, Torque Cap, 6-Bolt, 28h -OR- DT Swiss 350, 15x110, 6-Bolt, 28h |
| Felge vorne | Reserve 30|HD 29" |
| Nabe hinten | Industry Nine 1/1, 12x148, XD, 6-Bolt, 28h -OR- DT Swiss 350, 12x148, 6-Bolt, 28h |
| Felge hinten | Reserve 30|HD 29" |
| Bremsscheibe vorne | SRAM HS2 200mm |
| Bremsscheibe hinten | SRAM HS2 200mm |
| Bremsen | SRAM Code Silver Stealth |
| Kurbelgarnitur | SRAM X0 Eagle DUB T-Type Crankset, 32t |
| Lenker | Santa Cruz 35 Carbon Bar, 800mm |
| Vorbau | Burgtec Enduro MK3, 42mm |
| Sattel | WTB Silverado Medium, Ti |
| Sattelstütze | OneUp V2 Dropper Post, 31.6 -or- RockShox Reverb Stealth -or- Fox Transfer |
| Griffe | Santa Cruz Bicycles House Grips |
| Ladegerät | SRAM eTap Powerpack 1 Battery |
| Gewicht | 35.27 lbs / 16 kg |
|---|---|
| Material | Carbon CC |
| Federweg | 165mm |
| Laufradgröße | 29 |
| Dämpfer | RockShox Super Deluxe Ultimate Coil, 230x62.5 -or- FOX DHX2 Factory |
| Gabel | RockShox Zeb Ultimate, 170mm -or- Fox 38 Float Factory |
| Schaltwerk | SRAM X0 Eagle AXS T-Type, 12spd |
| Schalthebel | SRAM AXS Pod Bridge |
| Kassette | SRAM X0 Eagle T-Type, 10-52t |
| Kette | SRAM X0 Eagle T-Type, Flattop, 12spd |
| Kettenführung | OneUp Bash Guide |
| Tretlager | SRAM DUB 73mm MTB Wide BB |
| Steuersatz | Cane Creek 40 IS Integrated Headset |
| Hinterreifen | Maxxis Minion DHR II 29"x2.4", 3C MaxxGrip, Double Down |
| Vorderreifen | Maxxis Assegai 29"x2.5", 3C, MaxxGrip, Double Down |
| Nabe vorne | Industry Nine 1/1, 15x110, Torque Cap, 6-Bolt, 28h -OR- DT Swiss 350, 15x110, 6-Bolt, 28h |
| Felge vorne | Reserve 30|HD 29" |
| Nabe hinten | Industry Nine 1/1, 12x148, XD, 6-Bolt, 28h -OR- DT Swiss 350, 12x148, 6-Bolt, 28h |
| Felge hinten | RaceFace ARC Offset 30 29" |
| Bremsscheibe vorne | SRAM HS2 200mm |
| Bremsscheibe hinten | SRAM HS2 200mm |
| Bremsen | SRAM Code Silver Stealth |
| Kurbelgarnitur | SRAM X0 Eagle DUB T-Type Crankset, 32t |
| Lenker | Santa Cruz 35 Carbon Bar, 800mm |
| Vorbau | Burgtec Enduro MK3, 42mm |
| Sattel | WTB Silverado Medium, Ti |
| Sattelstütze | OneUp V2 Dropper Post, 31.6 -or- RockShox Reverb Stealth -or- Fox Transfer |
| Griffe | Santa Cruz Bicycles House Grips |
| Ladegerät | SRAM eTap Powerpack 1 Battery |
| Gewicht | 35.17 lbs / 15.96 kg |
|---|---|
| Material | Carbon CC |
| Federweg | 165mm |
| Laufradgröße | 29 |
| Dämpfer | FOX Float X2 Factory, 230x62.5 |
| Gabel | RockShox Zeb Ultimate, 170mm -or- Fox 38 Float Factory |
| Schaltwerk | SRAM XX Eagle AXS T-Type, 12spd |
| Schalthebel | SRAM AXS Pod Ultimate Bridge |
| Kassette | SRAM XX Eagle T-Type, 10-52t |
| Kette | SRAM XX Eagle T-Type, Flattop, 12spd |
| Kettenführung | OneUp Bash Guide |
| Tretlager | SRAM DUB 73mm MTB Wide BB |
| Steuersatz | Chris King DropSet 3 Integrated Headset |
| Hinterreifen | Maxxis Minion DHR II 29"x2.4"WT, 3C MaxxTerra, EXO+ |
| Vorderreifen | Maxxis Assegai 29"x2.5", 3C, MaxxGrip, EXO+ |
| Nabe vorne | Industry Nine Hydra, 15x110, Torque Cap, 6-Bolt, 28h |
| Felge vorne | Reserve 30|HD 29" |
| Nabe hinten | Industry Nine Hydra, 12x148, XD, 6-Bolt, 28h |
| Felge hinten | Reserve 30|HD 29" |
| Bremsscheibe vorne | SRAM HS2 200mm |
| Bremsscheibe hinten | SRAM HS2 200mm |
| Bremsen | Code Ultimate Stealth |
| Kurbelgarnitur | SRAM XX Eagle DUB T-Type Crankset, 32t |
| Lenker | Santa Cruz 35 Carbon Bar, 800mm |
| Vorbau | Industry Nine A35, 40mm |
| Sattel | WTB Silverado Medium, Ti |
| Sattelstütze | OneUp V2 Dropper Post, 31.6 -or- RockShox Reverb Stealth -or- Fox Transfer |
| Griffe | Santa Cruz Bicycles House Grips |
| Ladegerät | SRAM eTap Powerpack 1 Battery |
| Gewicht | 33.17 lbs / 15.05 kg |
|---|---|
| Material | Carbon CC |
| Federweg | 165mm |
| Laufradgröße | 29 |
| Dämpfer | FOX Float X2 Factory, 230x62.5 |
Geometrie
Alle Einheiten in Millimeter oder Grad
| s | m | l | xl | xxl | |
|---|---|---|---|---|---|
| Reach (Hi/Lo) | 430/427 | 455/452 | 475/472 | 495/492 | 520/517 |
| Stack (Hi/Lo) | 616/618 | 625/627 | 638/640 | 656/658 | 670/672 |
| C. Lenkwinkel (Hi/Lo) | 63.8°/63.5° | 63.8°/63.5° | 63.8°/63.5° | 63.8°/63.5° | 63.8°/63.5° |
| L. Sitzrohrlänge (Hi/Lo) | 380 | 405 | 430 | 460 | 500 |
| Front Center (Hi/Lo) | 770 | 799 | 826 | 855 | 886 |
| H. Tretlagerhöhe (Hi/Lo) | 346/342.5 | 346/342.5 | 346/342.5 | 346/342.5 | 346/342.5 |
| I. Tretlagerabsenkung (Hi/Lo) | 26.5/30 | 26.5/30 | 26.5/30 | 26.5/30 | 26.5/30 |
| E. Radstand (Hi/Lo) | 1206 | 1236/1237 | 1266 | 1298 | 1333/1334 |
| G. Hinterbaulänge (Hi/Lo) | 436/437 | 437/438 | 440/441 | 443/444 | 447/448 |
| K. Steuerrohrlänge (Hi/Lo) | 90 | 100 | 115 | 135 | 150 |
| M. Oberrohrlänge (Hi/Lo) | 570 | 594/595 | 613 | 637/638 | 666/667 |
| D. Sitzwinkel (Hi/Lo) | 77.24°/77.0° | 77.42°/77.2° | 77.8°/77.5° | 77.8°/77.5° | 77.8°/77.5° |
| J. Überstandshöhe (Hi/Lo) | 709/705 | 716/712 | 723/718 | 722/717 | 724/720 |
Größen-Empfehlung
S
M
L
XL
XXL
154cm
5'1"
-
165cm
5'5"
Reach: 430mm
165cm
5'5"
-
175cm
5'9"
Reach: 455mm
175cm
5'9"
-
185cm
6'1"
Reach: 475mm
185cm
6'1"
-
193cm
6'4"
Reach: 495mm
193cm
6'4"
-
200cm
6'7"
Reach: 520mm
Fahrwerks-Setup
Rockshox Zeb Base 170
| Fahrergewicht (lbs) | Fahrergewicht (kg) | Luftdruck (psi) | Rebound (Klicks von geschlossen) |
|---|---|---|---|
| 100 | 45 | 29 | 14 |
| 120 | 54 | 37 | 13 |
| 140 | 64 | 45 | 12 |
| 160 | 73 | 54 | 11 |
| 180 | 82 | 62 | 11 |
| 200 | 91 | 70 | 10 |
| 220 | 100 | 78 | 9 |
Rockshox Super Deluxe Select
| Fahrergewicht (lbs) | Fahrergewicht (kg) | Luftdruck (psi) | Sag | Rebound (Klicks von geschlossen) |
|---|---|---|---|---|
| 100 | 45 | 90 | 29-32%, 18-20mm | 7 |
| 120 | 54 | 115 | 29-32%, 18-20mm | 7 |
| 140 | 64 | 135 | 29-32%, 18-20mm | 7 |
| 160 | 73 | 160 | 29-32%, 18-20mm | 6 |
| 180 | 82 | 185 | 29-32%, 18-20mm | 6 |
| 200 | 91 | 210 | 29-32%, 18-20mm | 6 |
| 220 | 100 | 230 | 29-32%, 18-20mm | 5 |
| 240 | 109 | 255 | 29-32%, 18-20mm | 5 |
| 260 | 118 | 280 | 29-32%, 18-20mm | 5 |
Fox 38 Performance 170
| Fahrergewicht (lbs) | Fahrergewicht (kg) | Luftdruck (psi) | Rebound (Klicks von geschlossen) |
|---|---|---|---|
| 120 | 54 | 72 | 13 |
| 130 | 59 | 76 | 12 |
| 140 | 64 | 80 | 11 |
| 150 | 68 | 84 | 10 |
| 160 | 73 | 89 | 9 |
| 170 | 77 | 93 | 8 |
| 180 | 82 | 97 | 7 |
| 190 | 86 | 102 | 6 |
| 200 | 91 | 106 | 5 |
| 210 | 95 | 110 | 4 |
| 220 | 100 | 114 | 3 |
| 230 | 104 | 119 | 2 |
Rockshox Super Deluxe Select Plus
| Fahrergewicht (lbs) | Fahrergewicht (kg) | Luftdruck (psi) | Sag | Rebound (Klicks von geschlossen) |
|---|---|---|---|---|
| 100 | 45 | 90 | 29-32%, 18-20mm | 7 |
| 120 | 54 | 115 | 29-32%, 18-20mm | 7 |
| 140 | 64 | 135 | 29-32%, 18-20mm | 7 |
| 160 | 73 | 160 | 29-32%, 18-20mm | 6 |
| 180 | 82 | 185 | 29-32%, 18-20mm | 6 |
| 200 | 91 | 210 | 29-32%, 18-20mm | 6 |
| 220 | 100 | 230 | 29-32%, 18-20mm | 5 |
| 240 | 109 | 255 | 29-32%, 18-20mm | 5 |
| 260 | 118 | 280 | 29-32%, 18-20mm | 5 |
MY24 Rockshox Zeb Select Plus 170
| Fahrergewicht (lbs) | Fahrergewicht (kg) | Luftdruck (psi) | Rebound (Klicks von geschlossen) |
|---|---|---|---|
| 100 | 45 | 29 | 15 |
| 120 | 54 | 37 | 13 |
| 140 | 64 | 45 | 12 |
| 160 | 73 | 54 | 11 |
| 180 | 82 | 62 | 10 |
| 200 | 91 | 70 | 9 |
| 220 | 100 | 78 | 8 |
| 240 | 109 | 86 | 6 |
Super Deluxe Select Plus Coil
| Fahrergewicht (lbs) | Fahrergewicht (kg) | Federhärte | Sag | Vorspannung | Rebound (Klicks von geschlossen) |
|---|---|---|---|---|---|
| 100 | 45 | 250 | 29-32%, 18-20mm | 1-2 turns | 9 |
| 120 | 54 | 300 | 29-32%, 18-20mm | 1-2 turns | 9 |
| 140 | 64 | 350 | 29-32%, 18-20mm | 1-2 turns | 8 |
| 160 | 73 | 400 | 29-32%, 18-20mm | 1-2 turns | 8 |
| 180 | 82 | 450 | 29-32%, 18-20mm | 1-2 turns | 7 |
| 200 | 91 | 500 | 29-32%, 18-20mm | 1-2 turns | 6 |
| 220 | 100 | 550 | 29-32%, 18-20mm | 1-2 turns | 6 |
| 240 | 109 | 600 | 29-32%, 18-20mm | 1-2 turns | 5 |
Rockshox Zeb Ultimate 170
| Fahrergewicht (lbs) | Fahrergewicht (kg) | Luftdruck (psi) | Rebound (Klicks von geschlossen) | Compression (L/H - von der mittleren Position) |
|---|---|---|---|---|
| 100 | 45 | 29 | 15 | -2,middle |
| 120 | 54 | 37 | 13 | -2,middle |
| 140 | 64 | 45 | 12 | -2,middle |
| 160 | 73 | 54 | 11 | -2,middle |
| 180 | 82 | 62 | 10 | -2,middle |
| 200 | 91 | 70 | 9 | -2,middle |
| 220 | 100 | 78 | 8 | -2,middle |
| 240 | 109 | 86 | 6 | -2,middle |
Fox Float X2 Factory
| Fahrergewicht (lbs) | Fahrergewicht (kg) | Luftdruck (psi) | Sag | Rebound (L/H - Klicks von geschlossen) | Compression (L/H - Klicks von geschlossen) |
|---|---|---|---|---|---|
| 100 | 45 | 140 | 29-32%, 18-20mm | 11,7 | 13,7 |
| 120 | 54 | 160 | 29-32%, 18-20mm | 10,6 | 13,7 |
| 140 | 64 | 175 | 29-32%, 18-20mm | 10,6 | 13,7 |
| 160 | 73 | 195 | 29-32%, 18-20mm | 9,5 | 13,7 |
| 180 | 82 | 210 | 29-32%, 18-20mm | 9,5 | 13,7 |
| 200 | 91 | 230 | 29-32%, 18-20mm | 9,4 | 13,7 |
| 220 | 100 | 250 | 29-32%, 18-20mm | 8,4 | 13,7 |
| 240 | 109 | 270 | 29-32%, 18-20mm | 8,4 | 13,7 |
Rockshox Zeb Ultimate 170
| Fahrergewicht (lbs) | Fahrergewicht (kg) | Luftdruck (psi) | Rebound (Klicks von geschlossen) | Compression (L/H - von der mittleren Position) |
|---|---|---|---|---|
| 100 | 45 | 29 | 15 | -2,middle |
| 120 | 54 | 37 | 13 | -2,middle |
| 140 | 64 | 45 | 12 | -2,middle |
| 160 | 73 | 54 | 11 | -2,middle |
| 180 | 82 | 62 | 10 | -2,middle |
| 200 | 91 | 70 | 9 | -2,middle |
| 220 | 100 | 78 | 8 | -2,middle |
| 240 | 109 | 86 | 6 | -2,middle |
Rockshox Super Deluxe Ultimate Coil
| Fahrergewicht (lbs) | Fahrergewicht (kg) | Federhärte | Sag | Vorspannung | Rebound (Klicks von geschlossen) | Compression (L/H - von der mittleren Position) |
|---|---|---|---|---|---|---|
| 100 | 45 | 250 | 29-32%, 18-20mm | 1-2 turns | 9 | -2, middle |
| 120 | 54 | 300 | 29-32%, 18-20mm | 1-2 turns | 9 | -2, middle |
| 140 | 64 | 350 | 29-32%, 18-20mm | 1-2 turns | 8 | -2, middle |
| 160 | 73 | 400 | 29-32%, 18-20mm | 1-2 turns | 8 | -2, middle |
| 180 | 82 | 450 | 29-32%, 18-20mm | 1-2 turns | 7 | -2, middle |
| 200 | 91 | 500 | 29-32%, 18-20mm | 1-2 turns | 6 | -2, middle |
| 220 | 100 | 550 | 29-32%, 18-20mm | 1-2 turns | 6 | -2, middle |
| 240 | 109 | 600 | 29-32%, 18-20mm | 1-2 turns | 5 | -2, middle |
Explosionszeichnungen


Megatower 2 Small Parts
Kleinteile finden
Lower Link
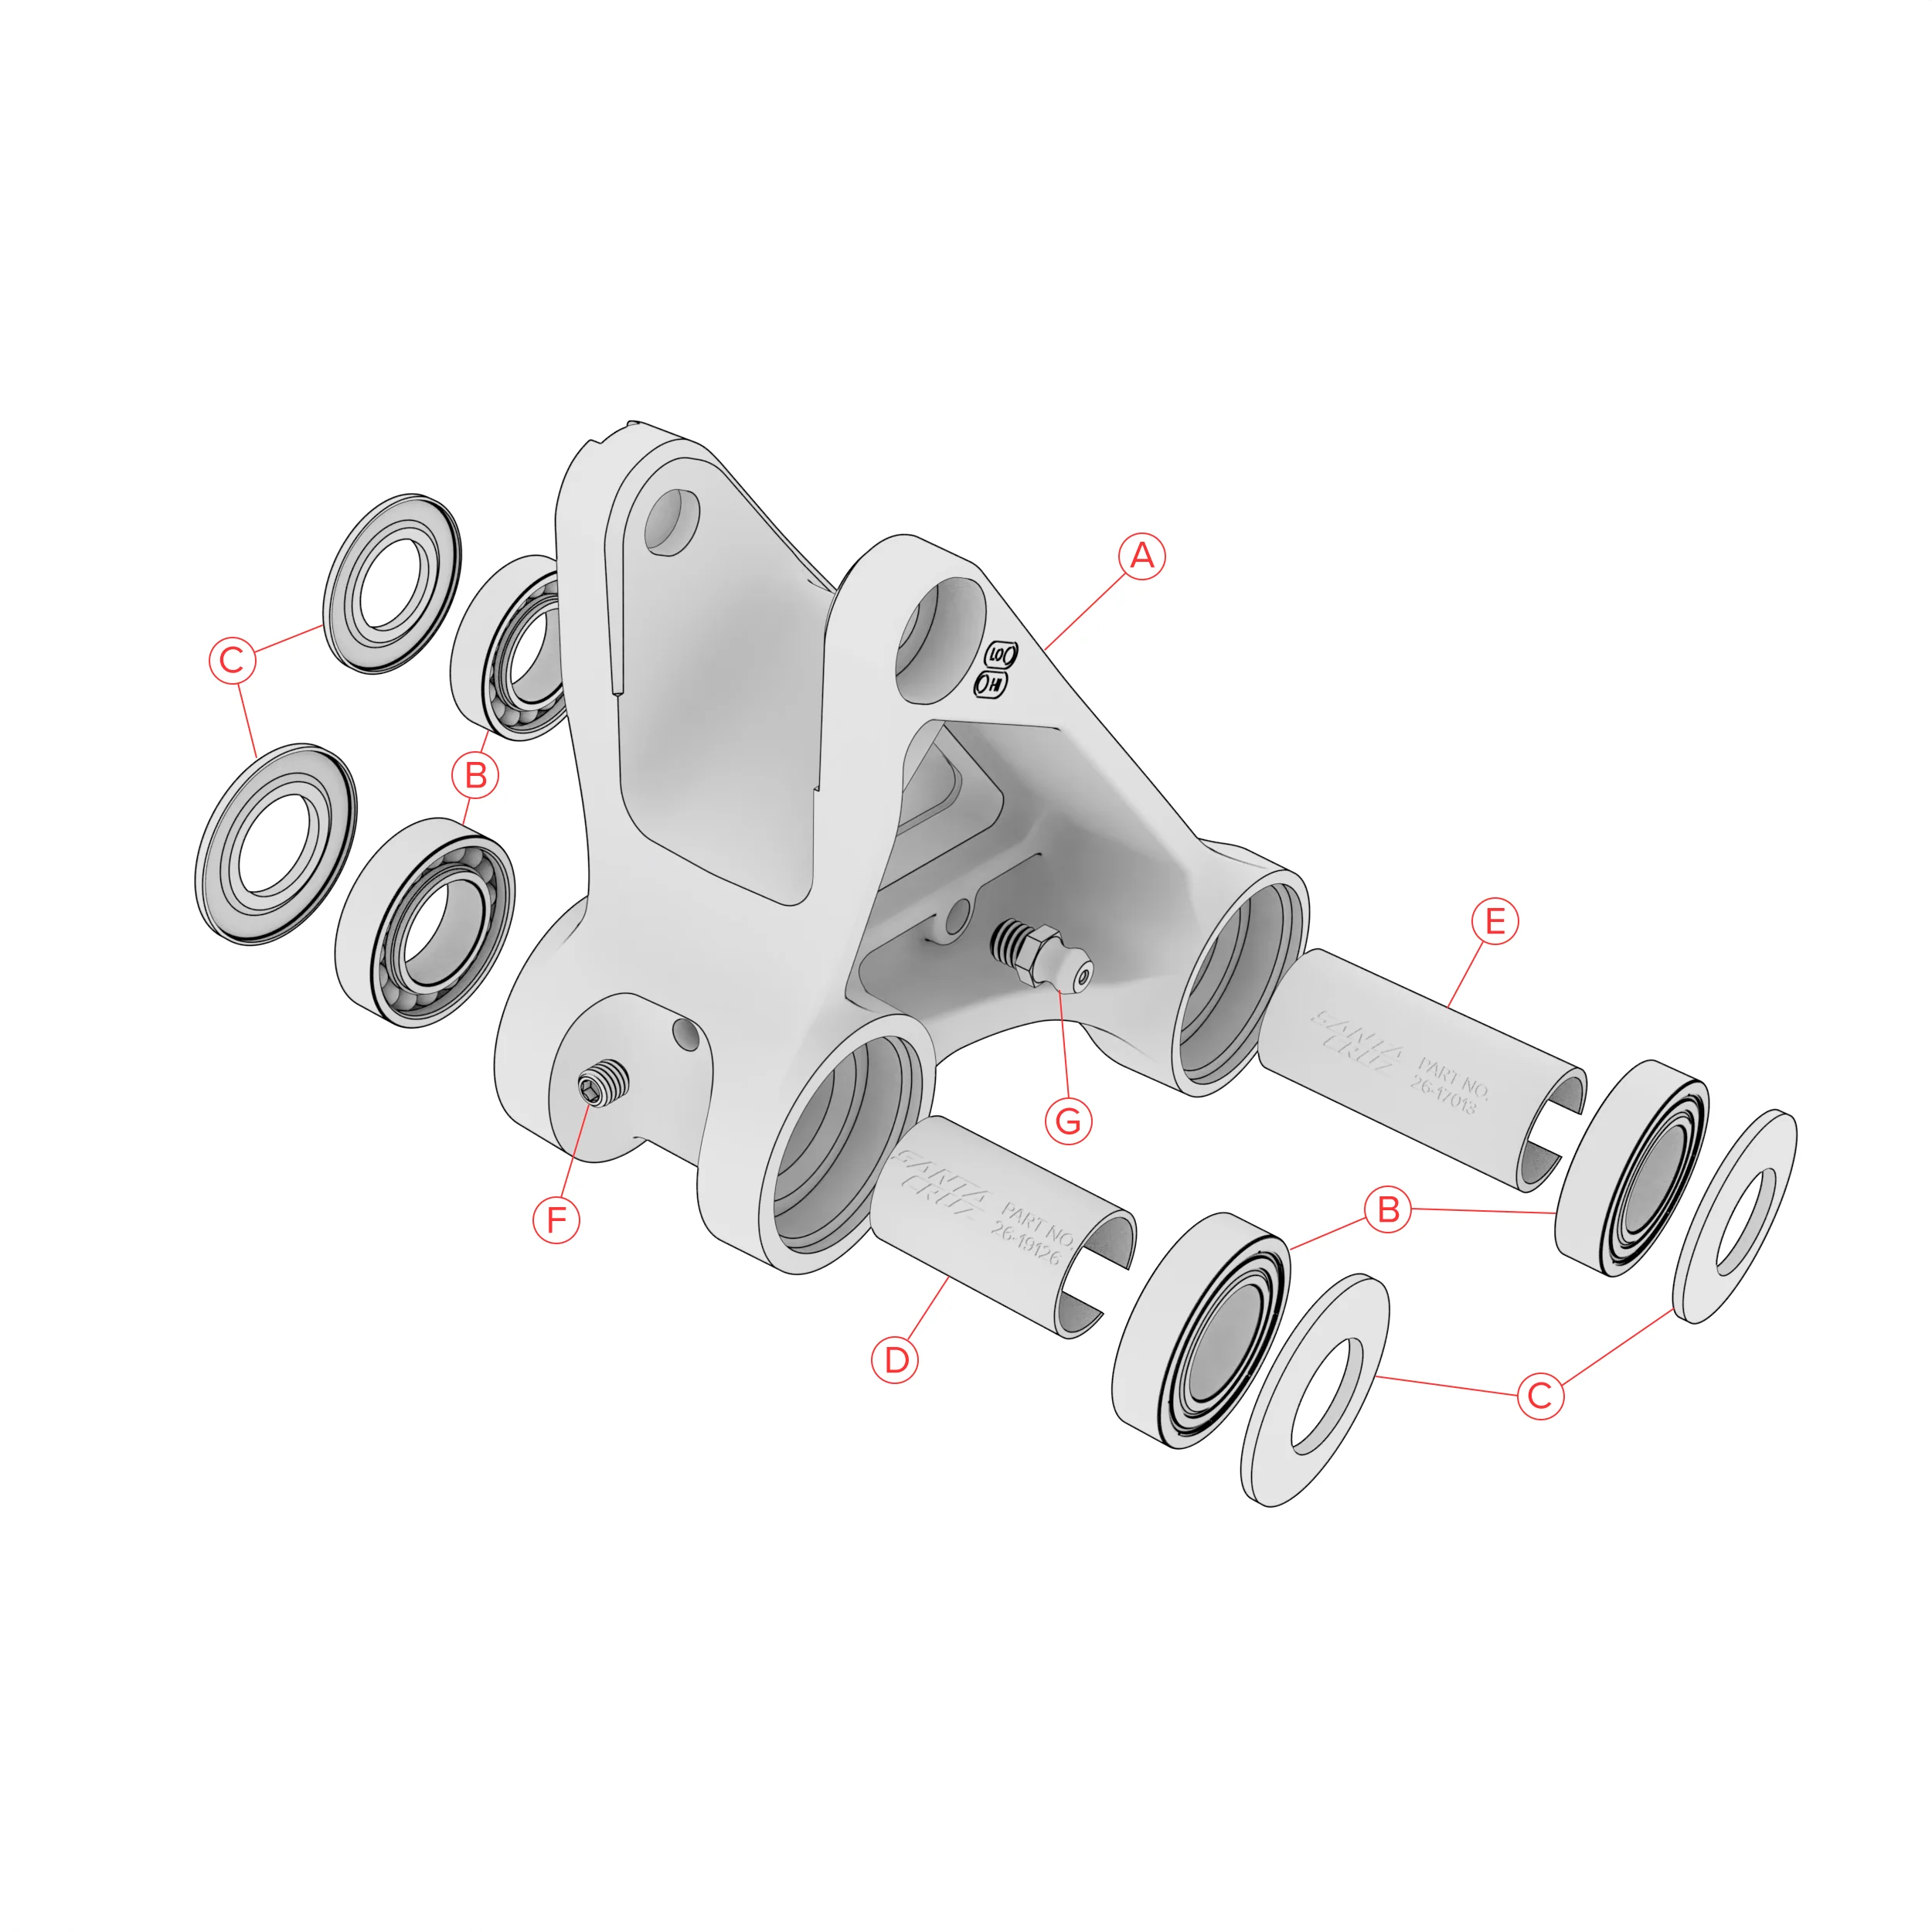
| Label | Name | Blurb | Quantity | Torque | Part Number |
|---|---|---|---|---|---|
| A | Lower Link | 1 | 29-23752 | ||
| B | 6902-1ZR Bearing | 4 | 11-17708 | ||
| C | Bearing Dust Shield | Apply grease to inner surface | 4 | 26-11612 | |
| D | 15x28 Bearing spacer | 1 | 26-19126 | ||
| E | 15x40.25 Bearing Spacer | 1 | 26-17013 | ||
| F | M5x5 Set Screw | Apply Loctite 242 to threads, titghten until flush | 1 | 26-15532 | |
| G | M6 Grease Fitting | 1 | 9 Nm | 26-12678 |
Laden

Upper Link
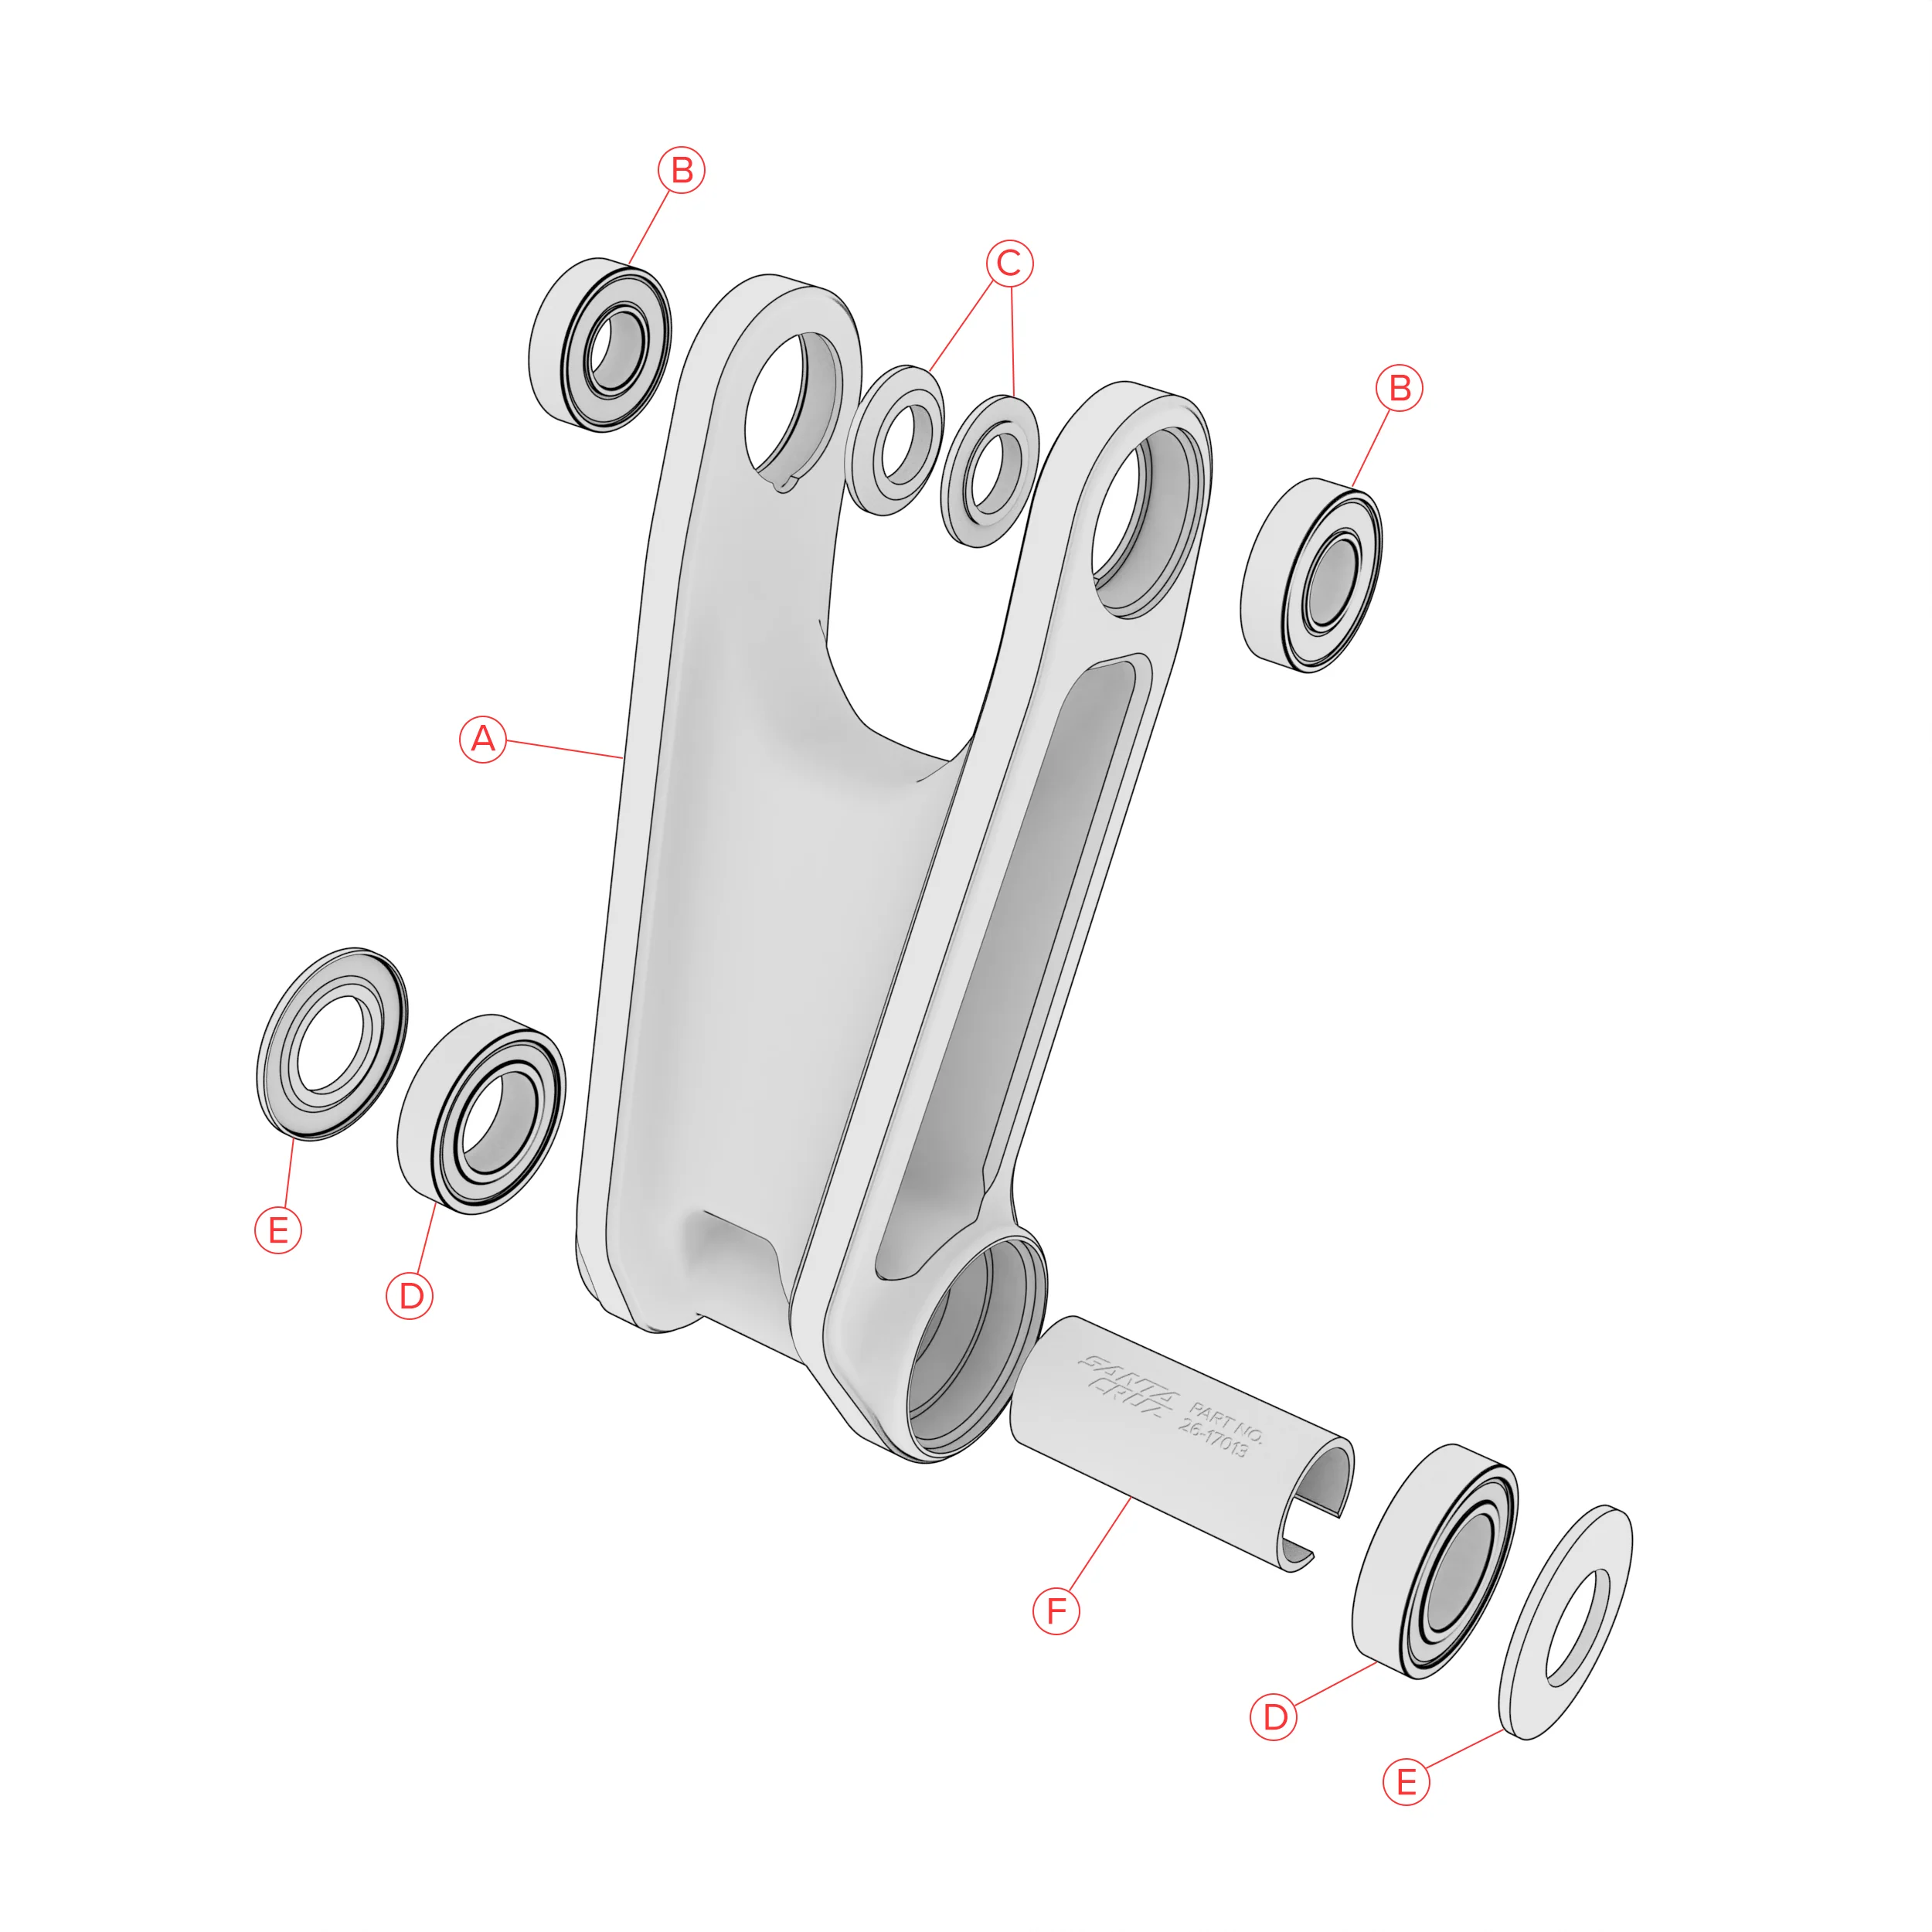
Laden

Rear Axle, Derailleur Hanger and Chainstay Protector
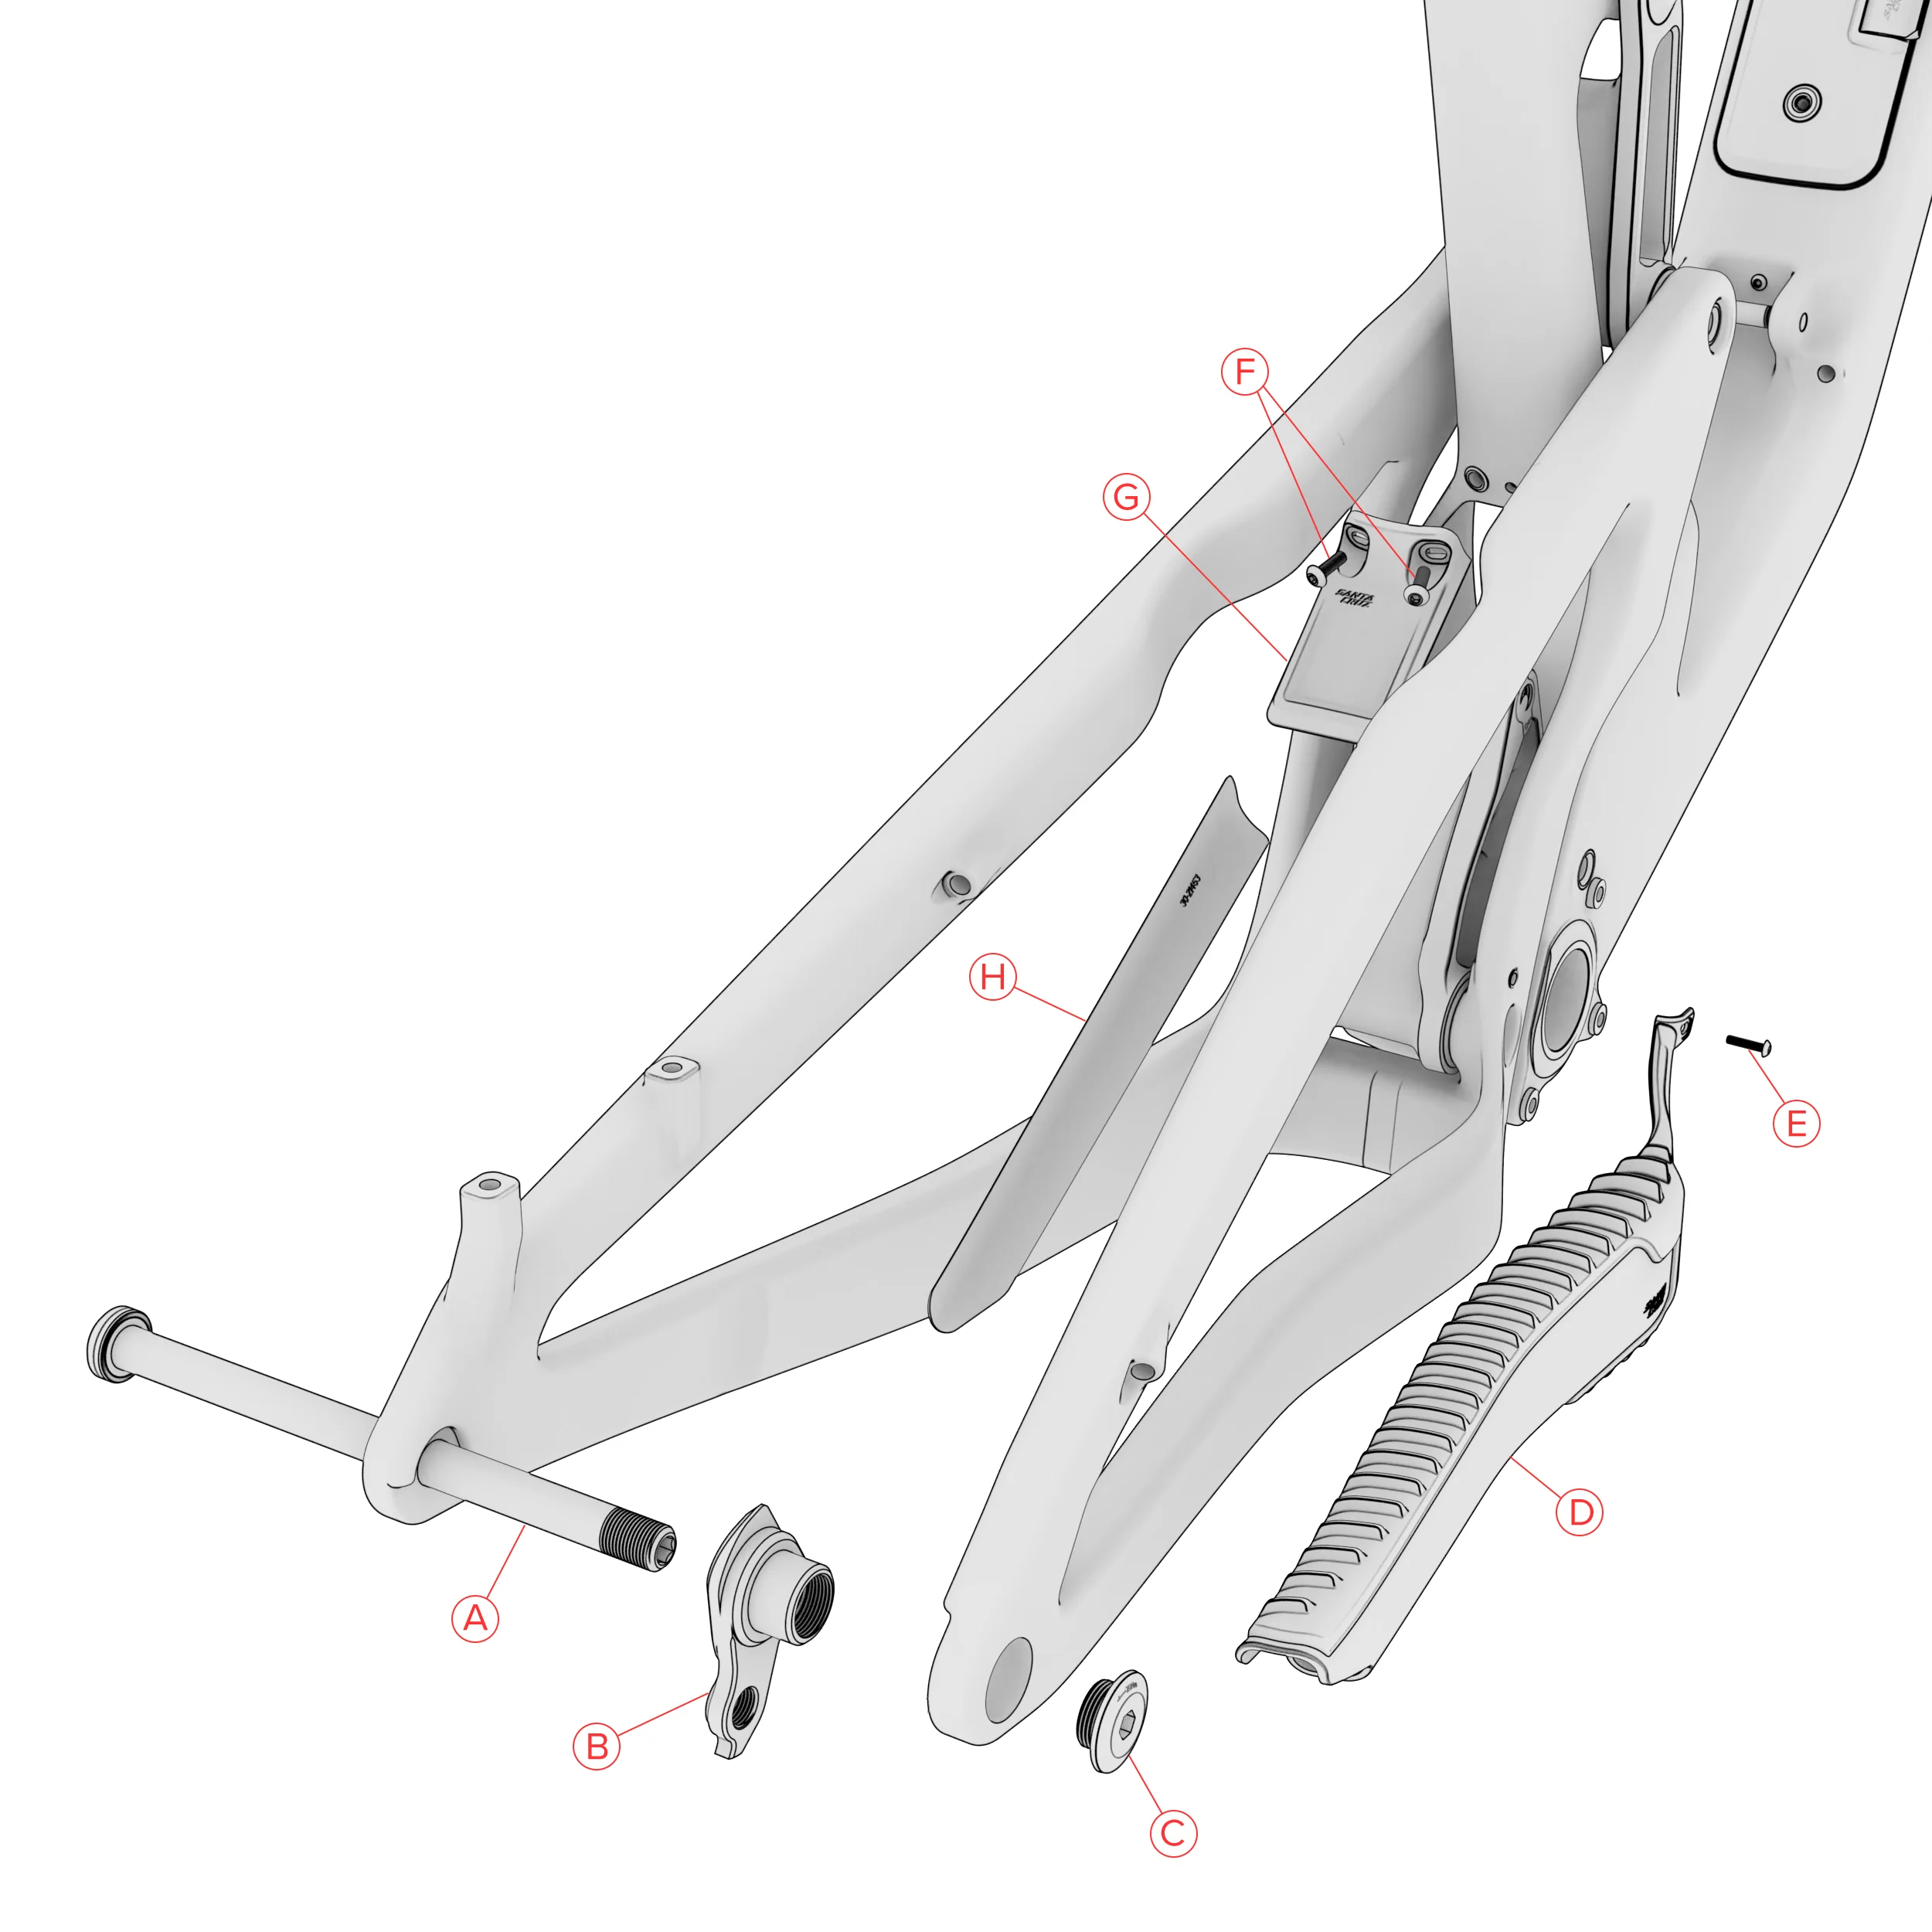
| Label | Name | Blurb | Quantity | Torque | Part Number |
|---|---|---|---|---|---|
| A | Rear axle 12x173.7 | Apply grease to shaft and threads | 1 | 08-22209 | |
| B | SCB UDH | Interchangeable with Sram UDH | 1 | 23-23491 | |
| C | SCB UDH screw | Reverse thread | 1 | 20 Nm | 26-23492 |
| D | Chainstay Protector | 1 | 30-20361 | ||
| E | M3x12 BHCS | Apply grease to treads | 1 | 0.5 Nm | 26-15939 |
| F | M4x12 BHC | Apply grease to treads | 2 | 0.65 Nm | 26-18382 |
| G | Lower Link Fender | 1 | 49-21567 | ||
| H | Seatstay Protector | 1 | 30-21453 |
Laden

Upper Link and Lower Link Hardware
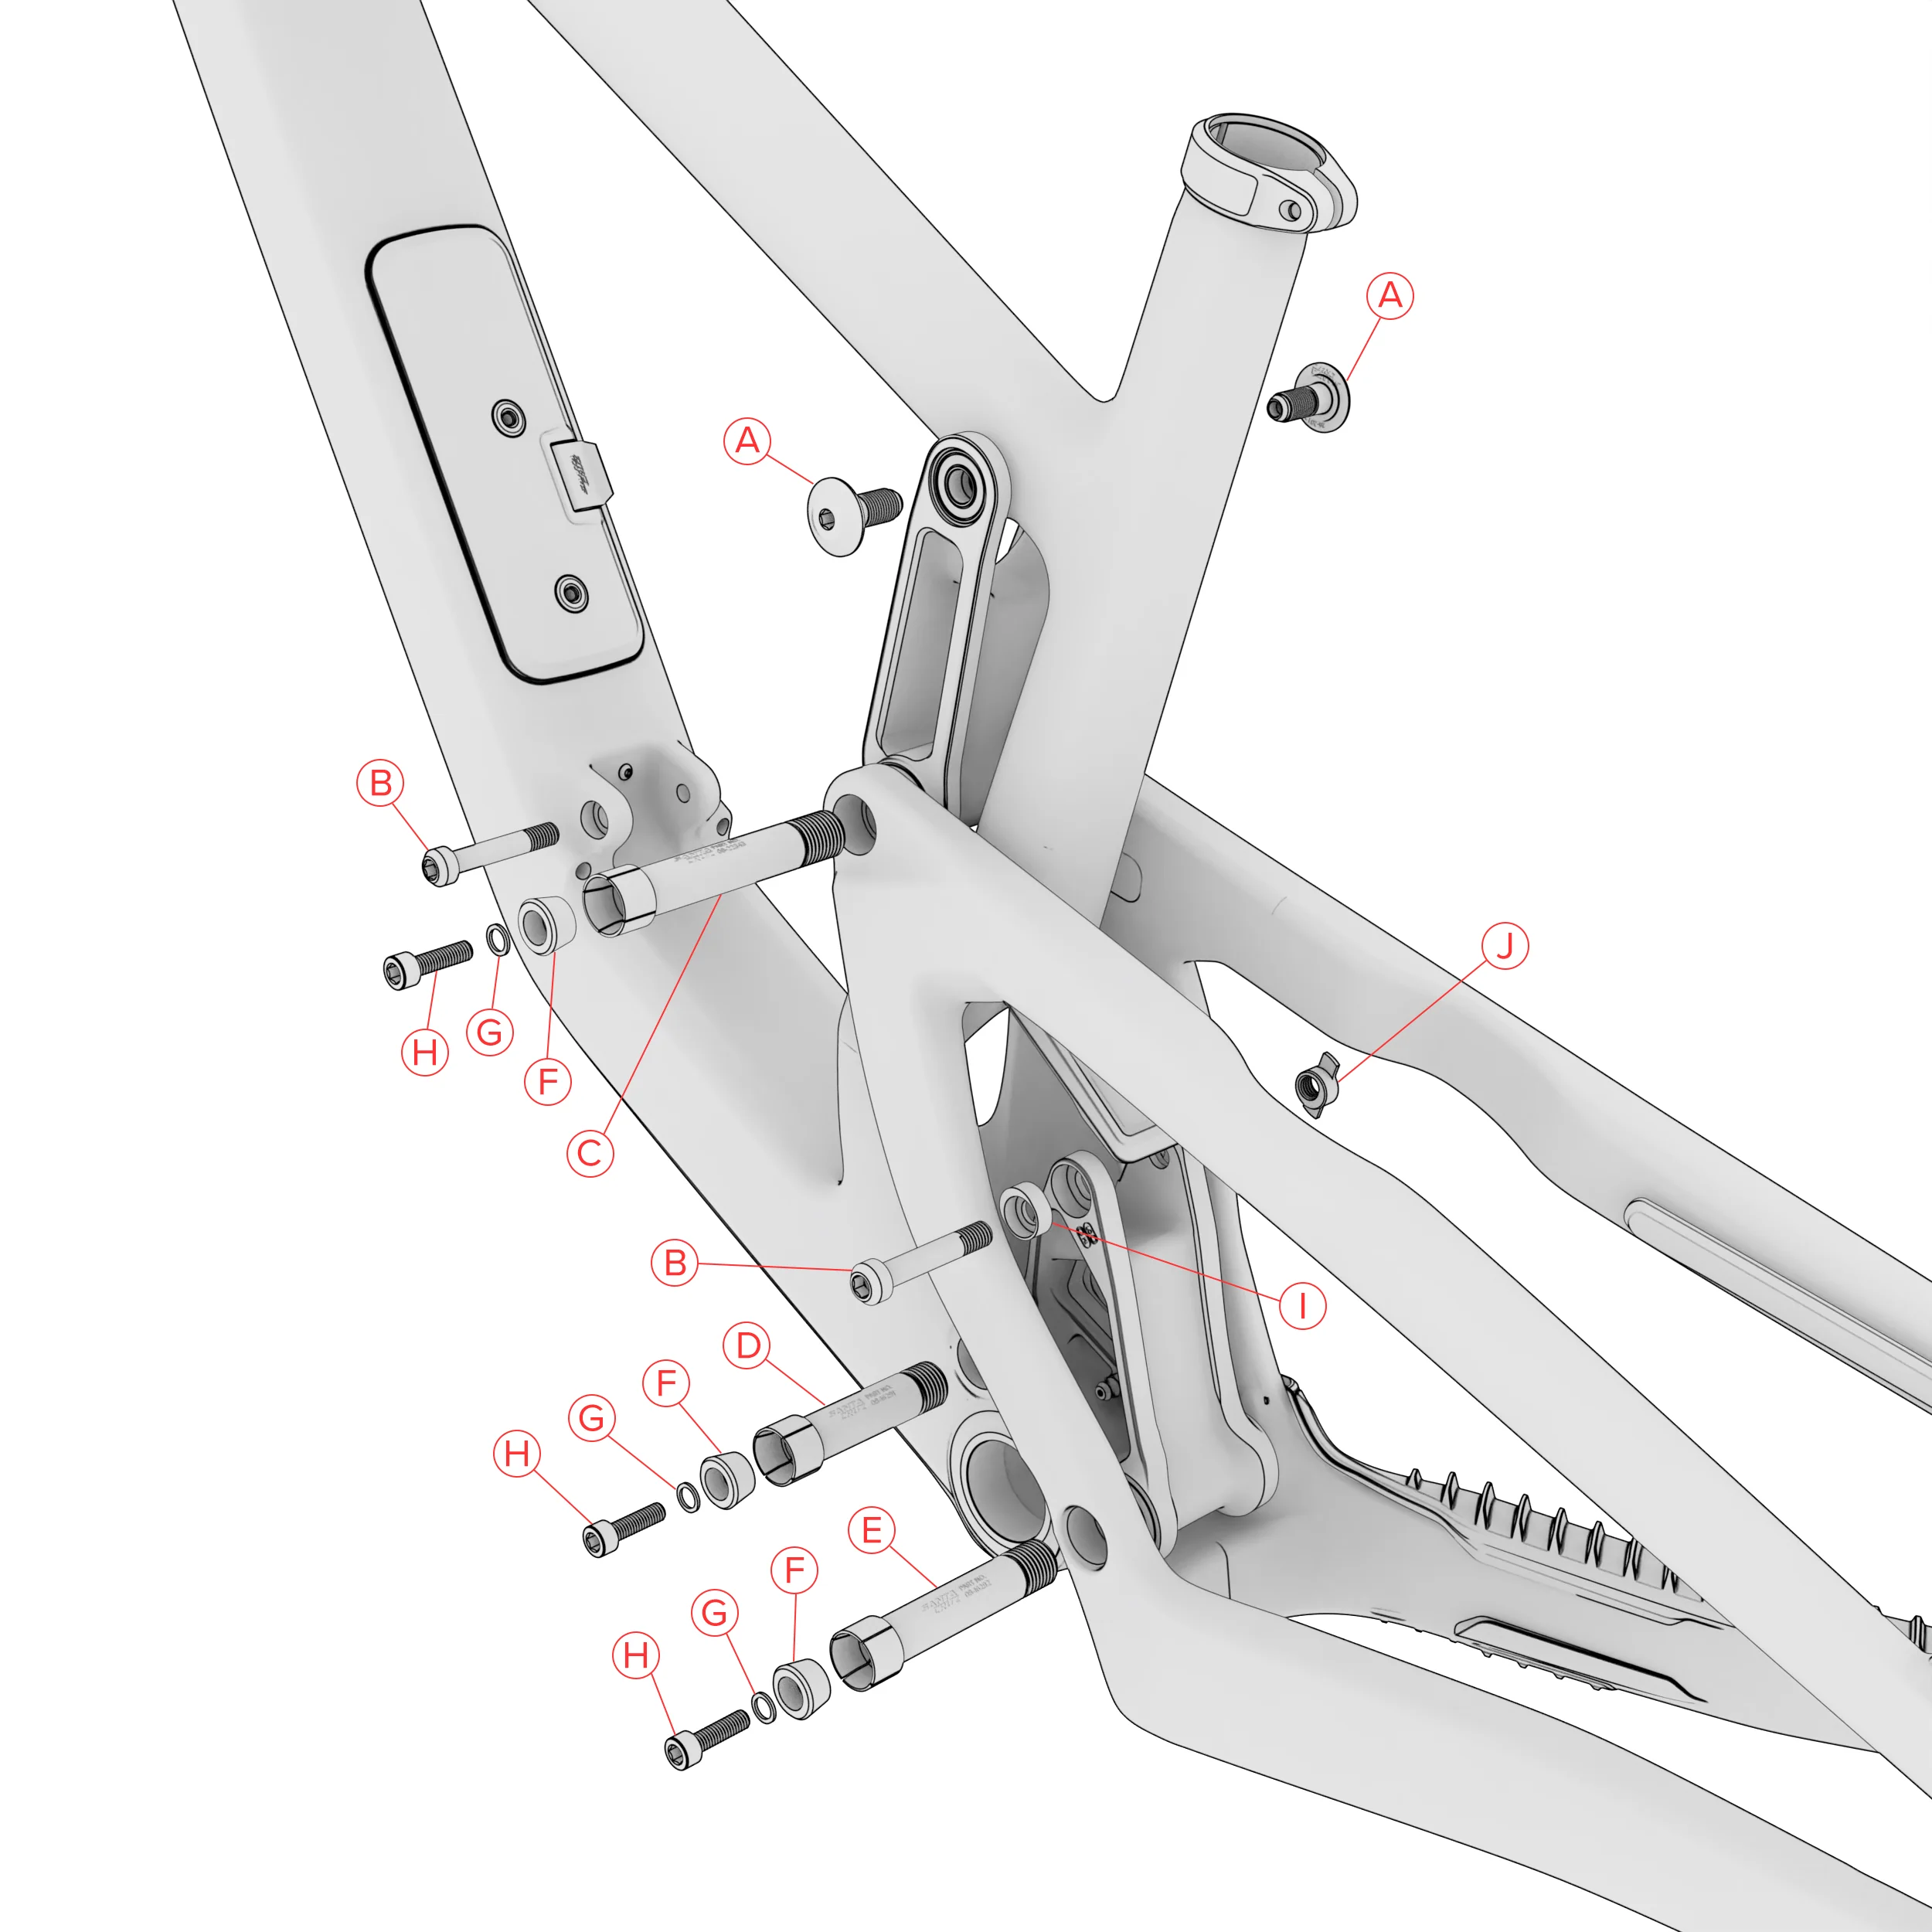
| Label | Name | Blurb | Quantity | Torque | Part Number |
|---|---|---|---|---|---|
| A | M10x23 Screw | Apply Loctite 242 to threads only, apply grease to shaft only | 2 | 16 Nm | 26-20122 |
| B | M8x45 Shock Bolt | Apply Loctite 242 to threads | 2 | 20 Nm | 26-22461 |
| C | Pivot Axle M15x91 | Apply Loctite 242 to threads only, apply grease to shaft only | 1 | 20 Nm | 08-22343 |
| D | Pivot axle M15x68.5 | Apply Loctite 242 to threads only, apply grease to shaft only | 1 | 20 Nm | 08-16291 |
| E | Pivot axle M15x80.5 | Apply Loctite 242 to threads only, apply grease to shaft only | 1 | 20 Nm | 08-16292 |
| F | M6 Tapered Washer | Apply grease to surface | 3 | 26-15633 | |
| G | M6 Washer | 3 | 26-11817 | ||
| H | M6x20 SHCS | Apply Loctite 242 to threads | 3 | 9 Nm | 26-15947 |
| I | M8x2 Flip Chip NDS | Apply grease to surface | 1 | 26-21452 | |
| J | M8x2 Flip Chip DS | Apply grease to surface | 1 | 26-21451 |
Laden

Seatpost Collar, Downtube Protector, Glovebox, and Shuttle Guard
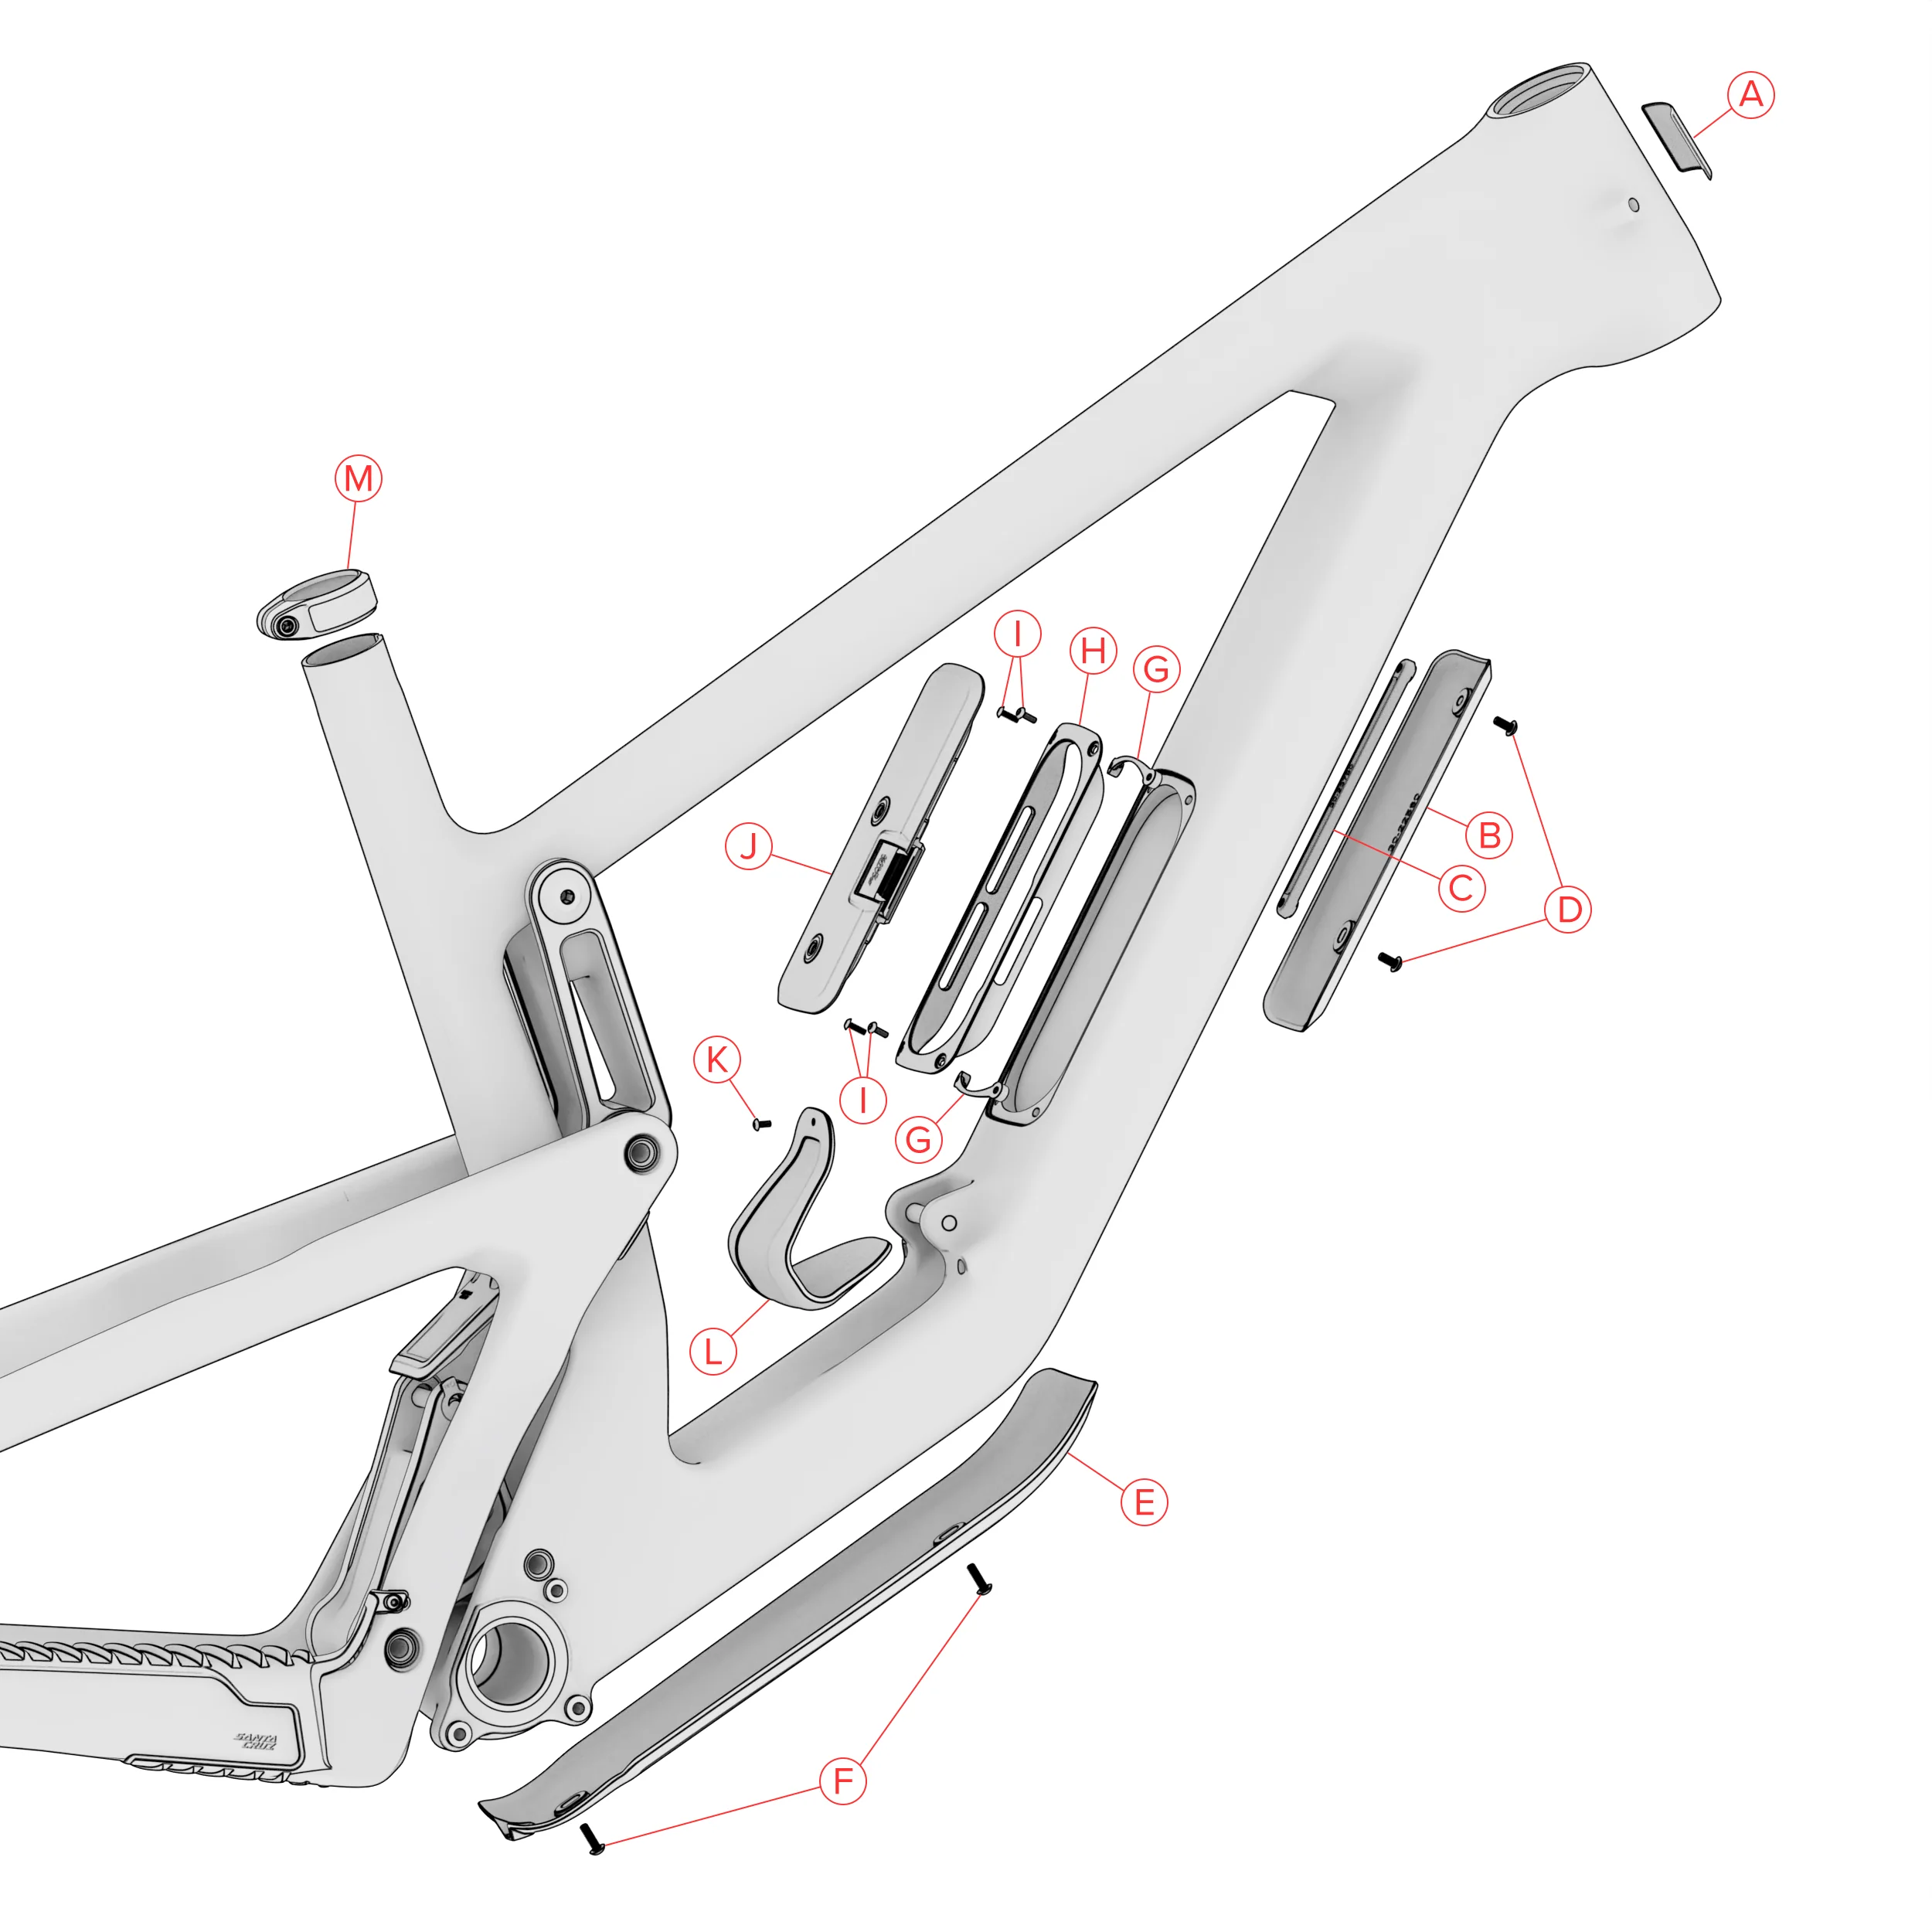
| Label | Name | Blurb | Quantity | Torque | Part Number |
|---|---|---|---|---|---|
| A | Head Tube Badge | Clean frame surface, center on headtube | 1 | 67-19217 | |
| B | Shuttle Guard | 1 | 30-22560 | ||
| C | Shuttle Guard Mount | 1 | 30-23750 | ||
| D | M4x8 BHCS | Apply grease to threads | 2 | 0.65 Nm | 26-21249 |
| E | Downtube Protector | 1 | 30-23718 | ||
| F | M4x12 BHC | Apply grease to treads | 2 | 0.65 Nm | 26-18382 |
| G | Glovebox nut | 2 | 30-23225 | ||
| H | Glovebox bezel | 1 | 26-25333 | ||
| I | M3x8 BHCS | Apply Loctite 242 to threads | 4 | 0.5 Nm | 26-23284 |
| J | Glovebox lid | 1 | 26-22843 | ||
| K | M3x6 | Apply Loctite 242 to threads | 1 | 0.6 Nm | 26-22358 |
Laden

Dateien
Wenn Du mehr Informationen zu Deinem Bike suchst, findest Du sie im Santa Cruz Bicycles-Benutzerhandbuch.