

Blur 4 MY24
2023 - 2024
LA LOI DU PLUS FIT
Forts de toutes ces années à fabriquer des vélos tout-suspendus en carbone de haute qualité, nous avons ajouté l'efficacité de la suspension Superlight™ afin de briller en Coupe du Monde de XC. Nous ne pouvons assurer que le Blur vous fera gagner, mais ce tout-suspendu étant le plus léger que nous ayons développé, ses performances pourraient bien vous faire viser la victoire... plutôt que de simplement terminer.
Carbon
C/CC
Avant (MM)
110
Arrière (MM)
107
Taille de roues
29
Spécificités du modèle
| Système de suspension | Superlight™ |
|---|---|
| Montage dérailleur avant | No compatibility |
| Jeu de direction | Integrated (IS41/52) |
| Diamètre de tige de selle | 31.6mm |
| Diamètre du collier de selle | 36.4mm |
| Longueur de l'amortisseur | 190mm |
| Course de l'amortisseur | 42.5mm (XC) | 45mm (TR) |
| Compatibilité de fourche | 100-120mm |
| Corps du boîtier de pédalier | 73mm Threaded |
| Dégagement maximum des pneus | 2.4" |
| Taille de plateau maximum | 36t |
| Montages de porte-bidon | 2 inside main triangle | 1 under downtube |
| Tailles de buselures d'amortisseur | 20x8 |
| Tailles de buselures d'amortisseur | 20x8 |
| Montage du frein arrière | 160 PM |
| Déport de la fourche (Offset) | 44mm |
Montages
Choisir un montage
| Poids | 25.8 lbs / 11.7 kg |
|---|---|
| Matériau | Carbon C |
| Débattement | 115mm |
| Taille de roues | 29 |
| Amortisseur | FOX Float Performance, 190x45 |
| Fourche | RockShox Sid RL, 120mm |
| Dérailleur arrière | SRAM NX Eagle, 12spd |
| Manette droite | SRAM NX Eagle, 12spd |
| Cassette | SRAM PG1230, 12spd, 11-50t |
| Chaîne | SRAM NX Eagle, 12spd |
| Guide-chaîne | OneUp Chainguide |
| Boîtier de pédalier | SRAM DUB 68/73mm Threaded BB |
| Jeu de direction | FSA IS-2/47/42 ACB or Cane Creek 10 IS Integrated |
| Pneu arrière | Maxxis Rekon Race 29"x2.4"WT, EXO |
| Pneu avant | Maxxis Rekon Race 29"x2.4"WT, EXO |
| Moyeu avant | SRAM MTH 716, 15x110, Torque Cap, 6-Bolt 32h |
| Jante avant | RaceFace AR Offset 27, 29" |
| Moyeu arrière | SRAM MTH 746, 12x148, HG, 6-Bolt, 32h |
| Jante arrière | RaceFace AR Offset 27, 29" |
| Disque avant | Avid Centerline, 180mm |
| Disque arrière | Avid Centerline, 180mm |
| Freins | SRAM Level T |
| Pédalier | SRAM Stylo 148 DUB 34t |
| Guidon | RaceFace Ride |
| Potence | RaceFace Ride, 60mm |
| Selle | WTB Silverado, CroMo |
| Tige de selle | SDG Tellis Dropper, 31.6 |
| Poignées | ESI Chunky Grips |
| Poids | 25.8 lbs / 11.7 kg |
|---|---|
| Matériau | Carbon C |
| Débattement | 107mm |
| Taille de roues | 29 |
| Amortisseur | RockShox SidLuxe Select+ w/ Remote, 190x42.5 |
| Fourche | RockShox Sid SL Select+, 110mm, w/Remote |
| Dérailleur arrière | SRAM GX Eagle, 12spd |
| Commande | SRAM TwistLoc Ultimate, Full Sprint |
| Manette droite | SRAM GX Eagle, 12spd |
| Cassette | SRAM XG1275 Eagle, 12spd, 10-50t |
| Chaîne | SRAM GX Eagle, 12spd |
| Guide-chaîne | OneUp Chainguide |
| Boîtier de pédalier | SRAM DUB 68/73mm Threaded BB |
| Jeu de direction | Cane Creek 40 IS Integrated Headset |
| Pneu arrière | Maxxis Aspen 29"x2.4"WT, EXO |
| Pneu avant | Maxxis Aspen 29"x2.4"WT, EXO |
| Moyeu avant | DT Swiss 370, 15x110, Torque Cap, 6-Bolt, 28h |
| Jante avant | RaceFace AR Offset 27, 29" |
| Moyeu arrière | DT Swis 370, 12x148, XD, 6-Bolt, 36t, 28h |
| Jante arrière | RaceFace AR Offset 27, 29" |
| Disque avant | Avid Centerline, 160mm |
| Disque arrière | Avid Centerline, 160mm |
| Freins | SRAM Level TL |
| Pédalier | SRAM GX Eagle 148 DUB 34t |
| Guidon | SRAM Atmos Flat Bar |
| Potence | SRAM Atmos Stem, 60mm |
| Selle | WTB Silverado, CroMo |
| Tige de selle | FOX Transfer SL Performance Dropper, XL 100mm, 31.6 |
| Poignées | SRAM TwistLoc |
| Poids | 26.07 lbs / 11.83 kg |
|---|---|
| Matériau | Carbon C |
| Débattement | 115mm |
| Taille de roues | 29 |
| Amortisseur | FOX Float Performance, 190x45 |
| Fourche | FOX 34SC Float Performance, 120mm |
| Dérailleur arrière | SRAM GX Eagle, 12spd |
| Manette droite | SRAM GX Eagle, 12spd |
| Cassette | SRAM XG1275 Eagle, 12spd, 10-50t |
| Chaîne | SRAM GX Eagle, 12spd |
| Guide-chaîne | OneUp Chainguide |
| Boîtier de pédalier | SRAM DUB 68/73mm Threaded BB |
| Jeu de direction | Cane Creek 40 IS Integrated Headset |
| Pneu arrière | Maxxis Rekon Race 29"x2.4"WT, EXO |
| Pneu avant | Maxxis Rekon Race 29"x2.4"WT, EXO |
| Moyeu avant | DT Swiss 370, 15x110, 6-Bolt, 28h |
| Jante avant | RaceFace AR Offset 27, 29" |
| Moyeu arrière | DT Swis 370, 12x148, XD, 6-Bolt, 36t, 28h |
| Jante arrière | RaceFace AR Offset 27, 29" |
| Disque avant | Avid Centerline, 180mm |
| Disque arrière | Avid Centerline, 180mm |
| Freins | SRAM Level TL |
| Pédalier | SRAM GX Eagle 148 DUB 34t |
| Guidon | SRAM Atmos Flat Bar |
| Potence | SRAM Atmos Stem, 60mm |
| Selle | WTB Silverado, CroMo |
| Tige de selle | FOX Transfer SL Performance Dropper, 31.6 |
| Poignées | ESI Chunky Grips |
| Poids | 25.37 lbs / 11.51 kg |
|---|---|
| Matériau | Carbon C |
| Débattement | 107mm |
| Taille de roues | 29 |
| Amortisseur | RockShox SidLuxe Select+ 190x40, w/Remote |
| Fourche | RockShox Sid SL Select+, 100mm, w/Remote |
| Dérailleur arrière | SRAM GX AXS Eagle, 12spd |
| Commande | SRAM TwistLoc Ultimate, Full Sprint |
| Manette droite | GX AXS Controller |
| Cassette | SRAM XG1275 Eagle, 12spd, 10-50t |
| Chaîne | SRAM DUB 68/73mm Threaded BB |
| Guide-chaîne | OneUp Chainguide |
| Boîtier de pédalier | Cane Creek 40 IS Integrated Headset |
| Jeu de direction | Maxxis Aspen 29"x2.4"WT, EXO, TR |
| Pneu arrière | Maxxis Aspen 29"x2.4"WT, EXO, TR |
| Pneu avant | Reserve Tubeless Sealant |
| Moyeu avant | i9 1/1, 15x110, Centerlock, 28h |
| Jante avant | RaceFace ARC Offset 27 29" |
| Moyeu arrière | i9 1/1, 12x148, XD, Centerlock, 28h |
| Jante arrière | RaceFace ARC Offset 27 29" |
| Disque avant | Avid Centerline Centerlock, 160mm |
| Disque arrière | Avid Centerline Centerlock, 160mm |
| Freins | SRAM Level TL |
| Pédalier | SRAM GX Eagle 148 DUB, 34t |
| Guidon | Santa Cruz Bicycles Carbon Flat Bar |
| Potence | SRAM Atmos 6k Stem, 60mm |
| Selle | WTB Silverado Medium CroMo |
| Tige de selle | FOX Transfer SL Performance Elite, 31.6 |
| Poignées | SRAM TwistLoc |
| Poids | 25.01 lbs / 11.34 kg |
|---|---|
| Matériau | Carbon C |
| Débattement | 107mm |
| Taille de roues | 29 |
| Amortisseur | RockShox SidLuxe Select+ 190x40, w/Remote |
| Fourche | RockShox Sid SL Select+, 100mm, w/Remote |
| Dérailleur arrière | SRAM GX AXS Eagle, 12spd |
| Commande | SRAM TwistLoc Ultimate, Full Sprint |
| Manette droite | GX AXS Controller |
| Cassette | SRAM XG1275 Eagle, 12spd, 10-50t |
| Chaîne | SRAM DUB 68/73mm Threaded BB |
| Guide-chaîne | OneUp Chainguide |
| Boîtier de pédalier | Cane Creek 40 IS Integrated Headset |
| Jeu de direction | Maxxis Aspen 29"x2.4"WT, EXO, TR |
| Pneu arrière | Maxxis Aspen 29"x2.4"WT, EXO, TR |
| Pneu avant | Reserve Tubeless Sealant |
| Moyeu avant | i9 1/1, 15x110, Centerlock, 24h |
| Jante avant | Reserve 28|XC 29", 24h |
| Moyeu arrière | i9 1/1, 12x148, XD, Centerlock, 24h |
| Jante arrière | Reserve 28|XC 29", 24h |
| Disque avant | Avid Centerline Centerlock, 160mm |
| Disque arrière | Avid Centerline Centerlock, 160mm |
| Freins | SRAM Level TL |
| Pédalier | SRAM GX Eagle 148 DUB, 34t |
| Guidon | Santa Cruz Bicycles Carbon Flat Bar |
| Potence | SRAM Atmos 6k Stem, 60mm |
| Selle | WTB Silverado Medium CroMo |
| Tige de selle | FOX Transfer SL Performance Elite, 31.6 |
| Poignées | SRAM TwistLoc |
| Poids | 25.41 lbs / 11.52 kg |
|---|---|
| Matériau | Carbon C |
| Débattement | 115mm |
| Taille de roues | 29 |
| Amortisseur | FOX Float Performance Elite DPS 190x45 |
| Fourche | FOX 34SC Performance Elite, 120mm |
| Dérailleur arrière | SRAM GX AXS Eagle, 12spd |
| Manette droite | GX AXS Controller |
| Cassette | SRAM XG1275 Eagle, 12spd, 10-50t |
| Chaîne | SRAM DUB 68/73mm Threaded BB |
| Guide-chaîne | OneUp Chainguide |
| Boîtier de pédalier | Cane Creek 40 IS Integrated Headset |
| Jeu de direction | Maxxis Rekon Race 29"x2.4"WT, EXO, TR |
| Pneu arrière | Maxxis Rekon Race 29"x2.4"WT, EXO, TR |
| Pneu avant | Reserve Tubeless Sealant |
| Moyeu avant | i9 1/1, 15x110, Centerlock, 28h |
| Jante avant | RaceFace ARC Offset 27 29" |
| Moyeu arrière | i9 1/1, 12x148, XD, Centerlock, 28h |
| Jante arrière | RaceFace ARC Offset 27 29" |
| Disque avant | Avid Centerline Centerlock, 180mm |
| Disque arrière | Avid Centerline Centerlock, 180mm |
| Freins | SRAM Level TL |
| Pédalier | SRAM GX Eagle 148 DUB, 34t |
| Guidon | Santa Cruz Bicycles Carbon Flat Bar |
| Potence | SRAM Atmos 6k Stem, 60mm |
| Selle | WTB Silverado Medium CroMo |
| Tige de selle | FOX Transfer SL Performance Elite, 31.6 |
| Poignées | ESI Chunky Grips |
| Poids | 24.95 lbs / 11.32 kg |
|---|---|
| Matériau | Carbon C |
| Débattement | 115mm |
| Taille de roues | 29 |
| Amortisseur | FOX Float Performance Elite DPS 190x45 |
| Fourche | FOX 34SC Performance Elite, 120mm |
| Dérailleur arrière | SRAM GX AXS Eagle, 12spd |
| Manette droite | GX AXS Controller |
| Cassette | SRAM XG1275 Eagle, 12spd, 10-50t |
| Chaîne | SRAM DUB 68/73mm Threaded BB |
| Guide-chaîne | OneUp Chainguide |
| Boîtier de pédalier | Cane Creek 40 IS Integrated Headset |
| Jeu de direction | Maxxis Rekon Race 29"x2.4"WT, EXO, TR |
| Pneu arrière | Maxxis Rekon Race 29"x2.4"WT, EXO, TR |
| Pneu avant | Reserve Tubeless Sealant |
| Moyeu avant | i9 1/1, 15x110, Centerlock, 24h |
| Jante avant | Reserve 28|XC 29", 24h |
| Moyeu arrière | i9 1/1, 12x148, XD, Centerlock, 24h |
| Jante arrière | Reserve 28|XC 29", 24h |
| Disque avant | Avid Centerline Centerlock, 180mm |
| Disque arrière | Avid Centerline Centerlock, 180mm |
| Freins | SRAM Level TL |
| Pédalier | SRAM GX Eagle 148 DUB, 34t |
| Guidon | Santa Cruz Bicycles Carbon Flat Bar |
| Potence | SRAM Atmos 6k Stem, 60mm |
| Selle | WTB Silverado Medium CroMo |
| Tige de selle | FOX Transfer SL Performance Elite, 31.6 |
| Poignées | ESI Chunky Grips |
| Poids | 24.1 lbs / 10.93 kg |
|---|---|
| Matériau | Carbon CC |
| Débattement | 107mm |
| Taille de roues | 29 |
| Amortisseur | RockShox SidLuxe Ultimate w/ Remote, 190x42.5 |
| Fourche | RockShox SID SL Ultimate, 2-Position, 110mm, w/ Remote |
| Dérailleur arrière | SRAM X01 Eagle AXS, 12spd |
| Commande | SRAM TwistLoc Ultimate, Full Sprint |
| Manette droite | SRAM GX Eagle AXS Controller 2 Button |
| Cassette | SRAM XG1275 Eagle, 12spd, 10-50t |
| Chaîne | SRAM GX Eagle, 12spd |
| Guide-chaîne | OneUp Chainguide |
| Boîtier de pédalier | SRAM DUB 73mm MTB Wide BB |
| Jeu de direction | Cane Creek 40 IS Integrated Headset |
| Pneu arrière | Maxxis Aspen 29"x2.4"WT, EXO |
| Pneu avant | Maxxis Aspen 29"x2.4"WT, EXO |
| Moyeu avant | Industry Nine 1/1, 15x110, Centerlock, 24h |
| Jante avant | Reserve 28|XC 29" |
| Moyeu arrière | Industry Nine 1/1, 12x148, XD, Centerlock, 24h |
| Jante arrière | Reserve 28|XC 29" |
| Disque avant | SRAM CLX, Centerlock, 160mm |
| Disque arrière | SRAM CLX, Centerlock, 160mm |
| Freins | SRAM Level TLM |
| Pédalier | SRAM X1 Eagle Carbon 148 DUB |
| Guidon | Santa Cruz Carbon Flat Bar, 31.8x760, 7mm Rise |
| Potence | SRAM Atmos 7k, 60mm |
| Selle | WTB Silverado Medium, Ti |
| Tige de selle | FOX Transfer SL Factory Dropper, XL 100mm 31.6 |
| Poignées | SRAM Grips |
| Chargeur | SRAM eTap Powerpack 1 Battery |
| Poids | 24.49 lbs / 11.11 kg |
|---|---|
| Matériau | Carbon CC |
| Débattement | 115mm |
| Taille de roues | 29 |
| Amortisseur | FOX Float Factory, 190x45 |
| Fourche | FOX 34SC Float Factory, 120mm |
| Dérailleur arrière | SRAM X01 Eagle AXS, 12spd |
| Manette droite | SRAM GX Eagle AXS Controller 2 Button |
| Cassette | SRAM XG1275 Eagle, 12spd, 10-50t |
| Chaîne | SRAM GX Eagle, 12spd |
| Guide-chaîne | OneUp Chainguide |
| Boîtier de pédalier | SRAM DUB 73mm MTB Wide BB |
| Jeu de direction | Cane Creek 40 IS Integrated Headset |
| Pneu arrière | Maxxis Rekon Race 29"x2.4"WT, EXO |
| Pneu avant | Maxxis Rekon Race 29"x2.4"WT, EXO |
| Moyeu avant | Industry Nine 1/1, 15x110, Centerlock, 24h |
| Jante avant | Reserve 28|XC 29" |
| Moyeu arrière | Industry Nine 1/1, 12x148, XD, Centerlock, 24h |
| Jante arrière | Reserve 28|XC 29" |
| Disque avant | SRAM CLX, Centerlock, 180mm |
| Disque arrière | SRAM CLX, Centerlock, 180mm |
| Freins | SRAM Level TLM |
| Pédalier | SRAM X1 Eagle Carbon 148 DUB |
| Guidon | Santa Cruz Carbon Flat Bar, 31.8x760, 7mm Rise |
| Potence | SRAM Atmos 7k, 60mm |
| Selle | WTB Silverado Medium, Ti |
| Tige de selle | FOX Transfer SL Factory Dropper, 31.6 -or- OneUp V2 Dropper Post |
| Poignées | ESI Chunky Grips |
| Chargeur | SRAM eTap Powerpack 1 Battery |
| Poids | 24.1 lbs / 10.93 kg |
|---|---|
| Matériau | Carbon CC |
| Débattement | 100mm |
| Taille de roues | 29 |
| Amortisseur | RockShox SidLuxe Ultimate w/ Remote, 190x42.5 |
| Fourche | RockShox SID SL Ultimate, 110mm, w/ Remote |
| Dérailleur arrière | SRAM X0 Eagle AXS T-Type, 12spd |
| Commande | #N/A |
| Manette droite | SRAM AXS Pod Bridge |
| Cassette | SRAM X0 Eagle T-Type, 10-52t |
| Chaîne | SRAM X0 Eagle T-Type, Flattop, 12spd |
| Guide-chaîne | OneUp Chainguide |
| Boîtier de pédalier | SRAM DUB 73mm MTB Wide BB |
| Jeu de direction | Cane Creek 40 IS Integrated Headset |
| Pneu arrière | Maxxis Aspen 29"x2.4"WT, EXO |
| Pneu avant | Maxxis Aspen 29"x2.4"WT, EXO |
| Moyeu avant | Industry Nine 1/1, 15x110, Centerlock, 24h |
| Jante avant | Reserve 28|XC 29" |
| Moyeu arrière | Industry Nine 1/1, 12x148, XD, Centerlock, 24h |
| Jante arrière | Reserve 28|XC 29" |
| Disque avant | SRAM CLX, Centerlock, 160mm |
| Disque arrière | SRAM CLX, Centerlock, 160mm |
| Freins | SRAM Level Silver Stealth 2-Piston |
| Pédalier | SRAM X0 Eagle DUB T-Type Crankset, 34t |
| Guidon | Santa Cruz Carbon Flat Bar, 31.8x760, 7mm Rise |
| Potence | SRAM Atmos 7k, 60mm |
| Selle | WTB Silverado Medium, Ti |
| Tige de selle | FOX Transfer SL Factory Dropper, XL 100mm 31.6 |
| Poignées | SRAM Grips |
| Chargeur | SRAM eTap Powerpack 1 Battery |
| Poids | 24.49 lbs / 11.11 kg |
|---|---|
| Matériau | Carbon CC |
| Débattement | 115mm |
| Taille de roues | 29 |
| Amortisseur | FOX Float Factory, 190x45 |
| Fourche | FOX 34SC Float Factory, 120mm |
| Dérailleur arrière | SRAM X0 Eagle AXS T-Type, 12spd |
| Commande | #N/A |
| Manette droite | SRAM AXS Pod Bridge |
| Cassette | SRAM X0 EagleT-Type, 10-52t |
| Chaîne | SRAM X0 Eagle T-Type, Flattop, 12spd |
| Guide-chaîne | OneUp Chainguide |
| Boîtier de pédalier | SRAM DUB 73mm MTB Wide BB |
| Jeu de direction | Cane Creek 40 IS Integrated Headset |
| Pneu arrière | Maxxis Rekon Race 29"x2.4"WT, EXO |
| Pneu avant | Maxxis Rekon Race 29"x2.4"WT, EXO |
| Moyeu avant | Industry Nine 1/1, 15x110, Centerlock, 24h |
| Jante avant | Reserve 28|XC 29" |
| Moyeu arrière | Industry Nine 1/1, 12x148, XD, Centerlock, 24h |
| Jante arrière | Reserve 28|XC 29" |
| Disque avant | SRAM CLX, Centerlock, 180mm |
| Disque arrière | SRAM CLX, Centerlock, 180mm |
| Freins | SRAM Level Silver Stealth 4-Piston |
| Pédalier | SRAM X0 Eagle DUB T-Type Crankset, 34t |
| Guidon | Santa Cruz Carbon Flat Bar, 31.8x760, 7mm Rise |
| Potence | SRAM Atmos 7k, 60mm |
| Selle | WTB Silverado Medium, Ti |
| Tige de selle | FOX Transfer SL Factory Dropper, 31.6 -or- OneUp V2 Dropper Post |
| Poignées | ESI Chunky Grips |
| Chargeur | SRAM eTap Powerpack 1 Battery |
| Poids | 23.02 lbs / 10.44 kg |
|---|---|
| Matériau | Carbon CC |
| Débattement | 107mm |
| Taille de roues | 29 |
| Amortisseur | RockShox SidLuxe Ultimate w/ Remote, 190x42.5 |
| Fourche | RockShox SID SL Ultimate, 2-Position, 110mm, w/ Remote |
| Dérailleur arrière | SRAM XX SL Eagle AXS T-Type, 12spd |
| Commande | SRAM TwistLoc Ultimate, Full Sprint |
| Manette droite | SRAM AXS Pod Ultimate Bridge |
| Cassette | SRAM XX SL Eagle T-Type, 10-52t |
| Chaîne | SRAM XX SL Eagle T-Type, Flattop, 12spd |
| Guide-chaîne | OneUp Chainguide |
| Boîtier de pédalier | SRAM DUB BSA MTB 68/73mm, 4.5mm spacer |
| Jeu de direction | Cane Creek AER IS Tapered Headset |
| Pneu arrière | Maxxis Aspen 29"x2.4"WT, EXO |
| Pneu avant | Maxxis Aspen 29"x2.4"WT, EXO |
| Moyeu avant | DT Swiss 180 EXP, 15x110, Torque Cap, Centerlock, 24h |
| Jante avant | Reserve 28|XC 29" |
| Moyeu arrière | DT Swiss 180 EXP, 12x148, XD, Centerlock, 36t, 24h |
| Jante arrière | Reserve 28|XC 29" |
| Disque avant | SRAM CLX, Centerlock, 160mm |
| Disque arrière | SRAM CLX, Centerlock, 160mm |
| Freins | SRAM Level Ultimate Stealth 2-Piston |
| Pédalier | SRAM XX SL Eagle DUB T-Type Crankset, 34t |
| Guidon | Santa Cruz Carbon Flat Bar, 31.8x760, 7mm Rise |
| Potence | SRAM Atmos 7k, 60mm |
| Selle | WTB Silverado Medium, Ti |
| Tige de selle | FOX Transfer SL Factory Dropper, XL 100mm 31.6 |
| Poignées | SRAM Grips |
| Chargeur | SRAM eTap Powerpack 1 Battery |
| Poids | 23.51 lbs / 10.66 kg |
|---|---|
| Matériau | Carbon CC |
| Débattement | 115mm |
| Taille de roues | 29 |
| Amortisseur | FOX Float Factory, 190x45 |
| Fourche | FOX 34SC Float Factory, 120mm |
| Dérailleur arrière | SRAM XX SL Eagle AXS T-Type, 12spd |
| Manette droite | SRAM AXS Pod Ultimate Bridge |
| Cassette | SRAM XX SL Eagle T-Type, 10-52t |
| Chaîne | SRAM XX SL Eagle T-Type, Flattop, 12spd |
| Guide-chaîne | OneUp Chainguide |
| Boîtier de pédalier | SRAM DUB BSA MTB 68/73mm, 4.5mm spacer |
| Jeu de direction | Cane Creek AER IS Tapered Headset |
| Pneu arrière | Maxxis Rekon Race 29"x2.4"WT, EXO |
| Pneu avant | Maxxis Rekon Race 29"x2.4"WT, EXO |
| Moyeu avant | DT Swiss 180 EXP, 15x110, Centerlock, 24h |
| Jante avant | Reserve 28|XC 29" |
| Moyeu arrière | DT Swiss 180 EXP, 12x148, XD, Centerlock, 36t, 24h |
| Jante arrière | Reserve 28|XC 29" |
| Disque avant | SRAM CLX, Centerlock, 180mm |
| Disque arrière | SRAM CLX, Centerlock, 180mm |
| Freins | SRAM Level Ultimate Stealth 4-Piston |
| Pédalier | SRAM XX SL Eagle DUB T-Type Crankset, 34t |
| Guidon | Santa Cruz Carbon Flat Bar, 31.8x760, 7mm Rise |
| Potence | SRAM Atmos 7k, 60mm |
| Selle | WTB Silverado Medium, Ti |
| Tige de selle | FOX Transfer SL Factory Dropper, 31.6 -or- OneUp V2 Dropper Post |
| Poignées | ESI Chunky Grips |
| Chargeur | SRAM eTap Powerpack 1 Battery |
| Poids | 4.09 lbs / 1.86 kg |
|---|---|
| Matériau | Carbon CC |
| Débattement | 115mm |
| Taille de roues | 29 |
| Amortisseur | FOX Float Factory, 190x45 |
Géométries
Configuration
Toutes les mesures sont en millimètres ou en degrés.
| s | m | l | xl | |
|---|---|---|---|---|
| Reach | 425 | 450 | 470 | 495 |
| Stack | 578.3 | 587.6 | 596.9 | 610.8 |
| Head tube angle | 68.3° | 68.3° | 68.3° | 68.3° |
| L. Longueur du tube de selle | 405 | 430 | 470 | 520 |
| Front Center | 685.8 | 714.5 | 738.2 | 768.7 |
| H. Hauteur du boitier | 330.5 | 330.5 | 330.5 | 330.5 |
| BB Drop | 42 | 42 | 42 | 42 |
| Wheel base | 1115.8 | 1147 | 1173.2 | 1206.2 |
| G. Longueur des bases | 430 | 432.5 | 435 | 437.5 |
| Headtube length | 90 | 100 | 110 | 125 |
| M. Longueur de tube supérieur | 563.9 | 592.8 | 616.9 | 647.2 |
| D. Angle du tube de selle | 76.5º | 76.3º | 75.8º | 75.7º |
| Standover Height | 737 | 740 | 739 | 745 |
| s | m | l | xl | |
|---|---|---|---|---|
| Reach | 412.3 | 437.8 | 457.5 | 482.5 |
| Stack | 587.4 | 597 | 606.5 | 620.7 |
| Head tube angle | 67.1º | 67.1º | 67.1º | 67.1º |
| L. Longueur du tube de selle | 405 | 430 | 470 | 520 |
| Front Center | 695 | 723.7 | 747.4 | 778 |
| H. Hauteur du boitier | 339.9 | 339.7 | 339.6 | 339.4 |
| BB Drop | 32.6 | 32.8 | 32.9 | 33.1 |
| Wheel base | 1125.8 | 1157 | 1183.2 | 1216.3 |
| G. Longueur des bases | 430.8 | 433.3 | 435.8 | 438.3 |
| Headtube length | 90 | 100 | 110 | 125 |
| M. Longueur de tube supérieur | 568.4 | 597.3 | 621.4 | 651.7 |
| D. Angle du tube de selle | 75.1º | 75º | 74.9º | 74.8º |
| Standover Height | 744 | 746 | 745 | 750 |
Guide des tailles
Small
Medium
Large
X-Large
154cm
5'1"
-
165cm
5'5"
Reach: 425mm
165cm
5'5"
-
175cm
5'9"
Reach: 450mm
175cm
5'9"
-
185cm
6'1"
Reach: 470mm
185cm
6'1"
-
195cm
6'5"
Reach: 495mm
Réglage des suspensions
Rockshox SID RL 120
| Poids du pilote (lbs) | Poids du pilote (kg) | Pression (psi) | Rebond (unique) |
|---|---|---|---|
| 100 | 45 | 64 | 19 |
| 120 | 54 | 70 | 18 |
| 140 | 64 | 90 | 16 |
| 160 | 73 | 105 | 15 |
| 180 | 82 | 120 | 13 |
| 200 | 91 | 135 | 10 |
| 220 | 100 | 150 | 8 |
| 240 | 109 | 167 | 6 |
| 260 | 118 | 193 | 5 |
Fox Float DPS Performance
| Poids du pilote (lbs) | Poids du pilote (kg) | Pression (psi) | Sag | Rebond (unique) |
|---|---|---|---|---|
| 100 | 45 | 95 | 28-30%, 12.5-13.5mm | 8 |
| 120 | 54 | 120 | 28-30%, 12.5-13.5mm | 7 |
| 140 | 64 | 140 | 28-30%, 12.5-13.5mm | 7 |
| 160 | 73 | 165 | 28-30%, 12.5-13.5mm | 6 |
| 180 | 82 | 190 | 28-30%, 12.5-13.5mm | 6 |
| 200 | 91 | 210 | 28-30%, 12.5-13.5mm | 6 |
| 220 | 100 | 235 | 28-30%, 12.5-13.5mm | 5 |
| 240 | 109 | 260 | 28-30%, 12.5-13.5mm | 5 |
| 260 | 118 | 280 | 28-30%, 12.5-13.5mm | 5 |
Rockshox SID SL Select + 100 remote
| Poids du pilote (lbs) | Poids du pilote (kg) | Pression (psi) | Rebond (unique) |
|---|---|---|---|
| 100 | 45 | 64 | 19 |
| 120 | 54 | 70 | 18 |
| 140 | 64 | 90 | 16 |
| 160 | 73 | 105 | 15 |
| 180 | 82 | 120 | 13 |
| 200 | 91 | 135 | 10 |
| 220 | 100 | 150 | 8 |
| 240 | 109 | 167 | 6 |
| 260 | 118 | 193 | 5 |
Rockshox SIDLuxe Select + rmt
| Poids du pilote (lbs) | Poids du pilote (kg) | Pression (psi) | Sag | Rebond (unique) |
|---|---|---|---|---|
| 100 | 45 | 105 | 28-30%, 11-12mm | 5 |
| 120 | 54 | 125 | 28-30%, 11-12mm | 5 |
| 140 | 64 | 150 | 28-30%, 11-12mm | 4 |
| 160 | 73 | 170 | 28-30%, 11-12mm | 4 |
| 180 | 82 | 195 | 28-30%, 11-12mm | 4 |
| 200 | 91 | 215 | 28-30%, 11-12mm | 3 |
| 220 | 100 | 240 | 28-30%, 11-12mm | 3 |
| 240 | 109 | 260 | 28-30%, 11-12mm | 3 |
| 260 | 118 | 285 | 28-30%, 11-12mm | 3 |
Fox SC34 Performance 120
| Poids du pilote (lbs) | Poids du pilote (kg) | Pression (psi) | Rebond (unique) |
|---|---|---|---|
| 100 | 45 | 49 | 15 |
| 120 | 54 | 58 | 13 |
| 140 | 64 | 68 | 11 |
| 160 | 73 | 77 | 9 |
| 180 | 82 | 86 | 7 |
| 200 | 91 | 96 | 5 |
| 220 | 100 | 105 | 3 |
| 240 | 109 | 114 | 1 |
Fox Float DPS Performance
| Poids du pilote (lbs) | Poids du pilote (kg) | Pression (psi) | Sag | Rebond (unique) |
|---|---|---|---|---|
| 100 | 45 | 95 | 28-30%, 12.5-13.5mm | 8 |
| 120 | 54 | 120 | 28-30%, 12.5-13.5mm | 7 |
| 140 | 64 | 140 | 28-30%, 12.5-13.5mm | 7 |
| 160 | 73 | 165 | 28-30%, 12.5-13.5mm | 6 |
| 180 | 82 | 190 | 28-30%, 12.5-13.5mm | 6 |
| 200 | 91 | 210 | 28-30%, 12.5-13.5mm | 6 |
| 220 | 100 | 235 | 28-30%, 12.5-13.5mm | 5 |
| 240 | 109 | 260 | 28-30%, 12.5-13.5mm | 5 |
| 260 | 118 | 280 | 28-30%, 12.5-13.5mm | 5 |
Rockshox SID SL Select + 100 remote
| Poids du pilote (lbs) | Poids du pilote (kg) | Pression (psi) | Rebond (unique) |
|---|---|---|---|
| 100 | 45 | 64 | 19 |
| 120 | 54 | 70 | 18 |
| 140 | 64 | 90 | 16 |
| 160 | 73 | 105 | 15 |
| 180 | 82 | 120 | 13 |
| 200 | 91 | 135 | 10 |
| 220 | 100 | 150 | 8 |
| 240 | 109 | 167 | 6 |
| 260 | 118 | 193 | 5 |
Rockshox SIDLuxe Select + rmt
| Poids du pilote (lbs) | Poids du pilote (kg) | Pression (psi) | Sag | Rebond (unique) |
|---|---|---|---|---|
| 100 | 45 | 105 | 28-30%, 11-12mm | 5 |
| 120 | 54 | 125 | 28-30%, 11-12mm | 5 |
| 140 | 64 | 150 | 28-30%, 11-12mm | 4 |
| 160 | 73 | 170 | 28-30%, 11-12mm | 4 |
| 180 | 82 | 195 | 28-30%, 11-12mm | 4 |
| 200 | 91 | 215 | 28-30%, 11-12mm | 3 |
| 220 | 100 | 240 | 28-30%, 11-12mm | 3 |
| 240 | 109 | 260 | 28-30%, 11-12mm | 3 |
| 260 | 118 | 285 | 28-30%, 11-12mm | 3 |
Fox 34 SC 120 29 Perf. Elite
| Poids du pilote (lbs) | Poids du pilote (kg) | Pression (psi) | Rebond (unique) |
|---|---|---|---|
| 120 | 54 | 58 | 12 |
| 130 | 59 | 63 | 11 |
| 140 | 64 | 68 | 10 |
| 150 | 68 | 72 | 9 |
| 160 | 73 | 77 | 8 |
| 170 | 77 | 82 | 7 |
| 180 | 82 | 86 | 6 |
| 190 | 86 | 91 | 6 |
| 200 | 91 | 96 | 5 |
| 210 | 95 | 100 | 4 |
| 220 | 100 | 105 | 3 |
| 230 | 104 | 110 | 2 |
Fox Float Perf Elite
| Poids du pilote (lbs) | Poids du pilote (kg) | Pression (psi) | Sag | Rebond (unique) |
|---|---|---|---|---|
| 100 | 45 | 95 | 28-30%, 12.5-13.5mm | 7 |
| 120 | 54 | 110 | 28-30%, 12.5-13.5mm | 6 |
| 140 | 64 | 125 | 28-30%, 12.5-13.5mm | 6 |
| 160 | 73 | 140 | 28-30%, 12.5-13.5mm | 5 |
| 180 | 82 | 155 | 28-30%, 12.5-13.5mm | 5 |
| 200 | 91 | 170 | 28-30%, 12.5-13.5mm | 4 |
| 220 | 100 | 190 | 28-30%, 12.5-13.5mm | 4 |
| 240 | 109 | 205 | 28-30%, 12.5-13.5mm | 3 |
| 260 | 118 | 225 | 28-30%, 12.5-13.5mm | 3 |
Rockshox SID SL Ultimate 100
| Poids du pilote (lbs) | Poids du pilote (kg) | Pression (psi) | Rebond (unique) |
|---|---|---|---|
| 100 | 45 | 64 | 19 |
| 120 | 54 | 70 | 18 |
| 140 | 64 | 90 | 16 |
| 160 | 73 | 105 | 15 |
| 180 | 82 | 120 | 13 |
| 200 | 91 | 135 | 10 |
| 220 | 100 | 150 | 8 |
| 240 | 109 | 167 | 6 |
| 260 | 118 | 193 | 5 |
Rockshox SIDLuxe Ultimate
| Poids du pilote (lbs) | Poids du pilote (kg) | Pression (psi) | Sag | Rebond (unique) |
|---|---|---|---|---|
| 100 | 45 | 105 | 28-30%, 11-12mm | 5 |
| 120 | 54 | 125 | 28-30%, 11-12mm | 5 |
| 140 | 64 | 150 | 28-30%, 11-12mm | 4 |
| 160 | 73 | 170 | 28-30%, 11-12mm | 4 |
| 180 | 82 | 195 | 28-30%, 11-12mm | 4 |
| 200 | 91 | 215 | 28-30%, 11-12mm | 3 |
| 220 | 100 | 240 | 28-30%, 11-12mm | 3 |
| 240 | 109 | 260 | 28-30%, 11-12mm | 3 |
| 260 | 118 | 285 | 28-30%, 11-12mm | 3 |
FOX 34SC Factory 120
| Poids du pilote (lbs) | Poids du pilote (kg) | Pression (psi) | Rebond (unique) | Compression (unique) |
|---|---|---|---|---|
| 100 | 45 | 49 | 14 | 15 |
| 120 | 54 | 58 | 12 | 15 |
| 140 | 64 | 68 | 10 | 15 |
| 160 | 73 | 77 | 8 | 15 |
| 180 | 82 | 86 | 6 | 15 |
| 200 | 91 | 96 | 5 | 15 |
| 220 | 100 | 105 | 3 | 15 |
| 240 | 109 | 114 | 1 | 15 |
Fox Float DPS Factory
| Poids du pilote (lbs) | Poids du pilote (kg) | Pression (psi) | Sag | Rebond (unique) |
|---|---|---|---|---|
| 100 | 45 | 95 | 28-30%, 12.5-13.5mm | 8 |
| 120 | 54 | 120 | 28-30%, 12.5-13.5mm | 7 |
| 140 | 64 | 140 | 28-30%, 12.5-13.5mm | 7 |
| 160 | 73 | 165 | 28-30%, 12.5-13.5mm | 6 |
| 180 | 82 | 190 | 28-30%, 12.5-13.5mm | 6 |
| 200 | 91 | 210 | 28-30%, 12.5-13.5mm | 6 |
| 220 | 100 | 235 | 28-30%, 12.5-13.5mm | 5 |
| 240 | 109 | 260 | 28-30%, 12.5-13.5mm | 5 |
| 260 | 118 | 280 | 28-30%, 12.5-13.5mm | 5 |
Vues éclatées


Blur 4 Small Parts
Acheter des pièces détachées
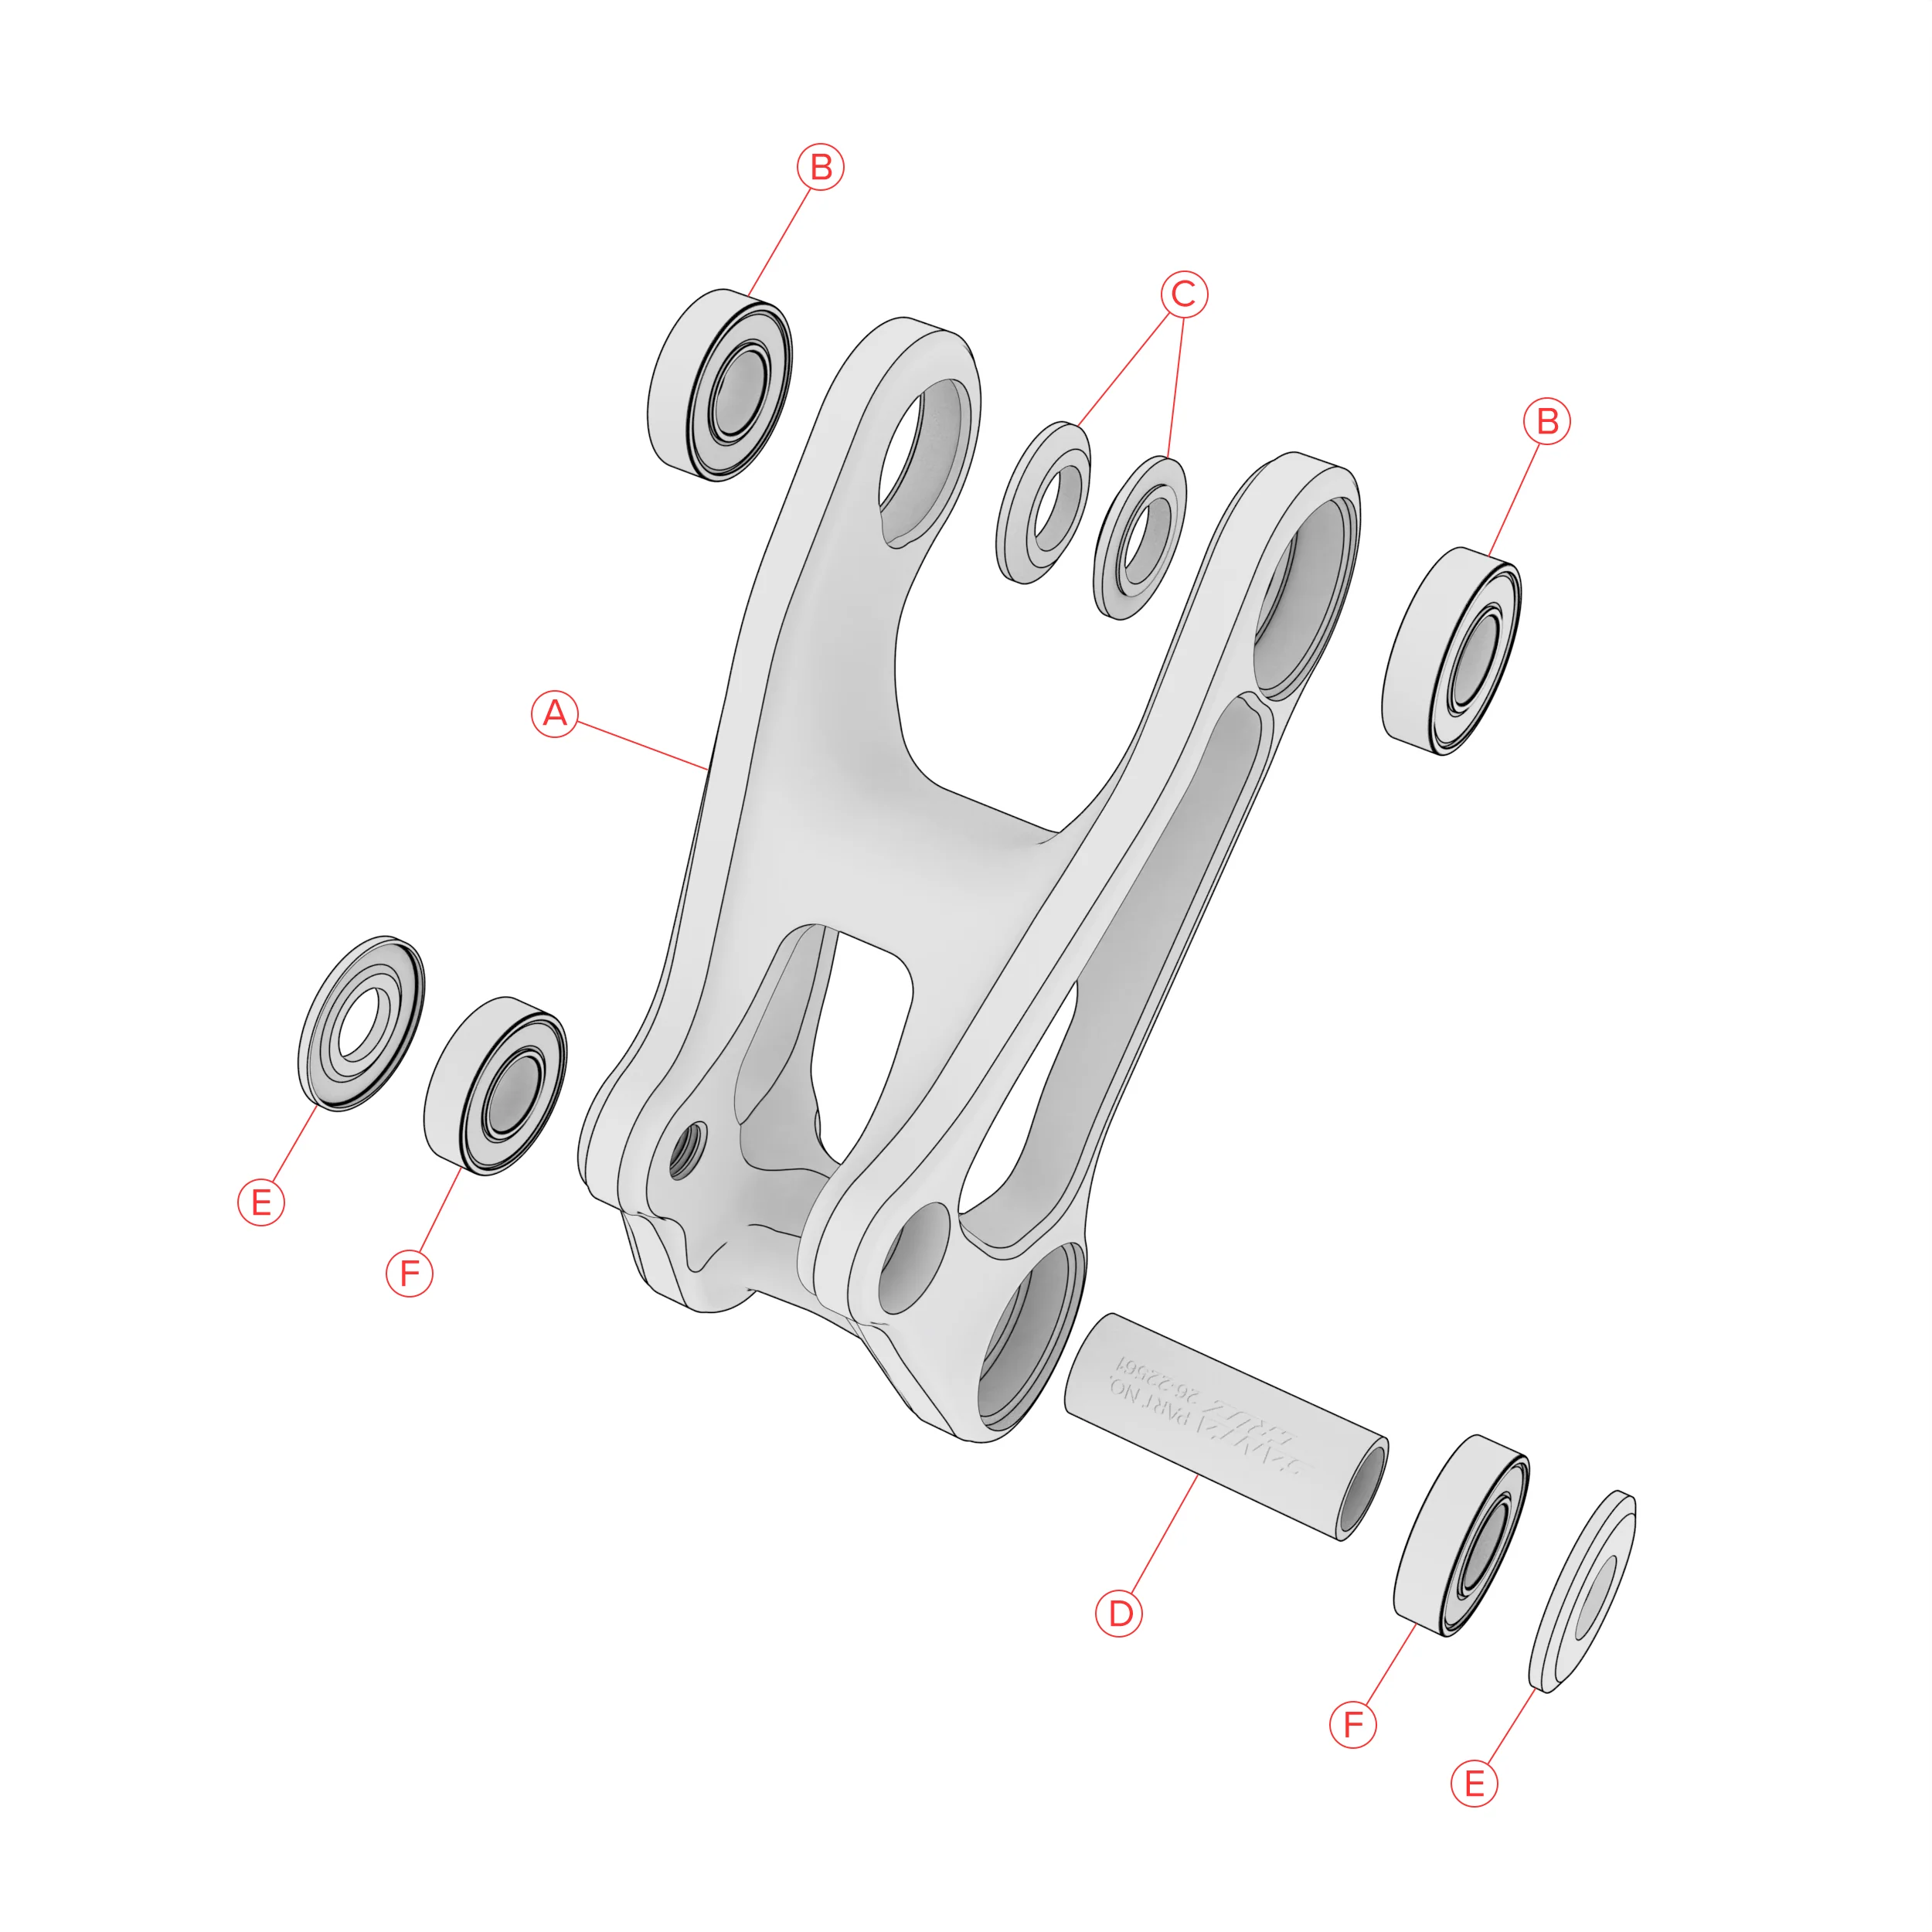
Upper Link
Chargement

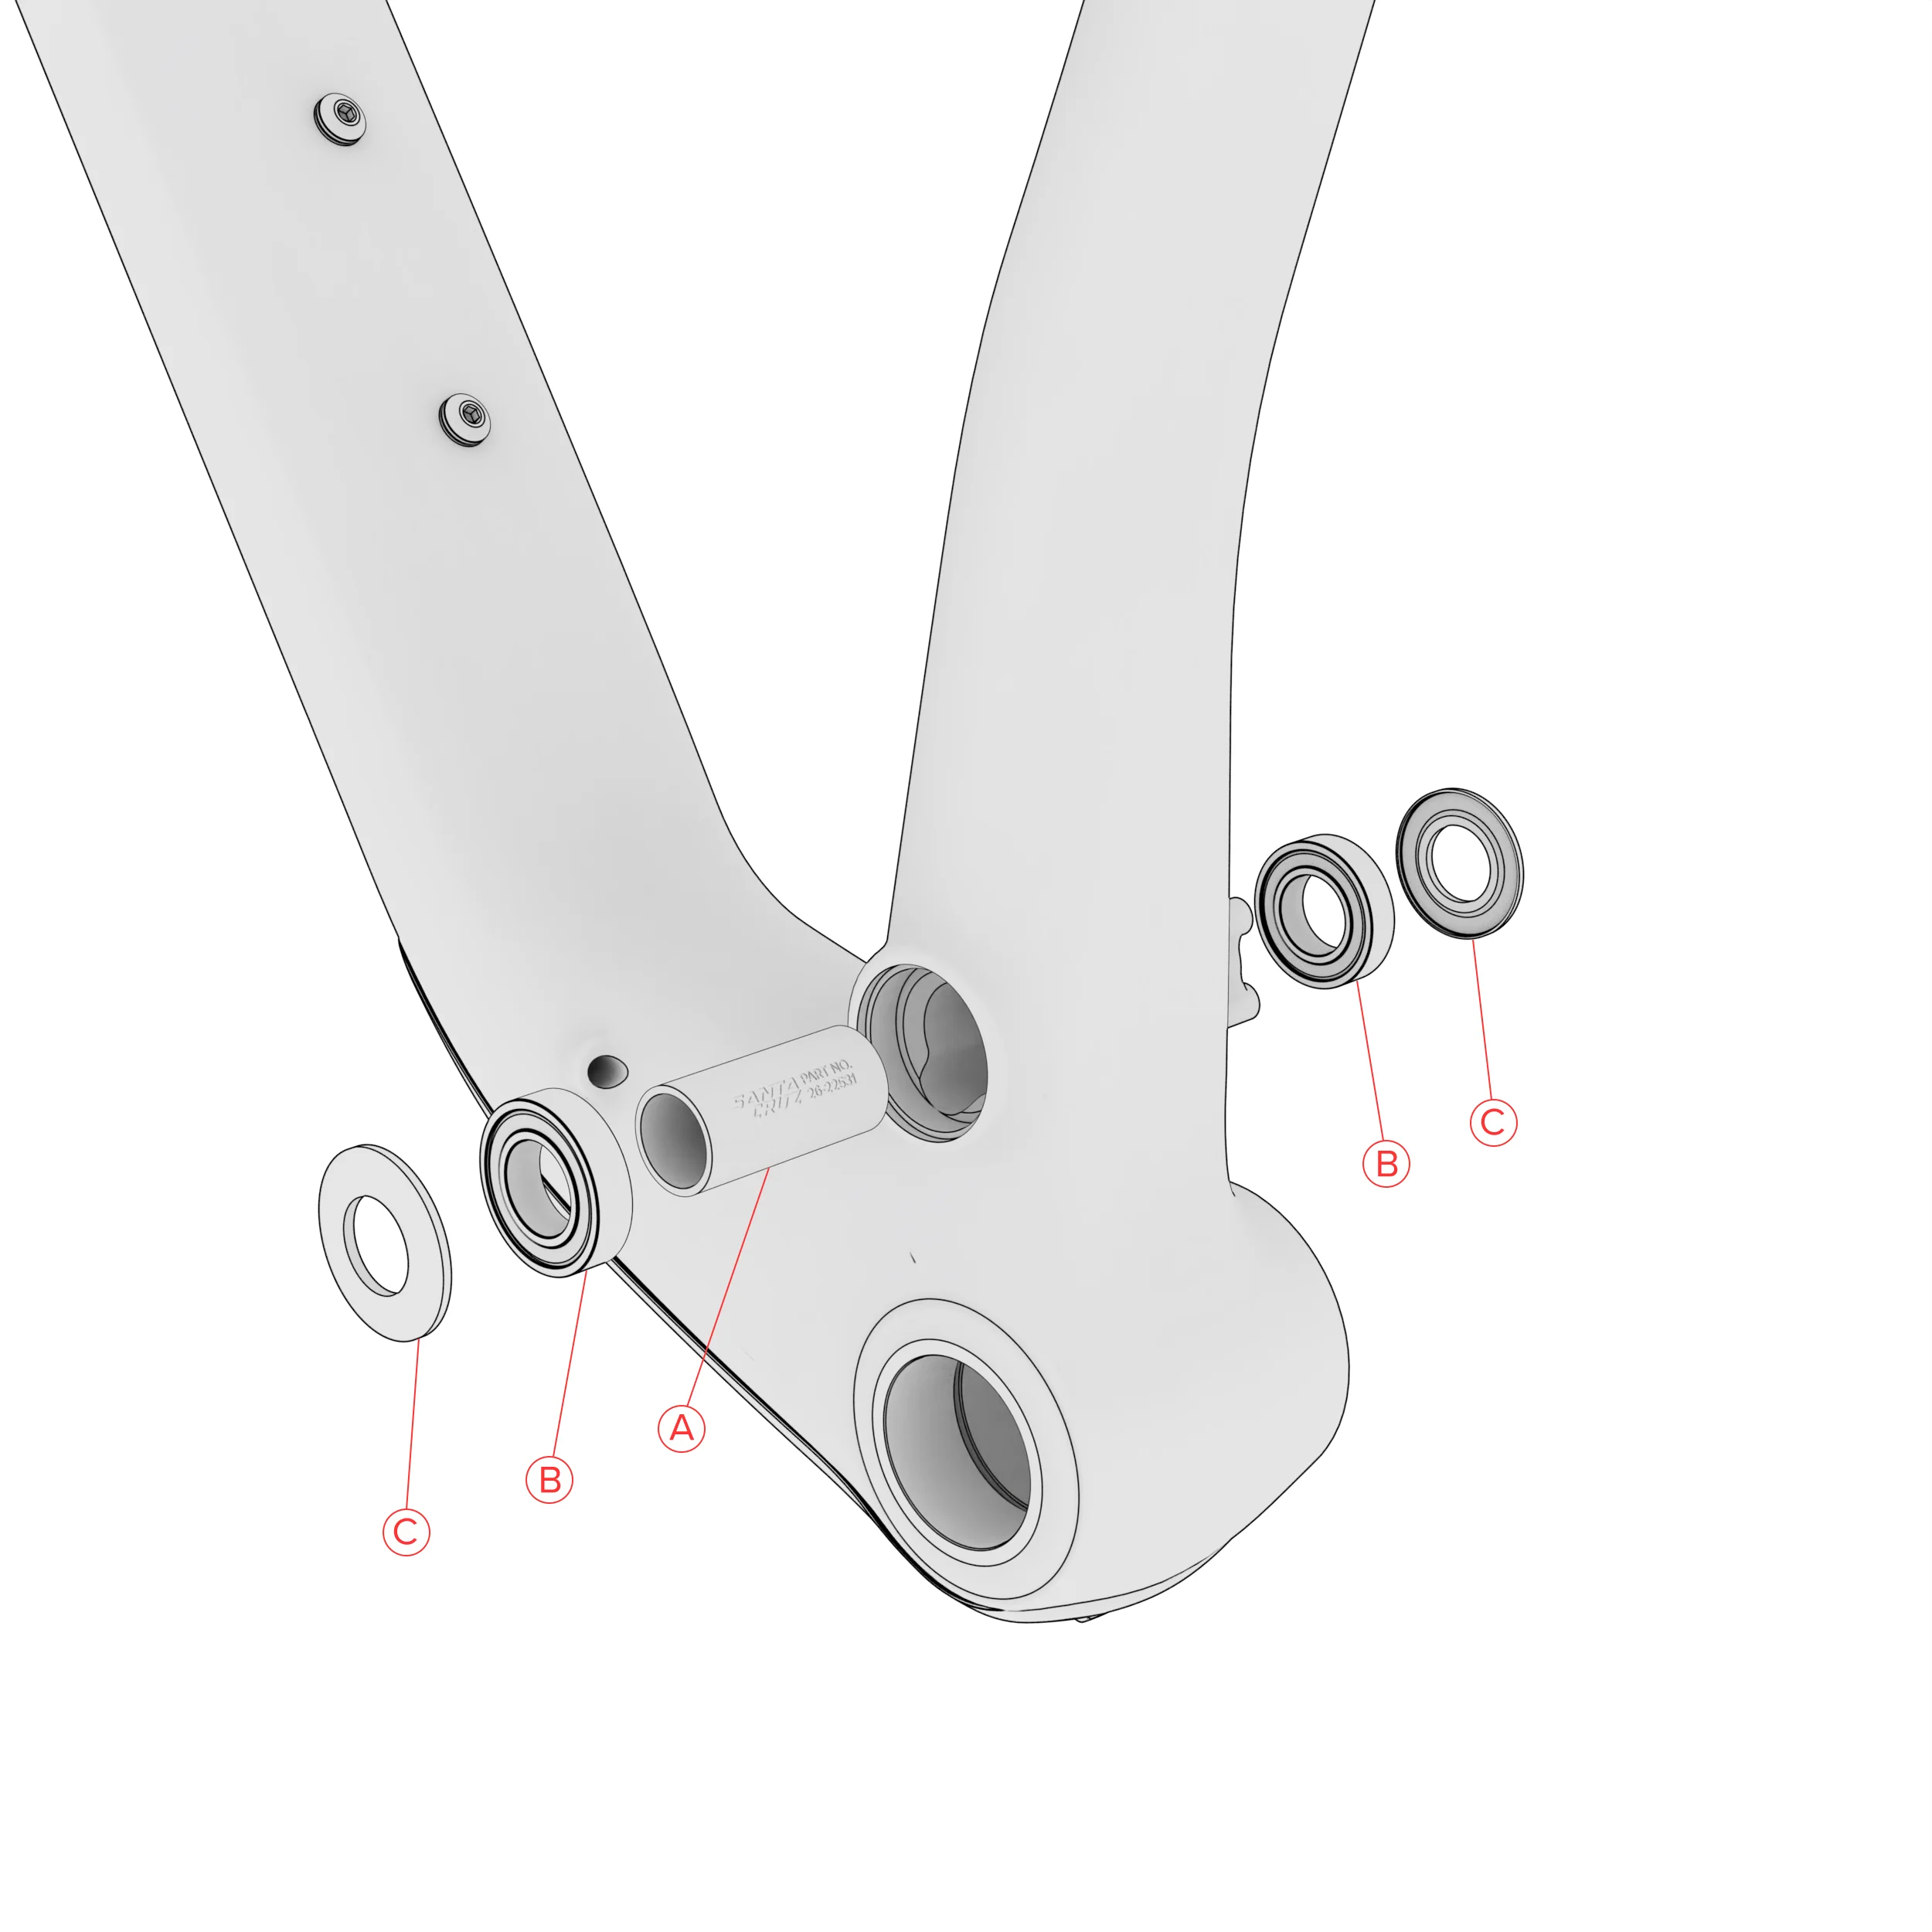
Lower Pivot Bearings
Chargement

Rear Axle, Chainstay Protector, Derailleur Hanger, and Chainguide
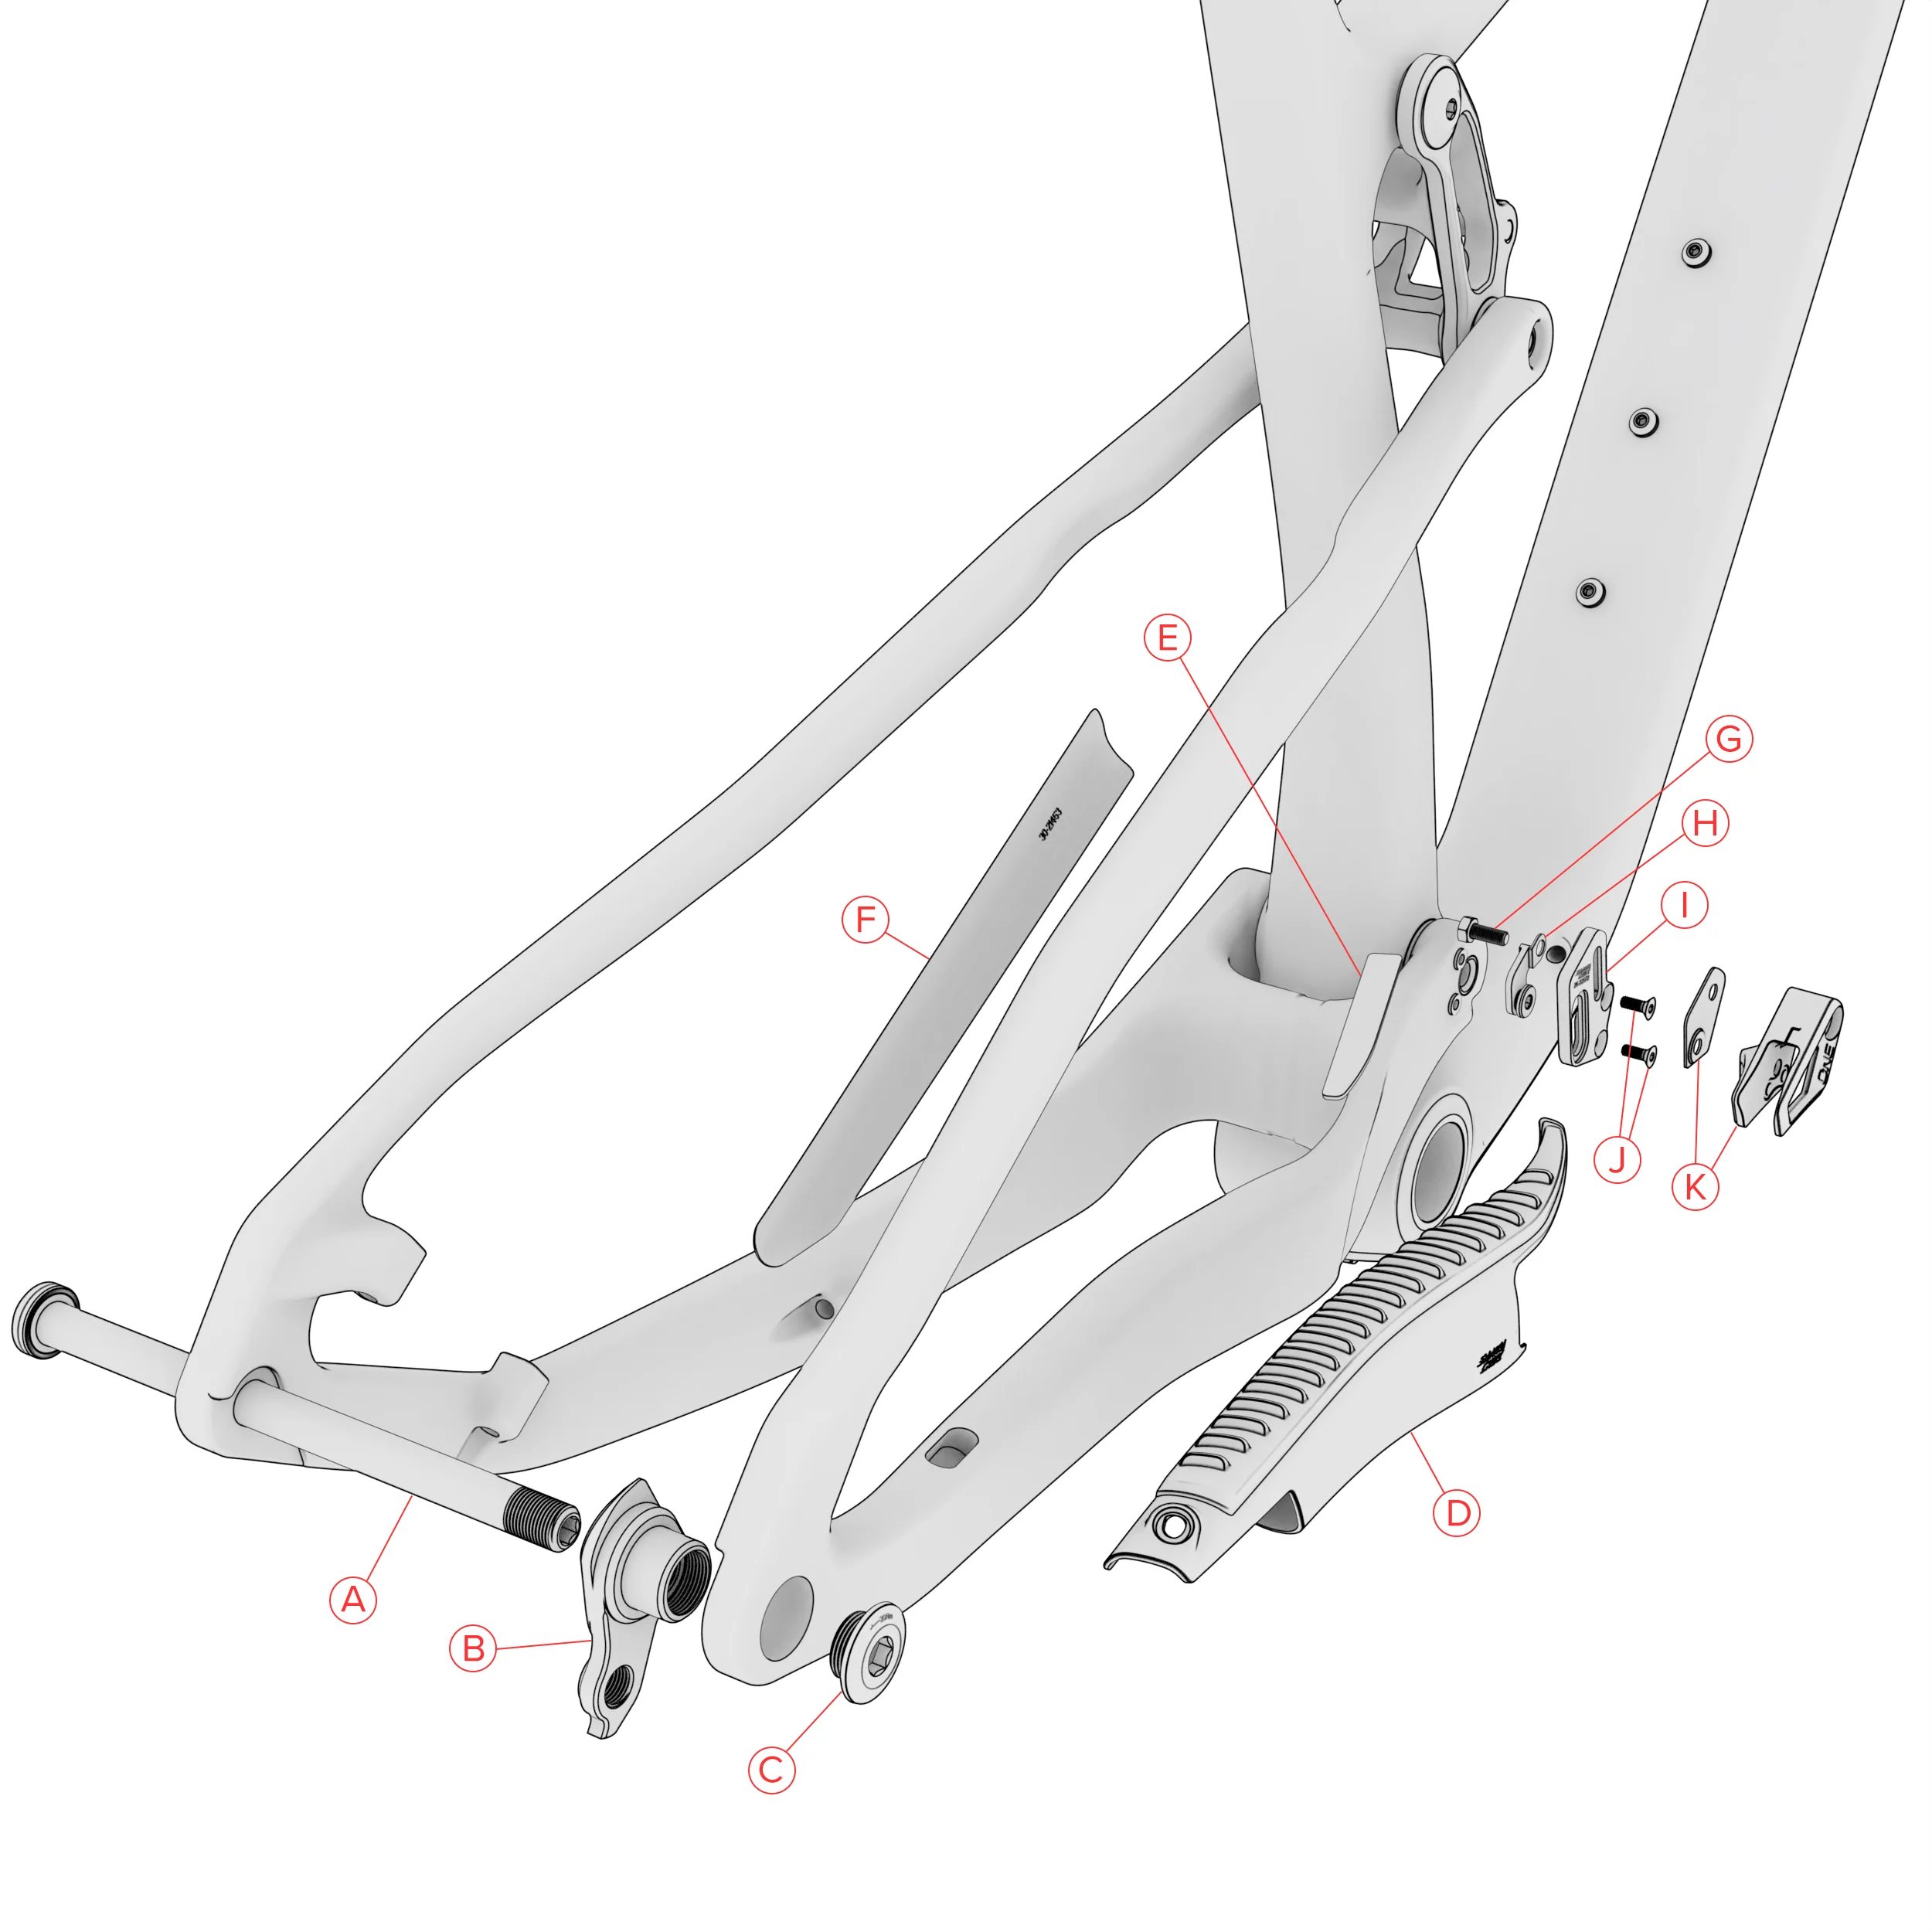
| Label | Name | Blurb | Quantity | Torque | Part Number |
|---|---|---|---|---|---|
| A | Rear axle 12x173.7 | Apply grease to shaft and threads | 1 | 08-22209 | |
| B | SCB UDH | Interchangeable with Sram UDH | 1 | 23-23491 | |
| C | SCB UDH screw | Reverse thread | 1 | 20 Nm | 26-23492 |
| D | Chainstay Protector | 1 | 30-20189 | ||
| E | Chainstay Protector | 1 | 30-20189 | ||
| F | Seatstay Protector | 1 | 30-21453 | ||
| G | M5x12 HHS | Apply Loctite 242 to threads | 1 | 2 Nm | 26-22570 |
| H | OneUp chainguide back plate | 1 | 26-22571 | ||
| I | OneUp chainguide mount | 1 | 26-22572 | ||
| J | M4x10 FHCS | Apply Loctite 242 to threads | 2 | 0.65 Nm | 26-22938 |
| K | OneUp chainguide | 1 | 19-22609 |
Chargement

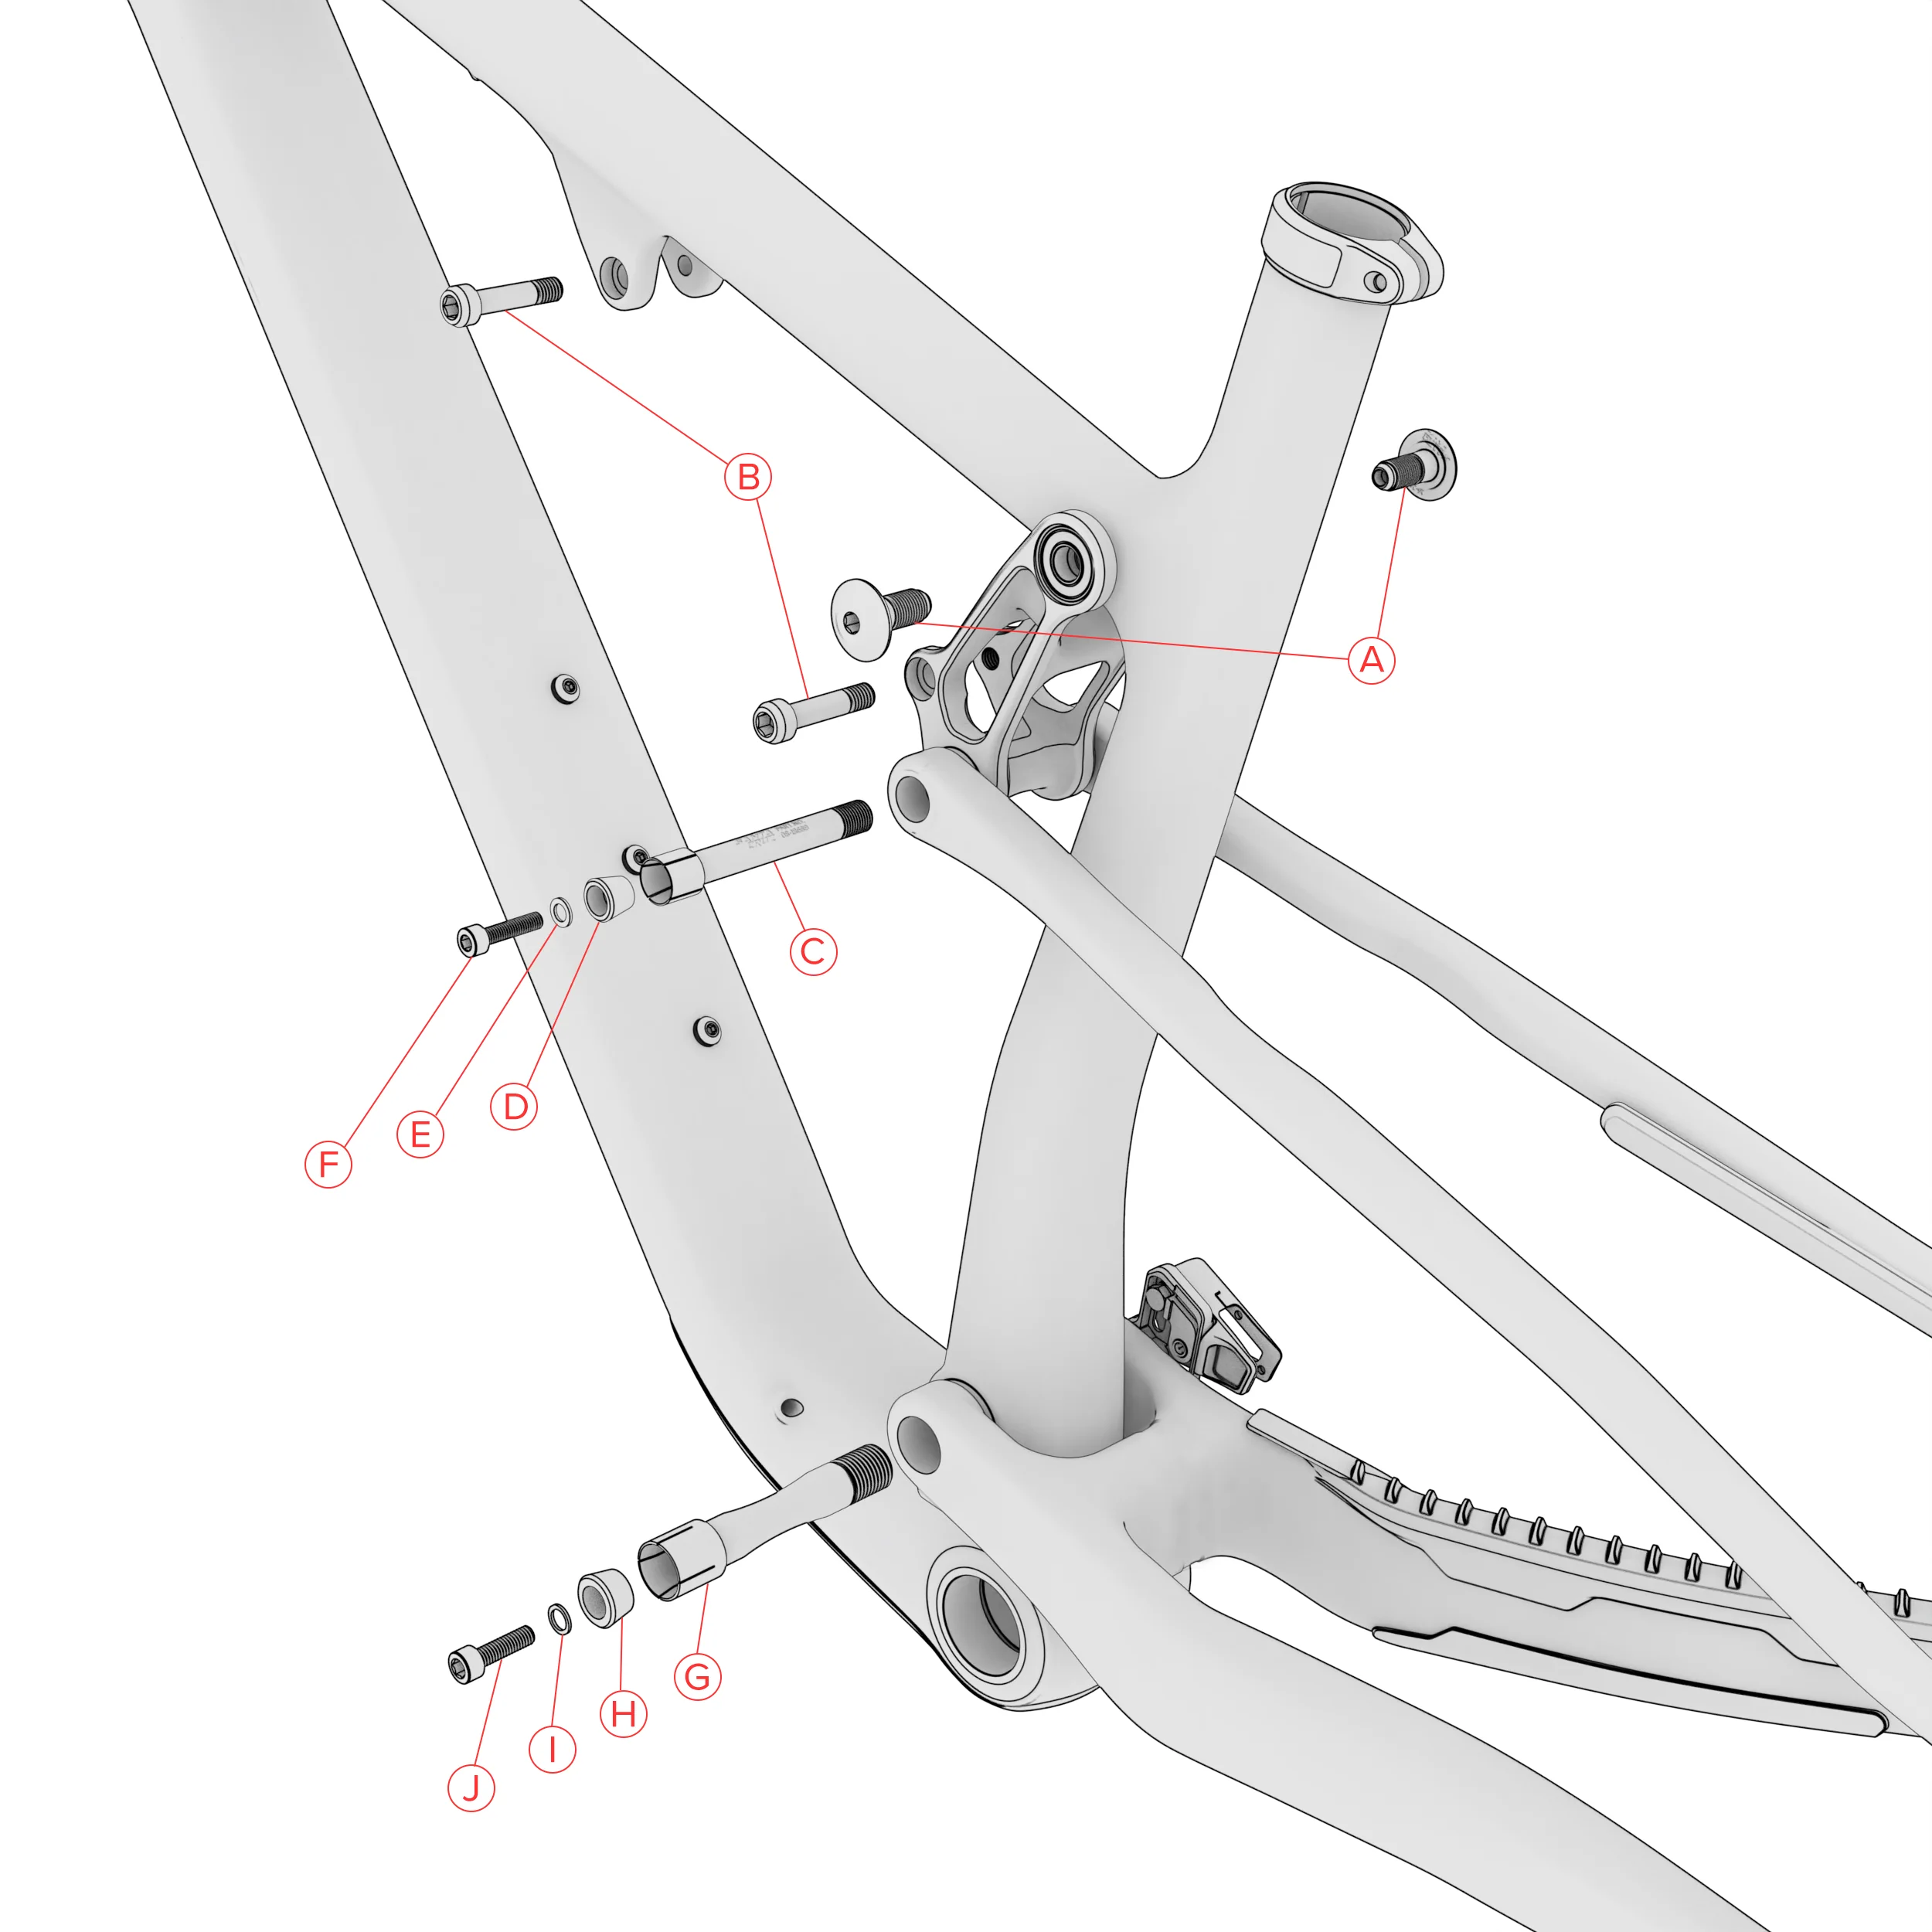
Upper Link and Lower Pivot Hardware
| Label | Name | Blurb | Quantity | Torque | Part Number |
|---|---|---|---|---|---|
| A | M10x23 Screw | Apply Loctite 242 to threads only, apply grease to shaft only | 2 | 16 Nm | 26-20122 |
| B | M8x35 Shock Bolt | Apply Loctite 242 to threads | 2 | 20 Nm | 26-22662 |
| C | Pivot Axle M10x81 | Apply Loctite 242 to threads only, apply grease to shaft only | 1 | 13.6 Nm | 08-23720 |
| D | M5 Tapered Washer | Apply grease to surface | 1 | 26-15632 | |
| E | M5 Washer | 1 | 26-12652 | ||
| F | M5x20 SHCS | Apply Loctite 242 to threads | 1 | 5.6 Nm | 26-15946 |
| G | Pivot axle M15x90.75 | Apply Loctite 242 to threads only, apply grease to shaft only | 1 | 20 Nm | 08-22530 |
| H | M6 Tapered Washer | Apply grease to surface | 1 | 26-15633 | |
| I | M6 Washer | 1 | 26-11817 | ||
| J | M6x20 SHCS | Apply Loctite 242 to threads | 1 | 9 Nm | 26-15947 |
Chargement

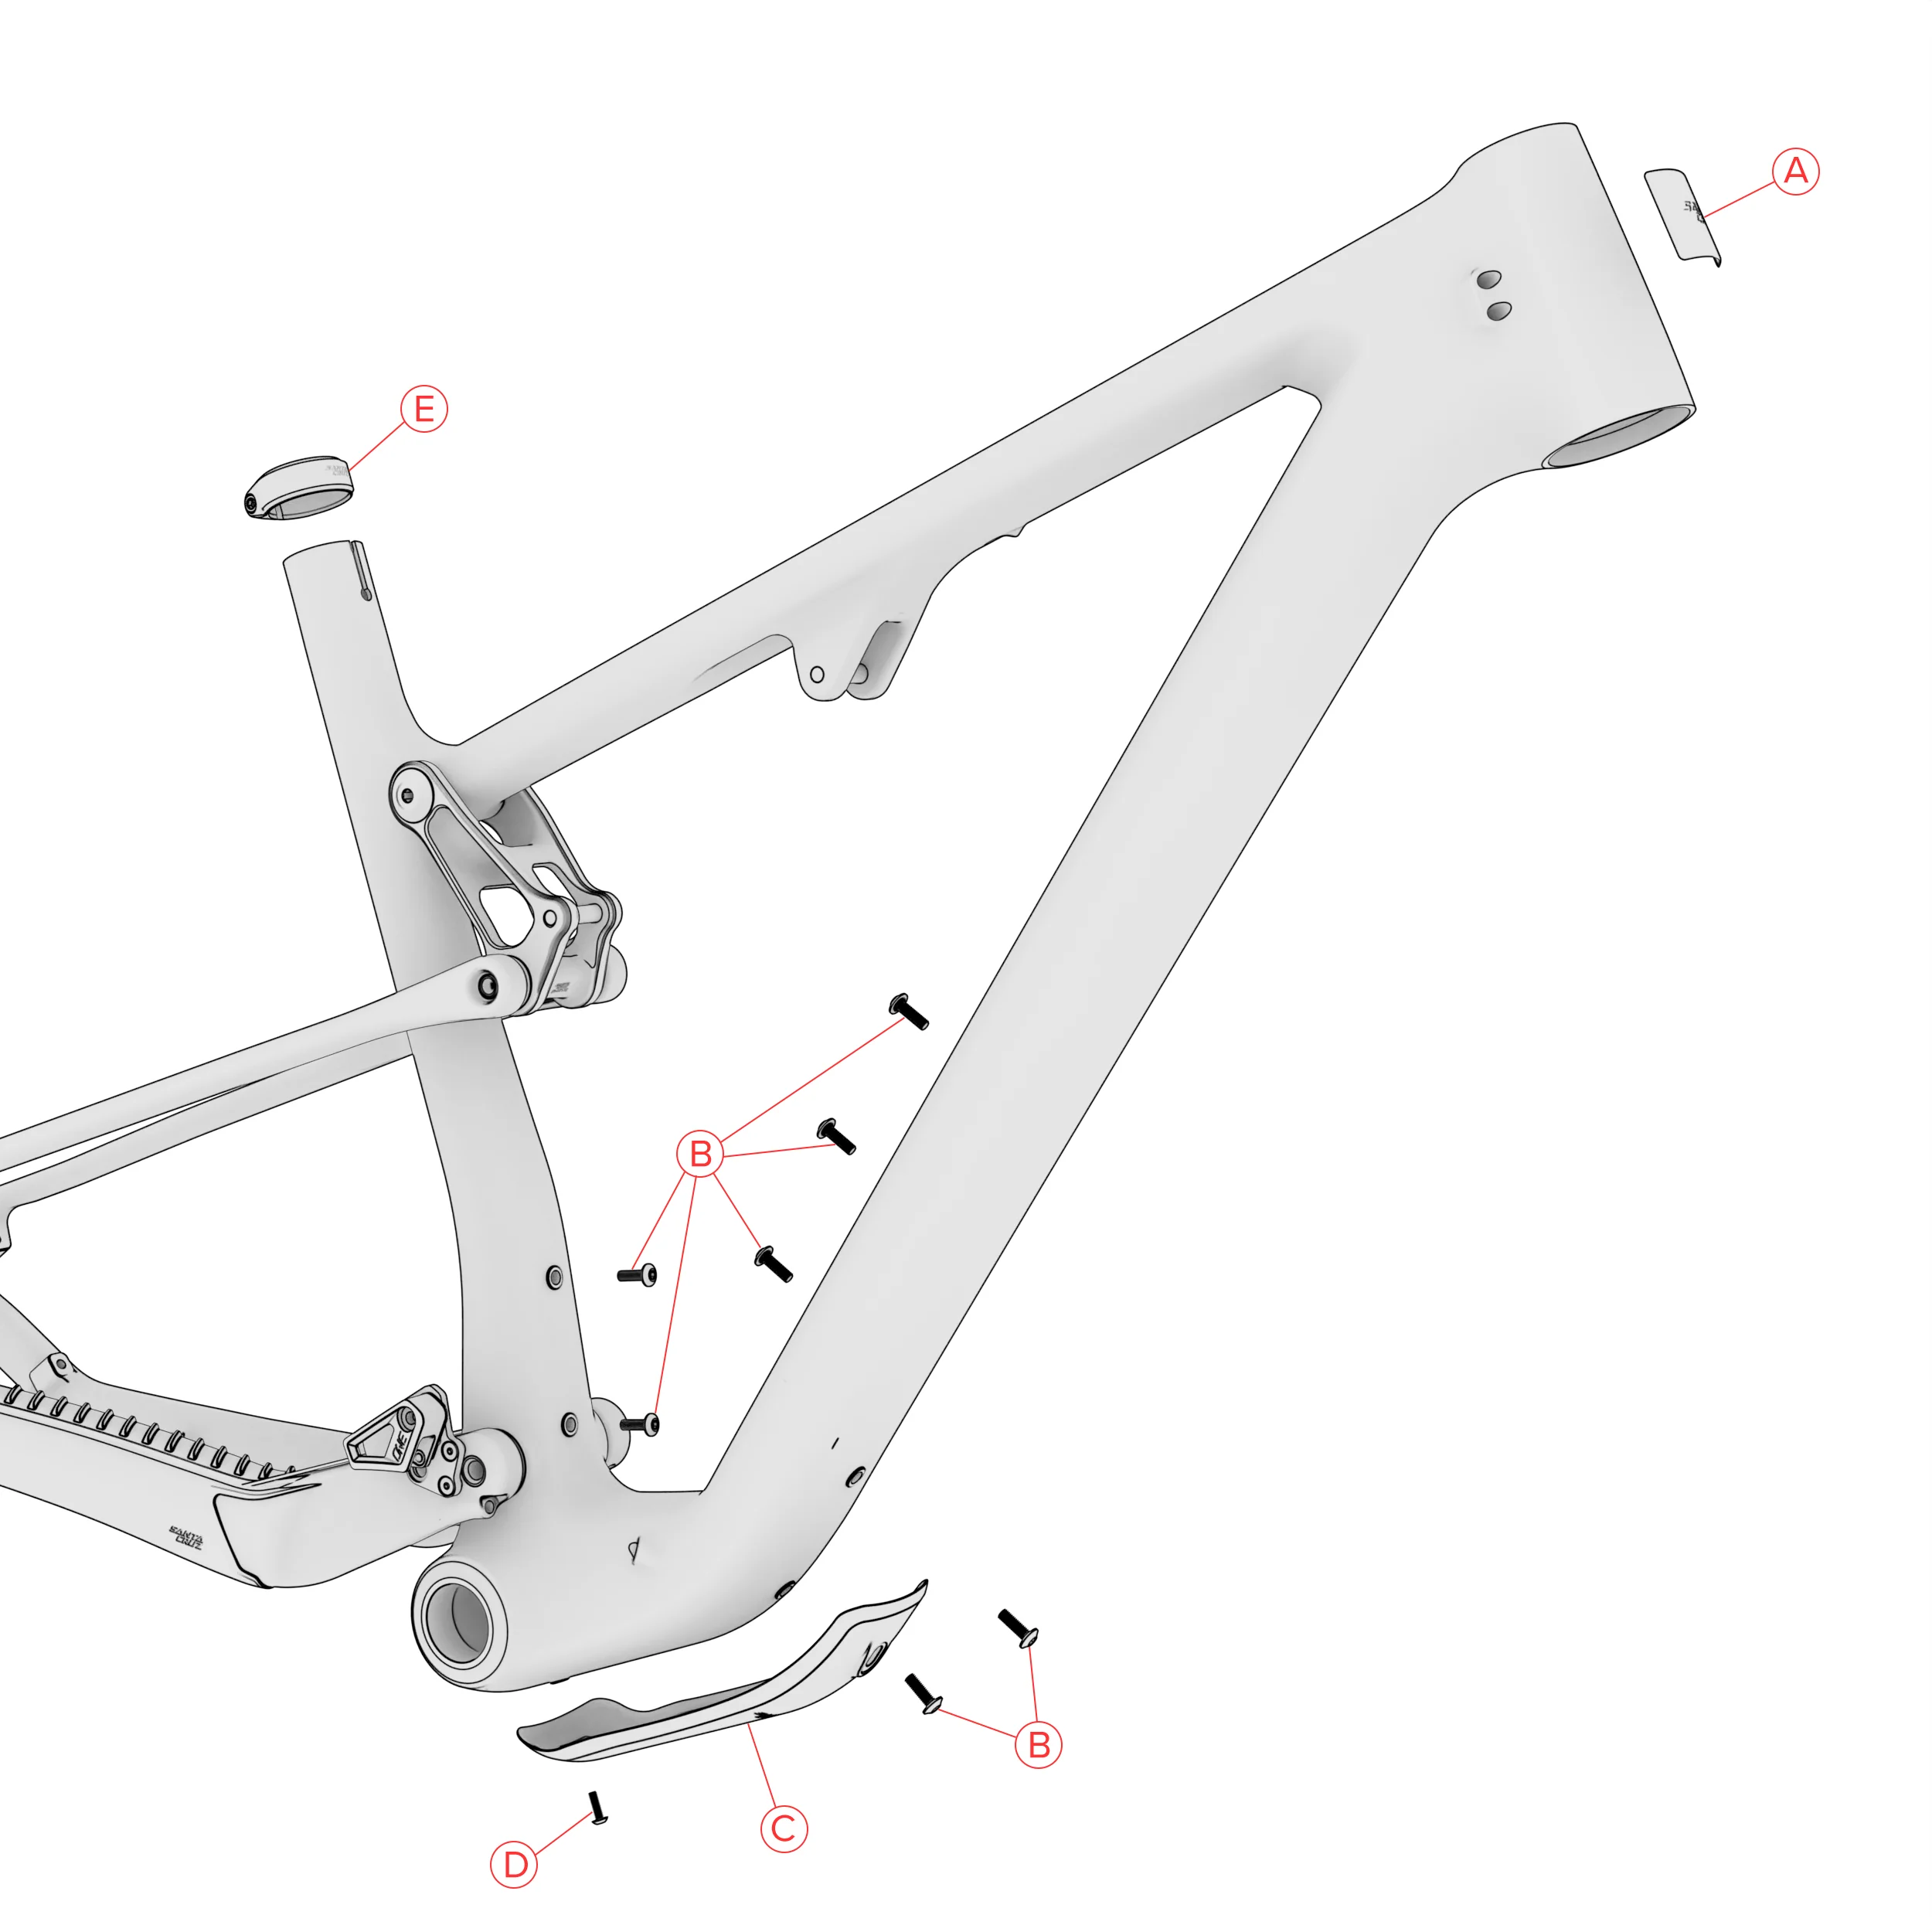
Downtube Protector, Bottle Cage Bolts, Seat Collar, and Headbadge
Chargement

Documents
Si vous cherchez davantage d'informations sur votre vélo, consultez le manuel d'utilisation.