
Blur 4 MY22
2021 - 2022
ARRIVAL OF THE FITTEST
We tapped into everything we’ve learned from years of making the highest quality carbon full-suspension bikes and added the super-efficient Superlight™ suspension to make a World Cup-winning XC race bike. The Blur isn’t guaranteed to make you a race winner but being the lightest, full-suspension carbon XC bike we’ve ever made, it might be the difference between claiming first place...or just crossing the line.
Carbon
C/CC
Front (MM)
110
Rear (MM)
107
Wheel Size
29
Model Specs
| Suspension System | Superlight™ |
|---|---|
| Front Derailleur Mount | No compatibility |
| Headset | Integrated (IS41/52) |
| Seat Post Diameter | 31.6mm |
| Seat Clamp Diameter | 36.4mm |
| Shock Length | 190mm |
| Shock Stroke | 40mm (XC) | 45mm (TR) |
| Fork Compatibility | 100-120mm |
| Bottom Bracket Shell | 73mm Threaded |
| Max Tire Clearance | 2.4" |
| Max Chainring Size | 36t |
| Water Bottle Mounts | 2 inside main triangle | 1 under downtube |
| Shock Bushing Size Front | 20x8 |
| Shock Bushing Size Rear | 20x8 |
| Rear Brake Mount | 160 PM |
| Fork Offset | 44mm |
Geometry
Configuration
All units are in millimeters or degrees.
| s | m | l | xl | |
|---|---|---|---|---|
| Reach | 425 | 450 | 470 | 495 |
| Stack | 578.3 | 587.6 | 596.9 | 610.8 |
| Head tube angle | 68.3° | 68.3° | 68.3° | 68.3° |
| Seat Tube Length | 405 | 430 | 470 | 520 |
| Front Center | 685.8 | 714.5 | 738.2 | 768.7 |
| BB Height | 330.5 | 330.5 | 330.5 | 330.5 |
| BB Drop | 42 | 42 | 42 | 42 |
| Wheel base | 1115.8 | 1147 | 1173.2 | 1206.2 |
| Rear Center | 430 | 432.5 | 435 | 437.5 |
| Headtube length | 90 | 100 | 110 | 125 |
| Top Tube Length | 563.9 | 592.8 | 616.9 | 647.2 |
| Seat Tube Angle | 76.5º | 76.3º | 75.8º | 75.7º |
| Standover Height | 736.6 | 740.1 | 739.2 | 745.1 |
| s | m | l | xl | |
|---|---|---|---|---|
| Reach | 412.3 | 437.8 | 457.5 | 482.5 |
| Stack | 587.4 | 597 | 606.5 | 620.7 |
| Head tube angle | 67.1º | 67.1º | 67.1º | 67.1º |
| Seat Tube Length | 405 | 430 | 470 | 520 |
| Front Center | 695 | 723.7 | 747.4 | 778 |
| BB Height | 339.9 | 339.7 | 339.6 | 339.4 |
| BB Drop | 32.6 | 32.8 | 32.9 | 33.1 |
| Wheel base | 1125.8 | 1157 | 1183.2 | 1216.3 |
| Rear Center | 430.8 | 433.3 | 435.8 | 438.3 |
| Headtube length | 90 | 100 | 110 | 125 |
| Top Tube Length | 568.4 | 597.3 | 621.4 | 651.7 |
| Seat Tube Angle | 75.1º | 75º | 74.9º | 74.8º |
| Standover Height | 743.5 | 746.4 | 745.4 | 750.1 |
Suspension Setup
Rockshox SID RL 120
| Rider Weight (lbs) | Rider Weight (kgs) | Pressure (psi) | Rebound (from closed) |
|---|---|---|---|
| 100 | 45 | 64 | 19 |
| 120 | 54 | 70 | 18 |
| 140 | 64 | 90 | 16 |
| 160 | 73 | 105 | 15 |
| 180 | 82 | 120 | 13 |
| 200 | 91 | 135 | 10 |
| 220 | 100 | 150 | 8 |
| 240 | 109 | 167 | 6 |
| 260 | 118 | 193 | 5 |
Fox Float DPS Performance
| Rider Weight (lbs) | Rider Weight (kgs) | Pressure (psi) | Sag | Rebound (from closed) |
|---|---|---|---|---|
| 100 | 45 | 95 | 28-30%, 12.5-13.5mm | 8 |
| 120 | 54 | 120 | 28-30%, 12.5-13.5mm | 7 |
| 140 | 64 | 140 | 28-30%, 12.5-13.5mm | 7 |
| 160 | 73 | 165 | 28-30%, 12.5-13.5mm | 6 |
| 180 | 82 | 190 | 28-30%, 12.5-13.5mm | 6 |
| 200 | 91 | 210 | 28-30%, 12.5-13.5mm | 6 |
| 220 | 100 | 235 | 28-30%, 12.5-13.5mm | 5 |
| 240 | 109 | 260 | 28-30%, 12.5-13.5mm | 5 |
| 260 | 118 | 280 | 28-30%, 12.5-13.5mm | 5 |
Rockshox SID SL Select + 100 remote
| Rider Weight (lbs) | Rider Weight (kgs) | Pressure (psi) | Rebound (from closed) |
|---|---|---|---|
| 100 | 45 | 64 | 19 |
| 120 | 54 | 70 | 18 |
| 140 | 64 | 90 | 16 |
| 160 | 73 | 105 | 15 |
| 180 | 82 | 120 | 13 |
| 200 | 91 | 135 | 10 |
| 220 | 100 | 150 | 8 |
| 240 | 109 | 167 | 6 |
| 260 | 118 | 193 | 5 |
Rockshox SIDLuxe Select + remote
| Rider Weight (lbs) | Rider Weight (kgs) | Pressure (psi) | Sag | Rebound (from closed) |
|---|---|---|---|---|
| 100 | 45 | 105 | 28-30%, 11-12mm | 5 |
| 120 | 54 | 125 | 28-30%, 11-12mm | 5 |
| 140 | 64 | 150 | 28-30%, 11-12mm | 4 |
| 160 | 73 | 170 | 28-30%, 11-12mm | 4 |
| 180 | 82 | 195 | 28-30%, 11-12mm | 4 |
| 200 | 91 | 215 | 28-30%, 11-12mm | 3 |
| 220 | 100 | 240 | 28-30%, 11-12mm | 3 |
| 240 | 109 | 260 | 28-30%, 11-12mm | 3 |
| 260 | 118 | 285 | 28-30%, 11-12mm | 3 |
Fox SC 34 Performance 120
| Rider Weight (lbs) | Rider Weight (kgs) | Pressure (psi) | Rebound (from closed) |
|---|---|---|---|
| 100 | 45 | 49 | 15 |
| 120 | 54 | 58 | 13 |
| 140 | 64 | 68 | 11 |
| 160 | 73 | 77 | 9 |
| 180 | 82 | 86 | 7 |
| 200 | 91 | 96 | 5 |
| 220 | 100 | 105 | 3 |
| 240 | 109 | 114 | 1 |
Fox Float DPS Performance
| Rider Weight (lbs) | Rider Weight (kgs) | Pressure (psi) | Sag | Rebound (from closed) |
|---|---|---|---|---|
| 100 | 45 | 95 | 28-30%, 12.5-13.5mm | 8 |
| 120 | 54 | 120 | 28-30%, 12.5-13.5mm | 7 |
| 140 | 64 | 140 | 28-30%, 12.5-13.5mm | 7 |
| 160 | 73 | 165 | 28-30%, 12.5-13.5mm | 6 |
| 180 | 82 | 190 | 28-30%, 12.5-13.5mm | 6 |
| 200 | 91 | 210 | 28-30%, 12.5-13.5mm | 6 |
| 220 | 100 | 235 | 28-30%, 12.5-13.5mm | 5 |
| 240 | 109 | 260 | 28-30%, 12.5-13.5mm | 5 |
| 260 | 118 | 280 | 28-30%, 12.5-13.5mm | 5 |
Rockshox SID SL Select + 100 remote
| Rider Weight (lbs) | Rider Weight (kgs) | Pressure (psi) | Rebound (from closed) |
|---|---|---|---|
| 100 | 45 | 64 | 19 |
| 120 | 54 | 70 | 18 |
| 140 | 64 | 90 | 16 |
| 160 | 73 | 105 | 15 |
| 180 | 82 | 120 | 13 |
| 200 | 91 | 135 | 10 |
| 220 | 100 | 150 | 8 |
| 240 | 109 | 167 | 6 |
| 260 | 118 | 193 | 5 |
Rockshox SIDLuxe Select + remote
| Rider Weight (lbs) | Rider Weight (kgs) | Pressure (psi) | Sag | Rebound (from closed) |
|---|---|---|---|---|
| 100 | 45 | 105 | 28-30%, 11-12mm | 5 |
| 120 | 54 | 125 | 28-30%, 11-12mm | 5 |
| 140 | 64 | 150 | 28-30%, 11-12mm | 4 |
| 160 | 73 | 170 | 28-30%, 11-12mm | 4 |
| 180 | 82 | 195 | 28-30%, 11-12mm | 4 |
| 200 | 91 | 215 | 28-30%, 11-12mm | 3 |
| 220 | 100 | 240 | 28-30%, 11-12mm | 3 |
| 240 | 109 | 260 | 28-30%, 11-12mm | 3 |
| 260 | 118 | 285 | 28-30%, 11-12mm | 3 |
Fox SC 34 Performance Elite 120
| Rider Weight (lbs) | Rider Weight (kgs) | Pressure (psi) | Rebound (from closed) | Compression |
|---|---|---|---|---|
| 100 | 45 | 49 | 14 | 15 |
| 120 | 54 | 58 | 12 | 15 |
| 140 | 64 | 68 | 10 | 15 |
| 160 | 73 | 77 | 8 | 15 |
| 180 | 82 | 86 | 6 | 15 |
| 200 | 91 | 96 | 5 | 15 |
| 220 | 100 | 105 | 3 | 15 |
| 240 | 109 | 114 | 1 | 15 |
Fox Float DPS Performance Elite
| Rider Weight (lbs) | Rider Weight (kgs) | Pressure (psi) | Sag | Rebound (from closed) |
|---|---|---|---|---|
| 100 | 45 | 95 | 28-30%, 12.5-13.5mm | 8 |
| 120 | 54 | 120 | 28-30%, 12.5-13.5mm | 7 |
| 140 | 64 | 140 | 28-30%, 12.5-13.5mm | 7 |
| 160 | 73 | 165 | 28-30%, 12.5-13.5mm | 6 |
| 180 | 82 | 190 | 28-30%, 12.5-13.5mm | 6 |
| 200 | 91 | 210 | 28-30%, 12.5-13.5mm | 6 |
| 220 | 100 | 235 | 28-30%, 12.5-13.5mm | 5 |
| 240 | 109 | 260 | 28-30%, 12.5-13.5mm | 5 |
| 260 | 118 | 280 | 28-30%, 12.5-13.5mm | 5 |
Rockshox SID SL Ultimate 100 remote
| Rider Weight (lbs) | Rider Weight (kgs) | Pressure (psi) | Rebound (from closed) |
|---|---|---|---|
| 100 | 45 | 64 | 19 |
| 120 | 54 | 70 | 18 |
| 140 | 64 | 90 | 16 |
| 160 | 73 | 105 | 15 |
| 180 | 82 | 120 | 13 |
| 200 | 91 | 135 | 10 |
| 220 | 100 | 150 | 8 |
| 240 | 109 | 167 | 6 |
| 260 | 118 | 193 | 5 |
Rockshox SIDLuxe Ultimate remote
| Rider Weight (lbs) | Rider Weight (kgs) | Pressure (psi) | Sag | Rebound (from closed) |
|---|---|---|---|---|
| 100 | 45 | 105 | 28-30%, 11-12mm | 5 |
| 120 | 54 | 125 | 28-30%, 11-12mm | 5 |
| 140 | 64 | 150 | 28-30%, 11-12mm | 4 |
| 160 | 73 | 170 | 28-30%, 11-12mm | 4 |
| 180 | 82 | 195 | 28-30%, 11-12mm | 4 |
| 200 | 91 | 215 | 28-30%, 11-12mm | 3 |
| 220 | 100 | 240 | 28-30%, 11-12mm | 3 |
| 240 | 109 | 260 | 28-30%, 11-12mm | 3 |
| 260 | 118 | 285 | 28-30%, 11-12mm | 3 |
Fox SC 34 Factory 120
| Rider Weight (lbs) | Rider Weight (kgs) | Pressure (psi) | Rebound (from closed) | Compression |
|---|---|---|---|---|
| 100 | 45 | 49 | 14 | 15 |
| 120 | 54 | 58 | 12 | 15 |
| 140 | 64 | 68 | 10 | 15 |
| 160 | 73 | 77 | 8 | 15 |
| 180 | 82 | 86 | 6 | 15 |
| 200 | 91 | 96 | 5 | 15 |
| 220 | 100 | 105 | 3 | 15 |
| 240 | 109 | 114 | 1 | 15 |
Fox Float DPS Factory
| Rider Weight (lbs) | Rider Weight (kgs) | Pressure (psi) | Sag | Rebound (from closed) |
|---|---|---|---|---|
| 100 | 45 | 95 | 28-30%, 12.5-13.5mm | 8 |
| 120 | 54 | 120 | 28-30%, 12.5-13.5mm | 7 |
| 140 | 64 | 140 | 28-30%, 12.5-13.5mm | 7 |
| 160 | 73 | 165 | 28-30%, 12.5-13.5mm | 6 |
| 180 | 82 | 190 | 28-30%, 12.5-13.5mm | 6 |
| 200 | 91 | 210 | 28-30%, 12.5-13.5mm | 6 |
| 220 | 100 | 235 | 28-30%, 12.5-13.5mm | 5 |
| 240 | 109 | 260 | 28-30%, 12.5-13.5mm | 5 |
| 260 | 118 | 280 | 28-30%, 12.5-13.5mm | 5 |
Exploded Diagrams
Downtube Protector, Bottle Cage Bolts, Seat Collar, and Headbadge
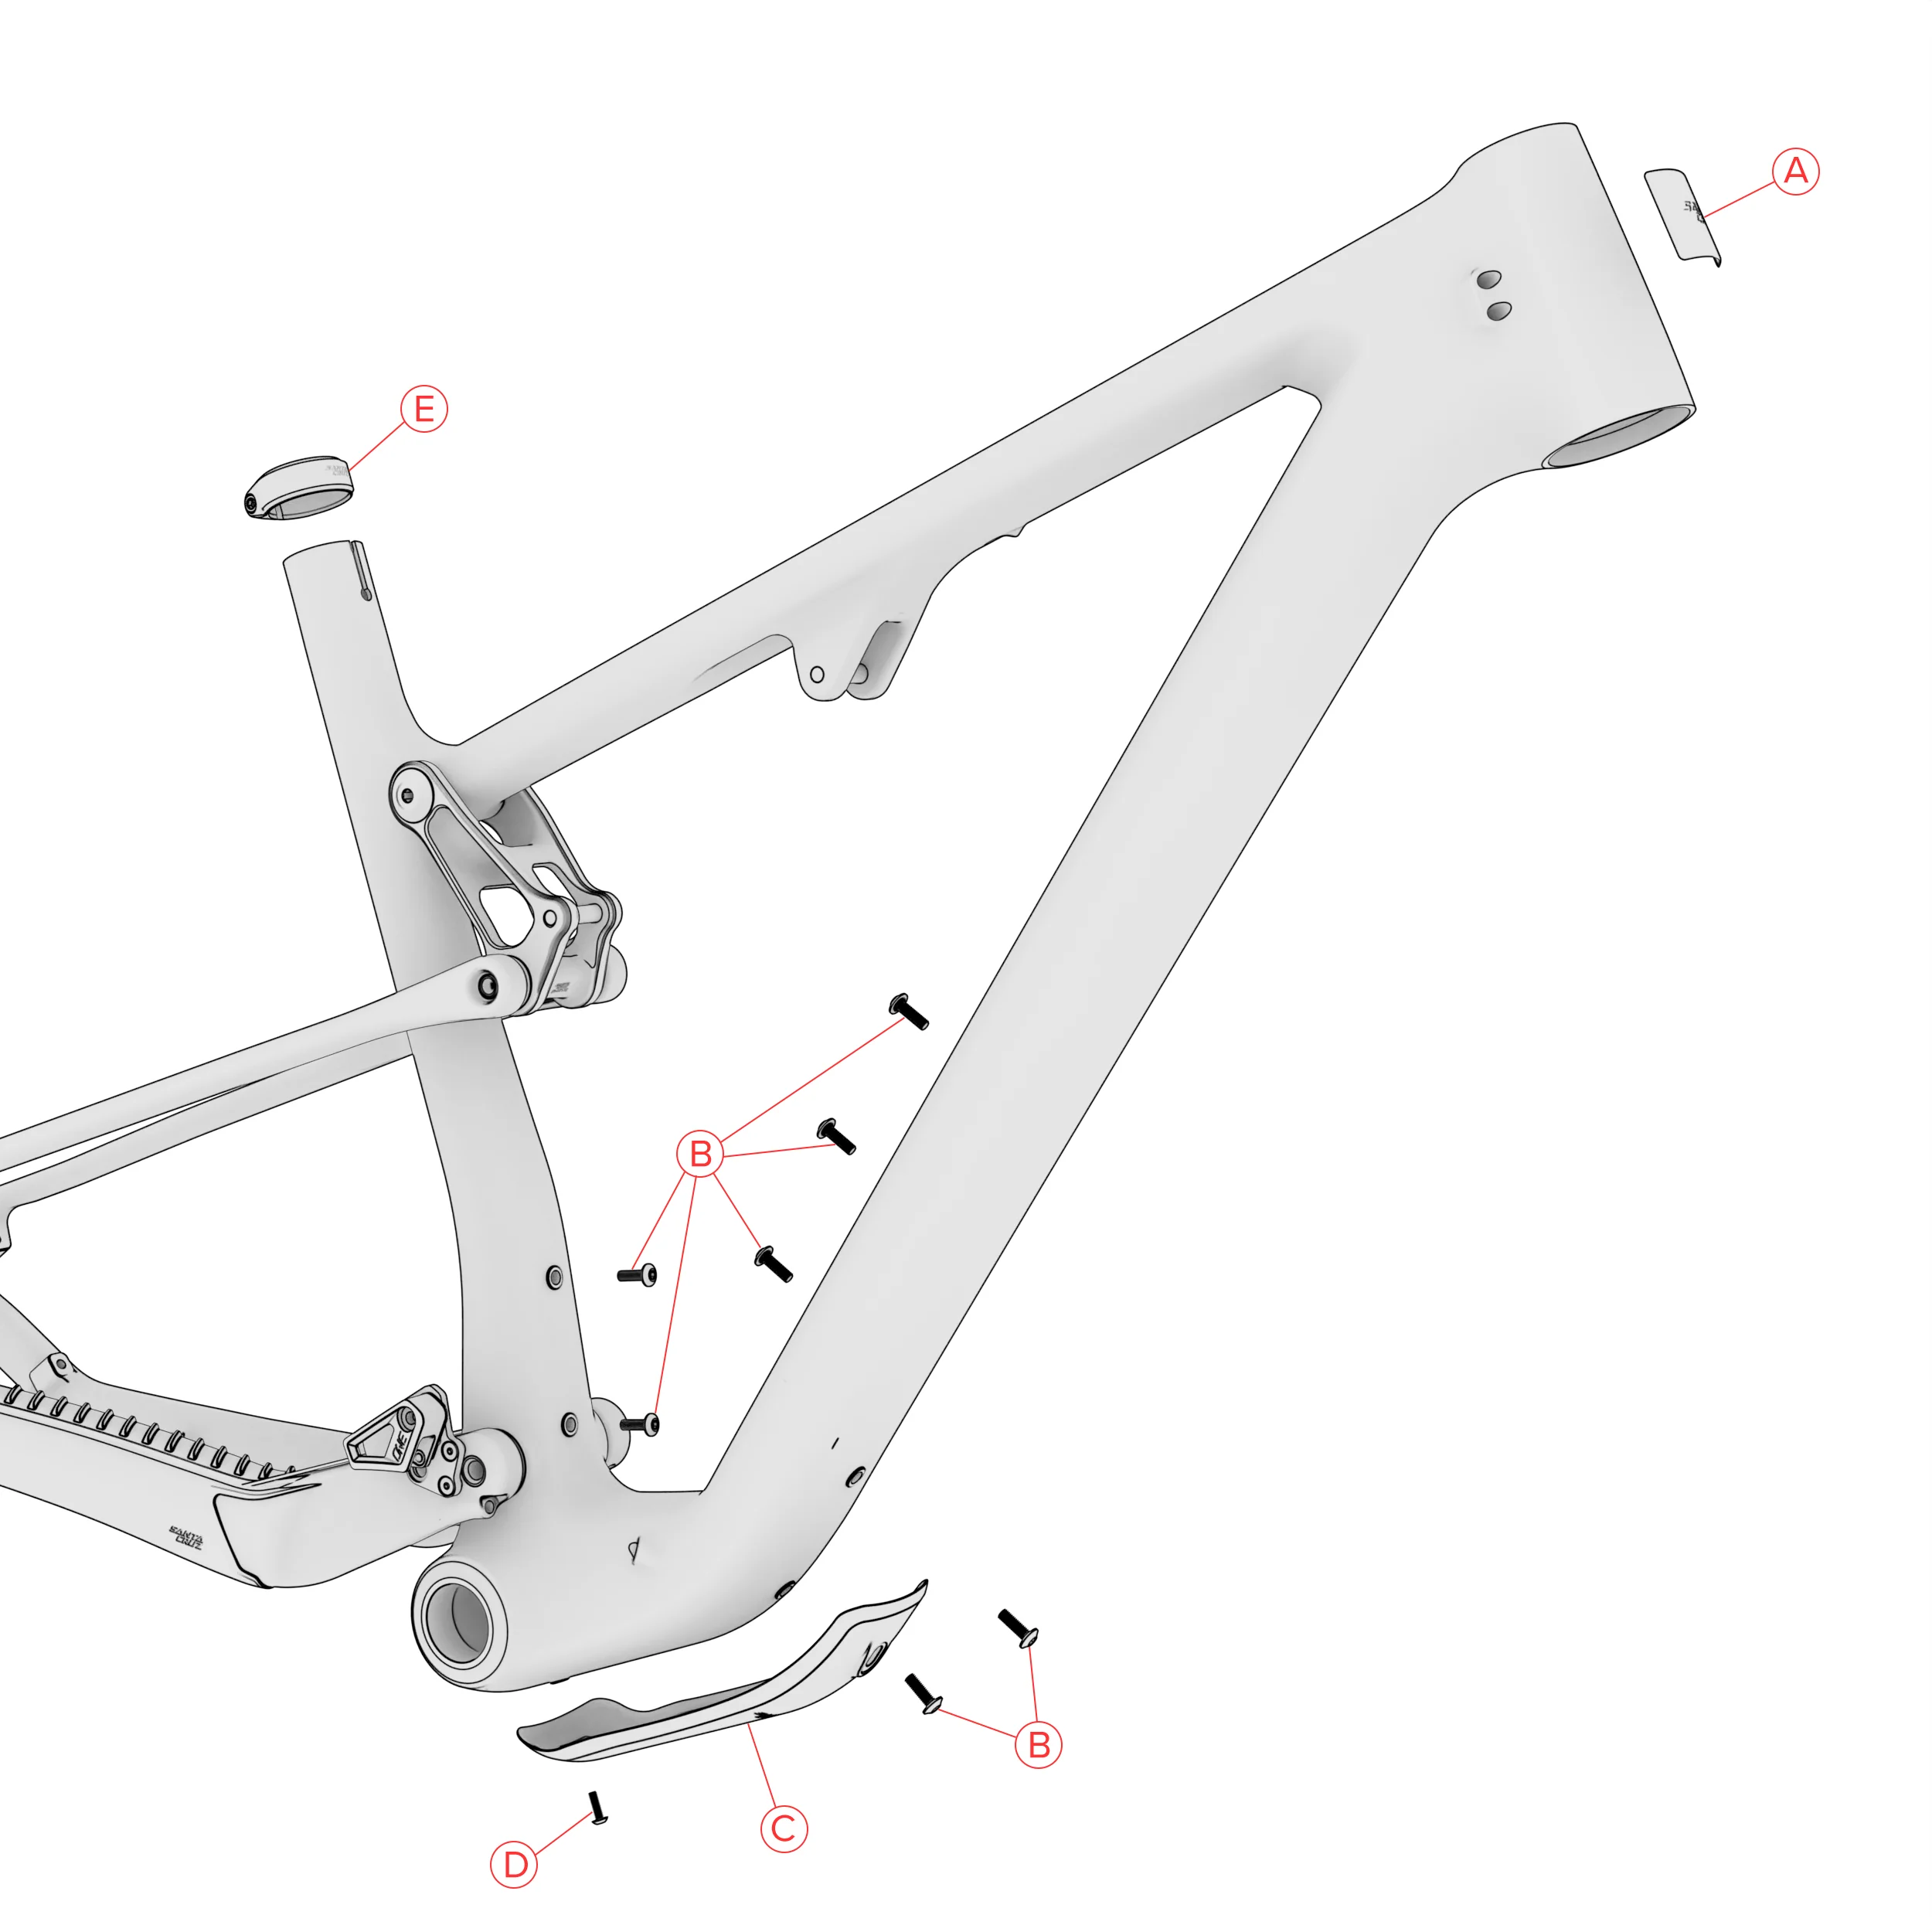
| label | part_number | quantity | name | blurb | torque |
|---|---|---|---|---|---|
| A | 67-19217 | 1 | Head Tube Badge | Clean frame surface, center on headtube | |
| B | 26-20124 | 7 | M5x16 Water Bottle screw | Apply grease to threads | |
| C | 30-22562 | 1 | Downtube Protector | ||
| D | 26-18382 | 1 | M4x12 BHC | Apply grease to treads | 0.65 Nm |
| E | 34-20201 | 1 | 36.4 Seat Collar |
Loading

Upper Link and Lower Pivot Hardware
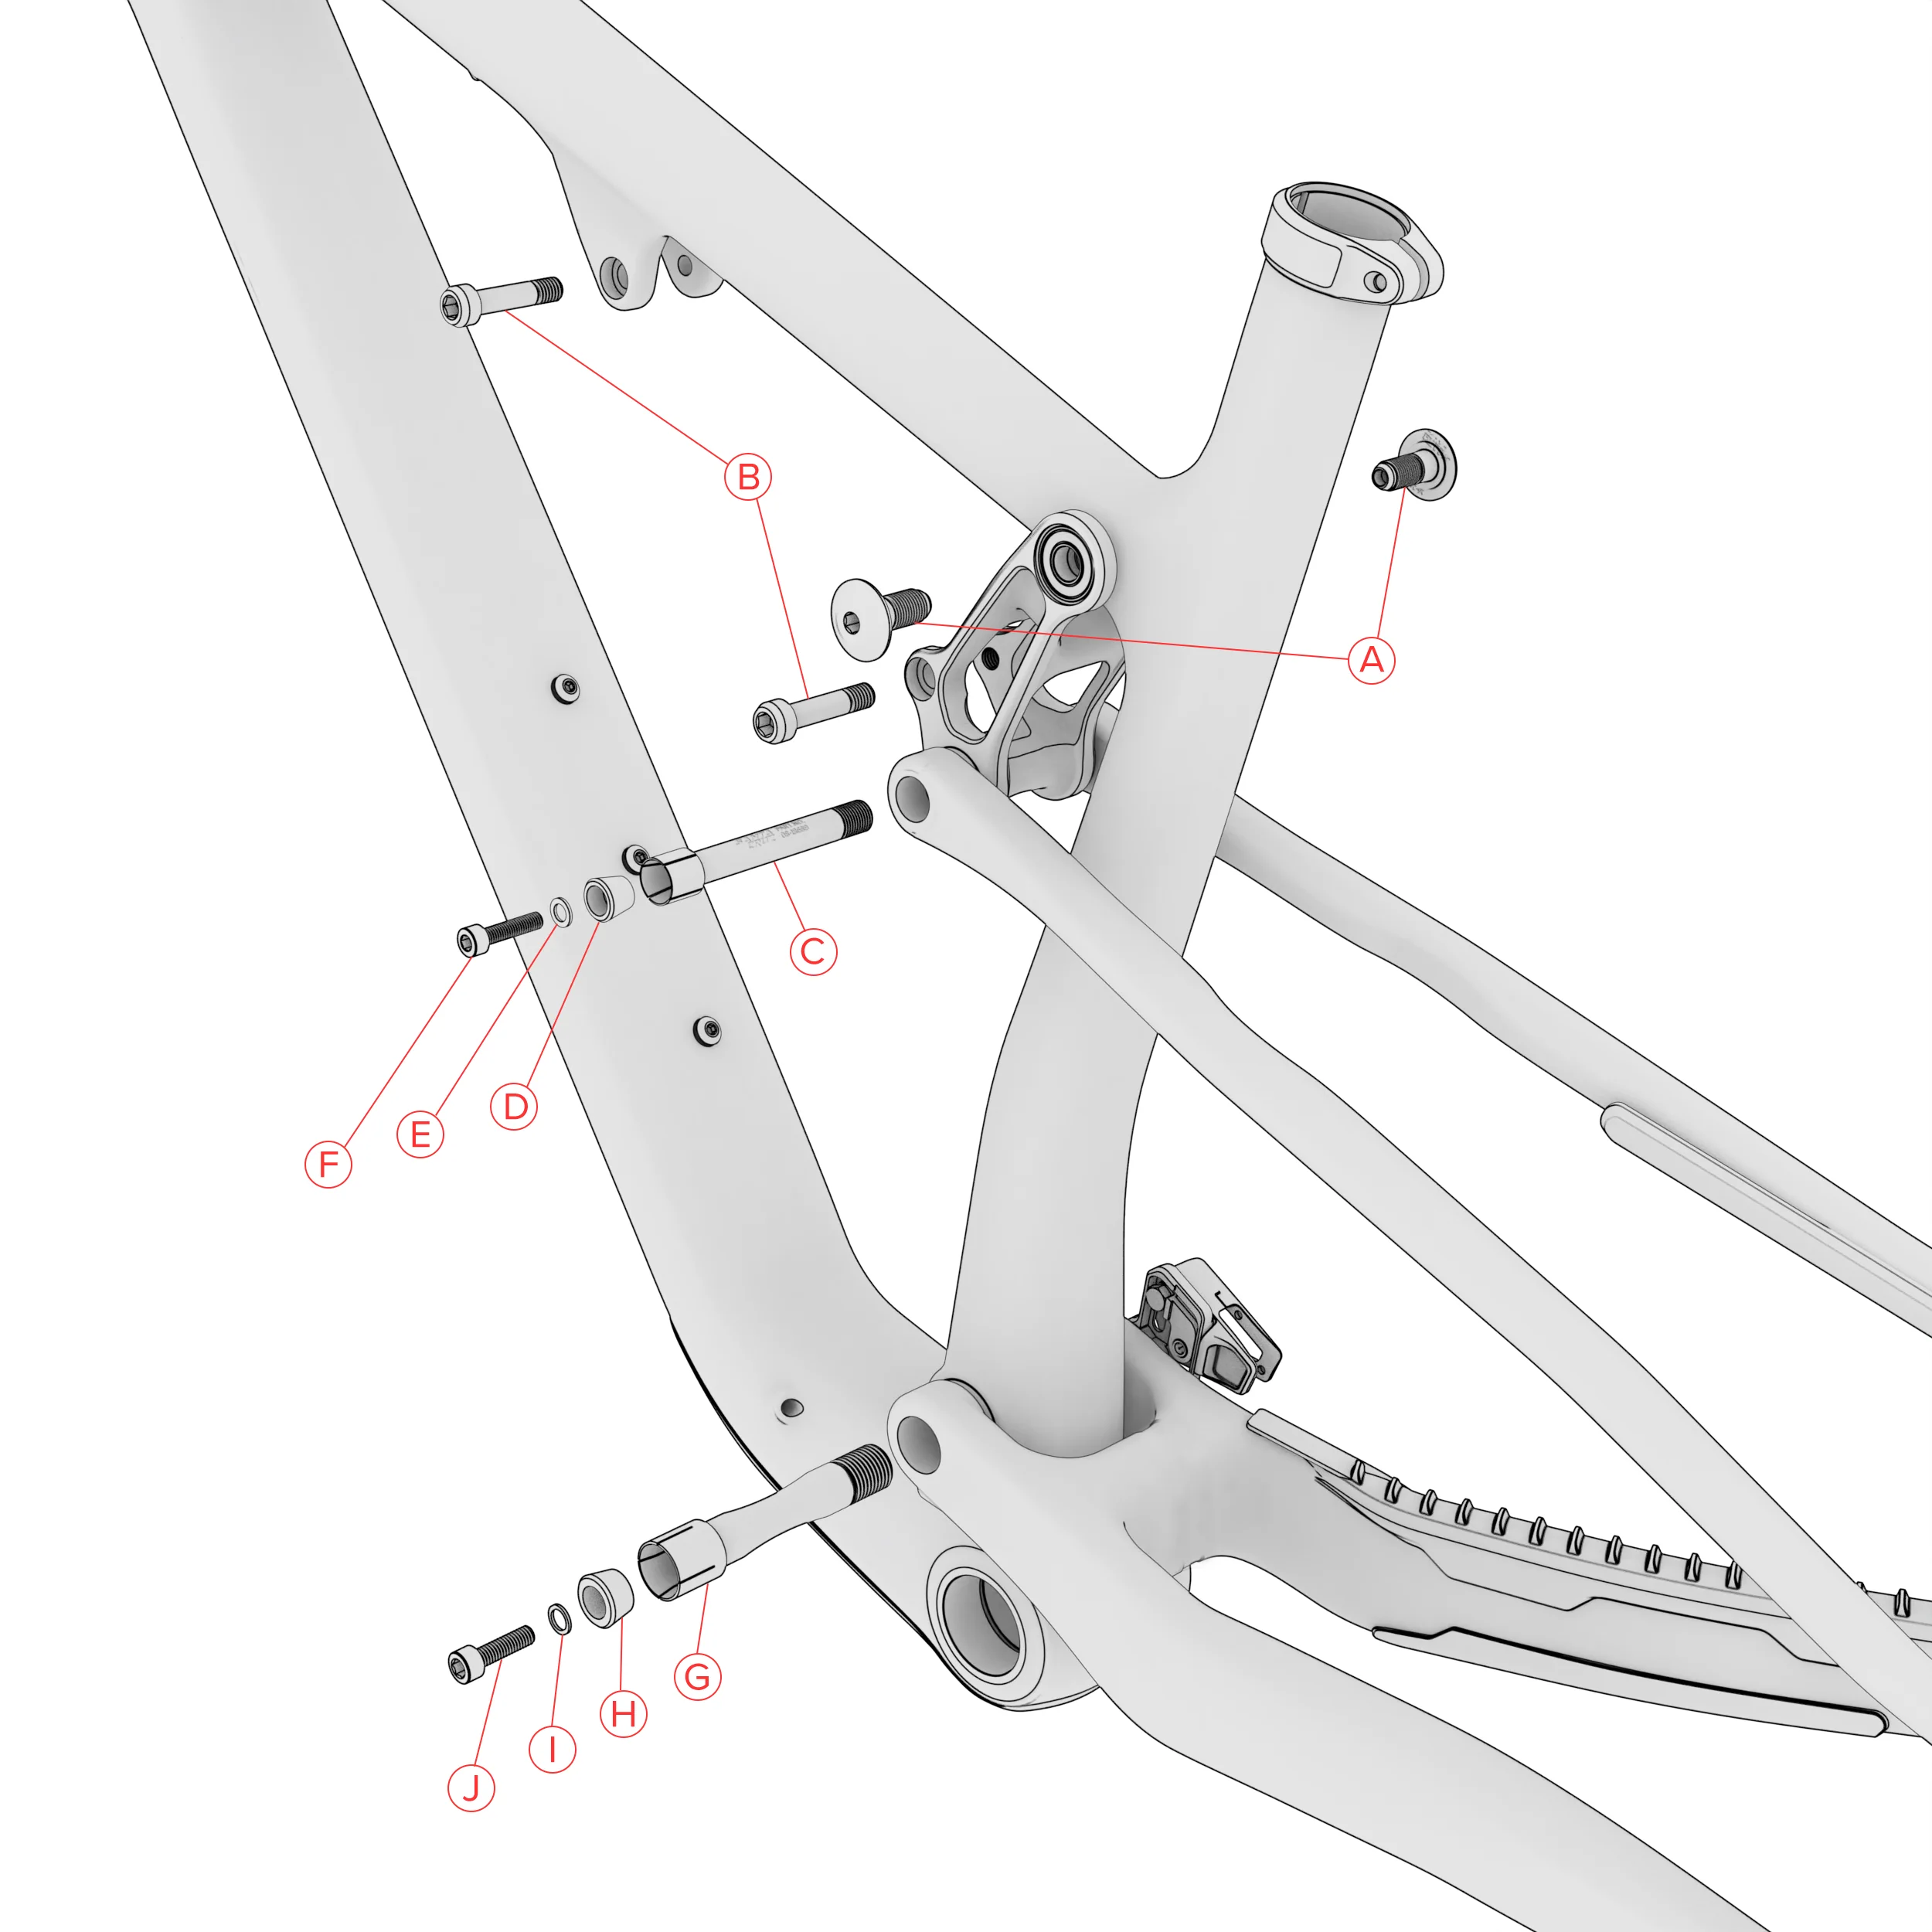
| label | part_number | quantity | torque | name | blurb |
|---|---|---|---|---|---|
| A | 26-20122 | 2 | 16 Nm | M10x23 Screw | Apply Loctite 242 to threads only, apply grease to shaft only |
| B | 26-22662 | 2 | 20 Nm | M8x35 Shock Bolt | Apply Loctite 242 to threads |
| C | 08-23720 | 1 | 13.6 Nm | Pivot Axle M10x81 | Apply Loctite 242 to threads only, apply grease to shaft only |
| D | 26-15632 | 1 | M5 Tapered Washer | Apply grease to surface | |
| E | 26-12652 | 1 | M5 Washer | ||
| F | 26-15946 | 1 | 5.6 Nm | M5x20 SHCS | Apply Loctite 242 to threads |
| G | 08-22530 | 1 | 20 Nm | Pivot axle M15x90.75 | Apply Loctite 242 to threads only, apply grease to shaft only |
| H | 26-15633 | 1 | M6 Tapered Washer | Apply grease to surface | |
| I | 26-11817 | 1 | M6 Washer | ||
| J | 26-15947 | 1 | 9 Nm | M6x20 SHCS | Apply Loctite 242 to threads |
Loading

Rear Axle, Chainstay Protector, Derailleur Hanger, and Chainguide
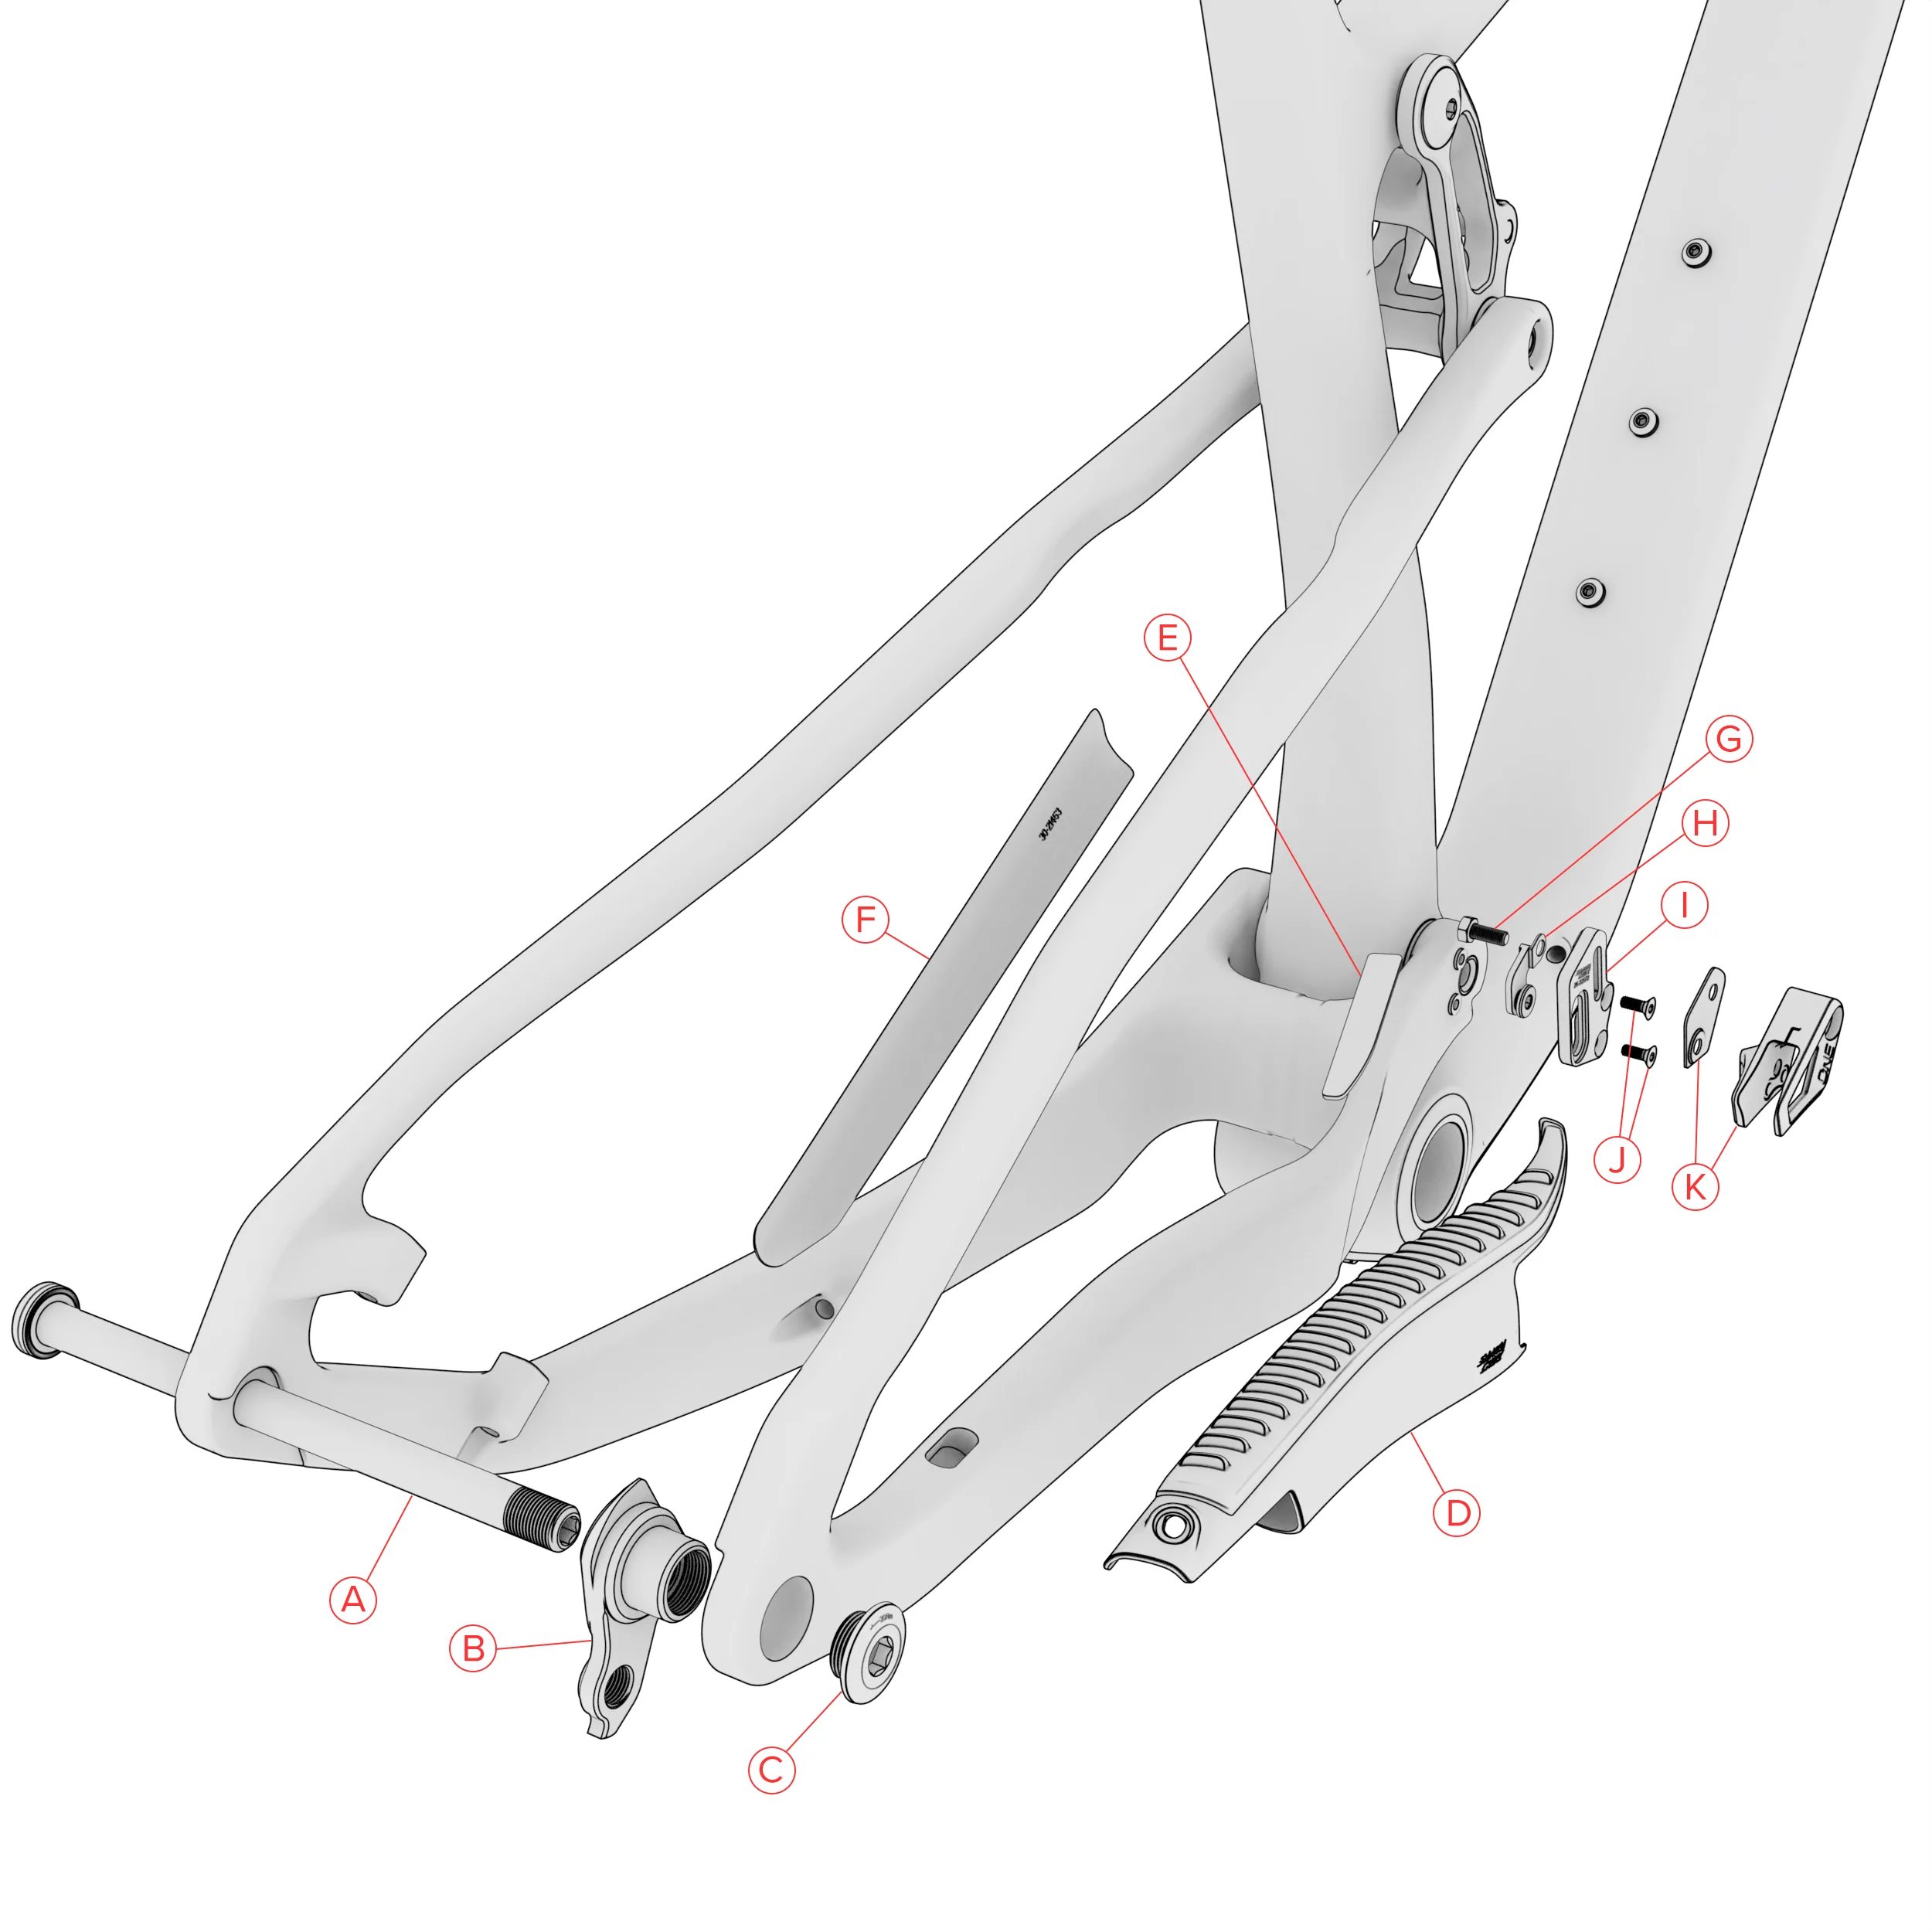
| label | part_number | quantity | name | blurb | torque |
|---|---|---|---|---|---|
| A | 08-22209 | 1 | Rear axle 12x173.7 | Apply grease to shaft and threads | |
| B | 23-23491 | 1 | SCB UDH | Interchangeable with Sram UDH | |
| C | 26-23492 | 1 | SCB UDH screw | Reverse thread | 20 Nm |
| D | 30-20189 | 1 | Chainstay Protector | ||
| E | 30-20189 | 1 | Chainstay Protector | ||
| F | 30-21453 | 1 | Seatstay Protector | ||
| G | 26-22570 | 1 | M5x12 HHS | Apply Loctite 242 to threads | 2 Nm |
| H | 26-22571 | 1 | OneUp chainguide back plate | ||
| I | 26-22572 | 1 | OneUp chainguide mount | ||
| J | 26-22938 | 2 | M4x10 FHCS | Apply Loctite 242 to threads | 0.65 Nm |
| K | 19-22609 | 1 | OneUp chainguide |
Loading

Lower Pivot Bearings
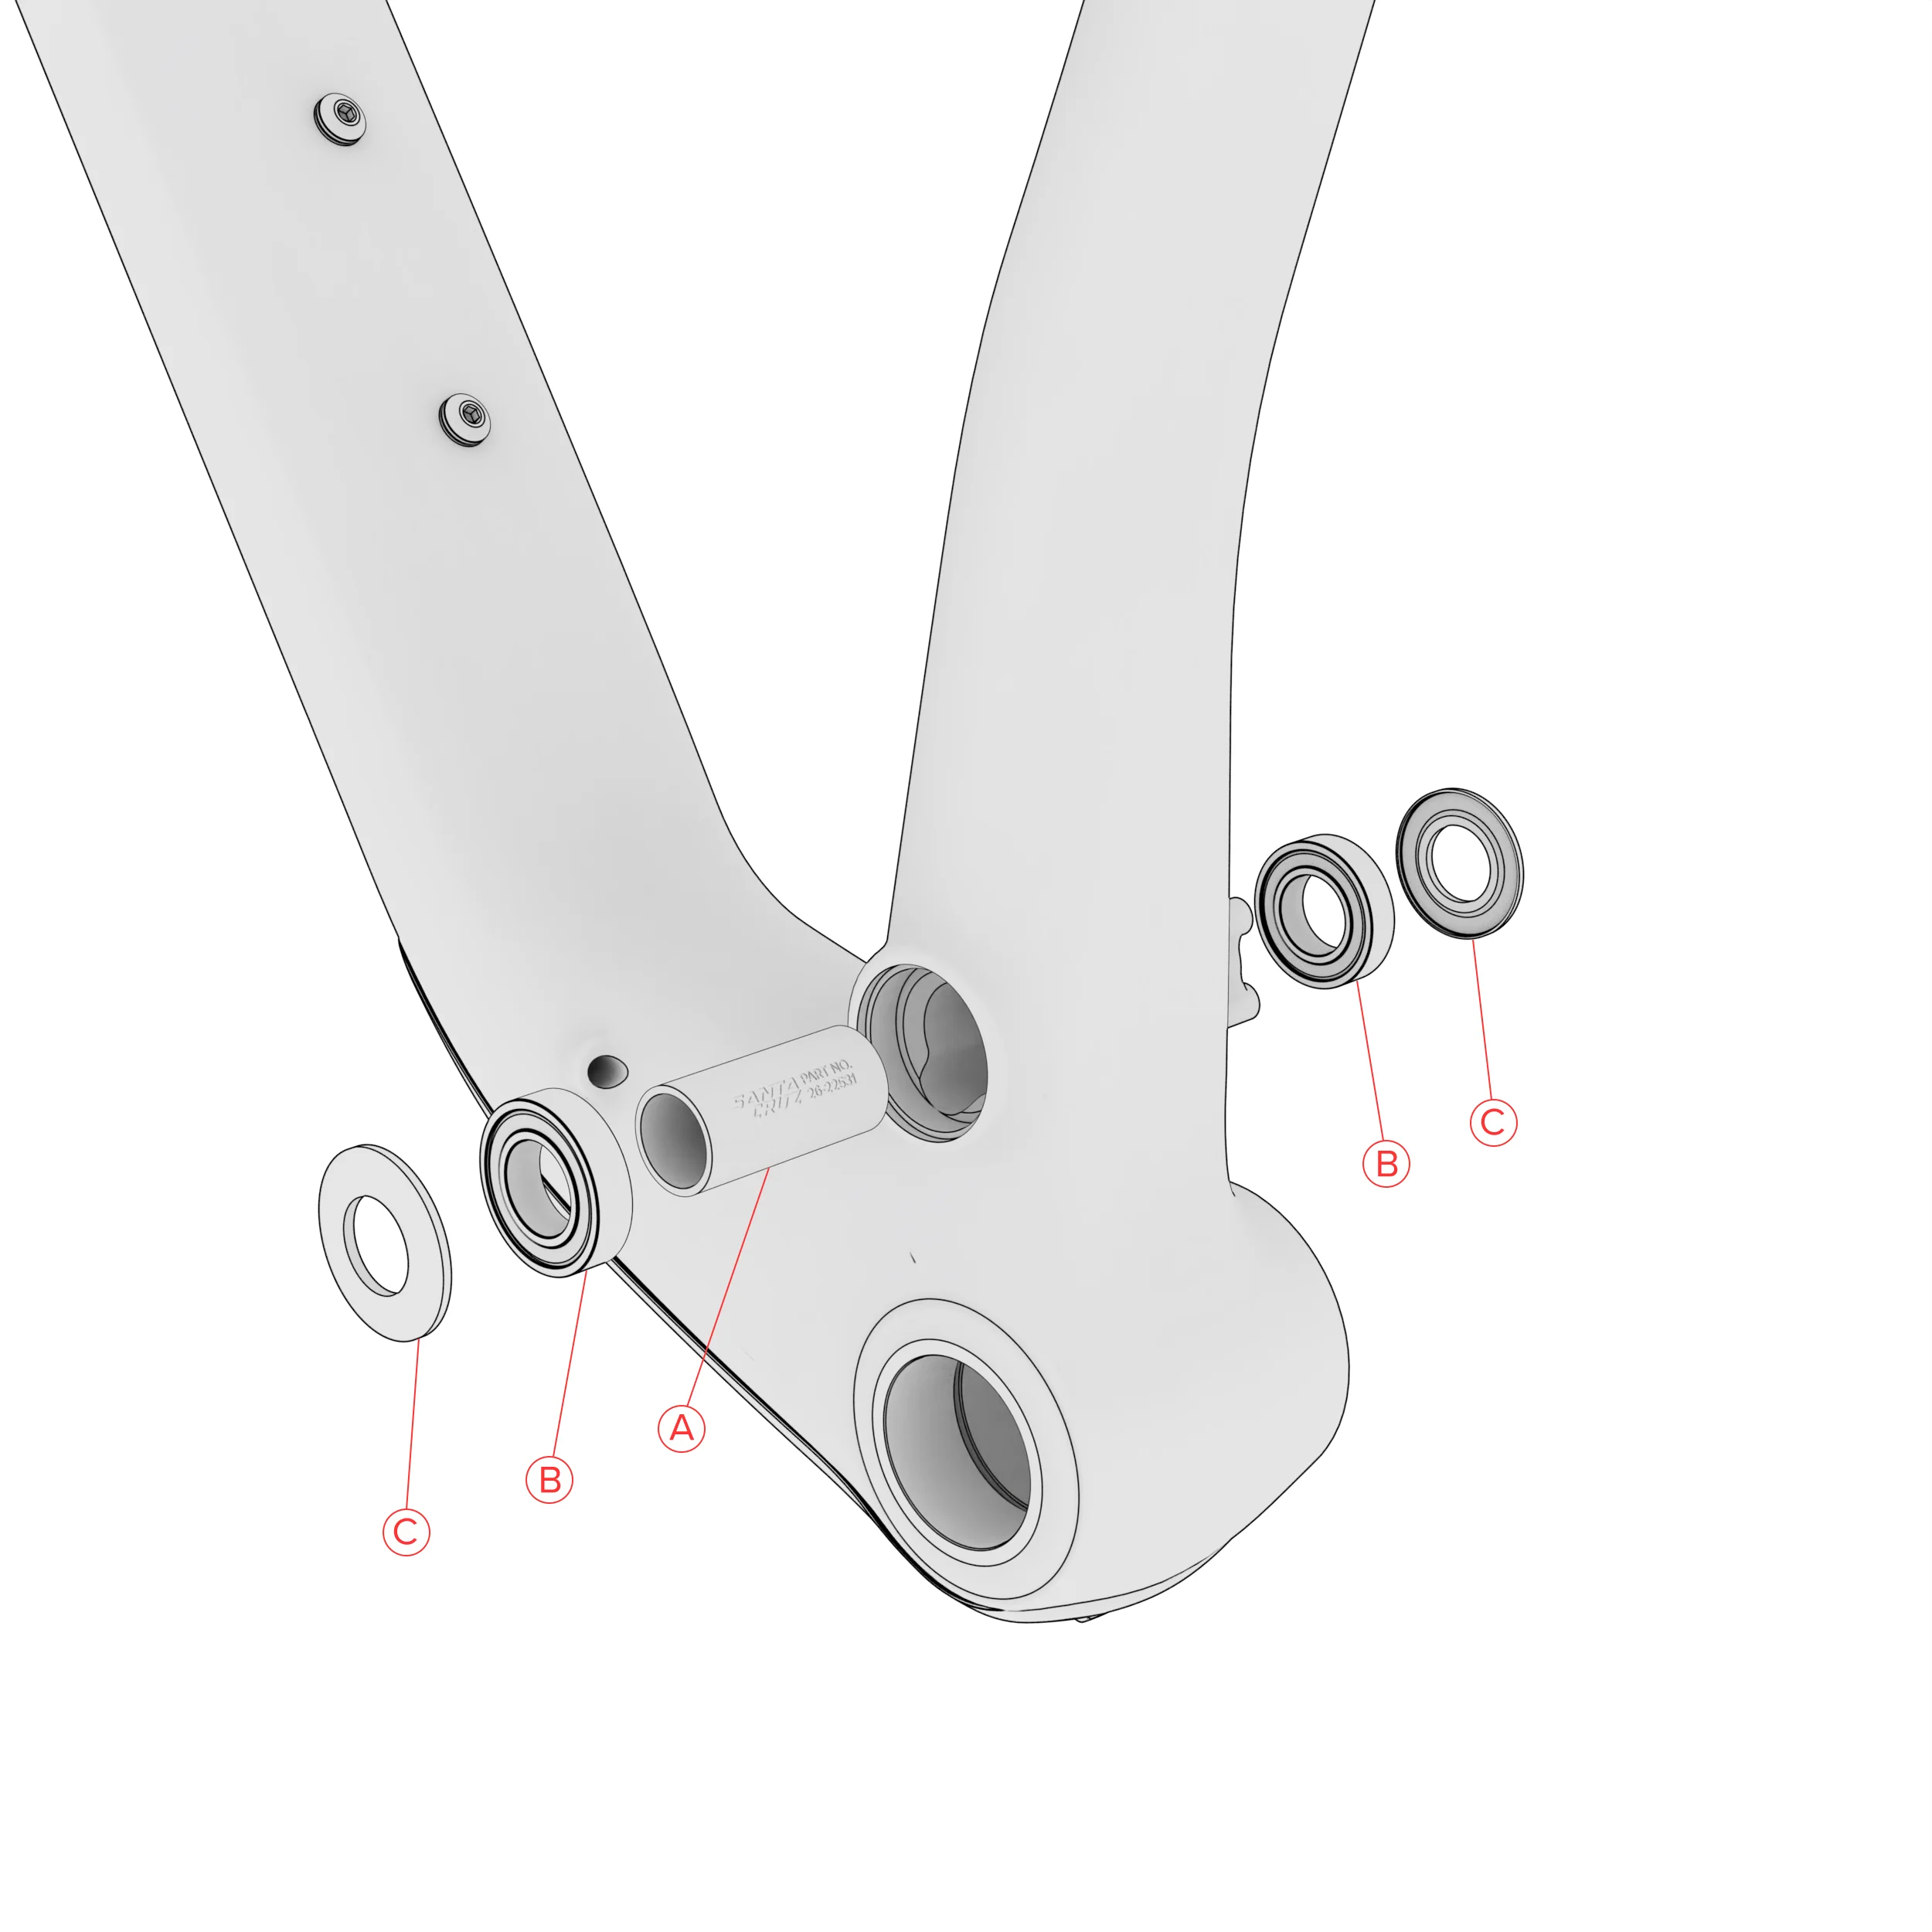
| label | part_number | quantity | name | blurb |
|---|---|---|---|---|
| A | 26-22531 | 1 | 15x38.25 Bearing spacer | |
| B | 11-12218 | 2 | 6902-2RS Max Bearing | |
| C | 26-11612 | 2 | Bearing Dust Shield | Apply grease to inner surface |
Loading

Upper Link
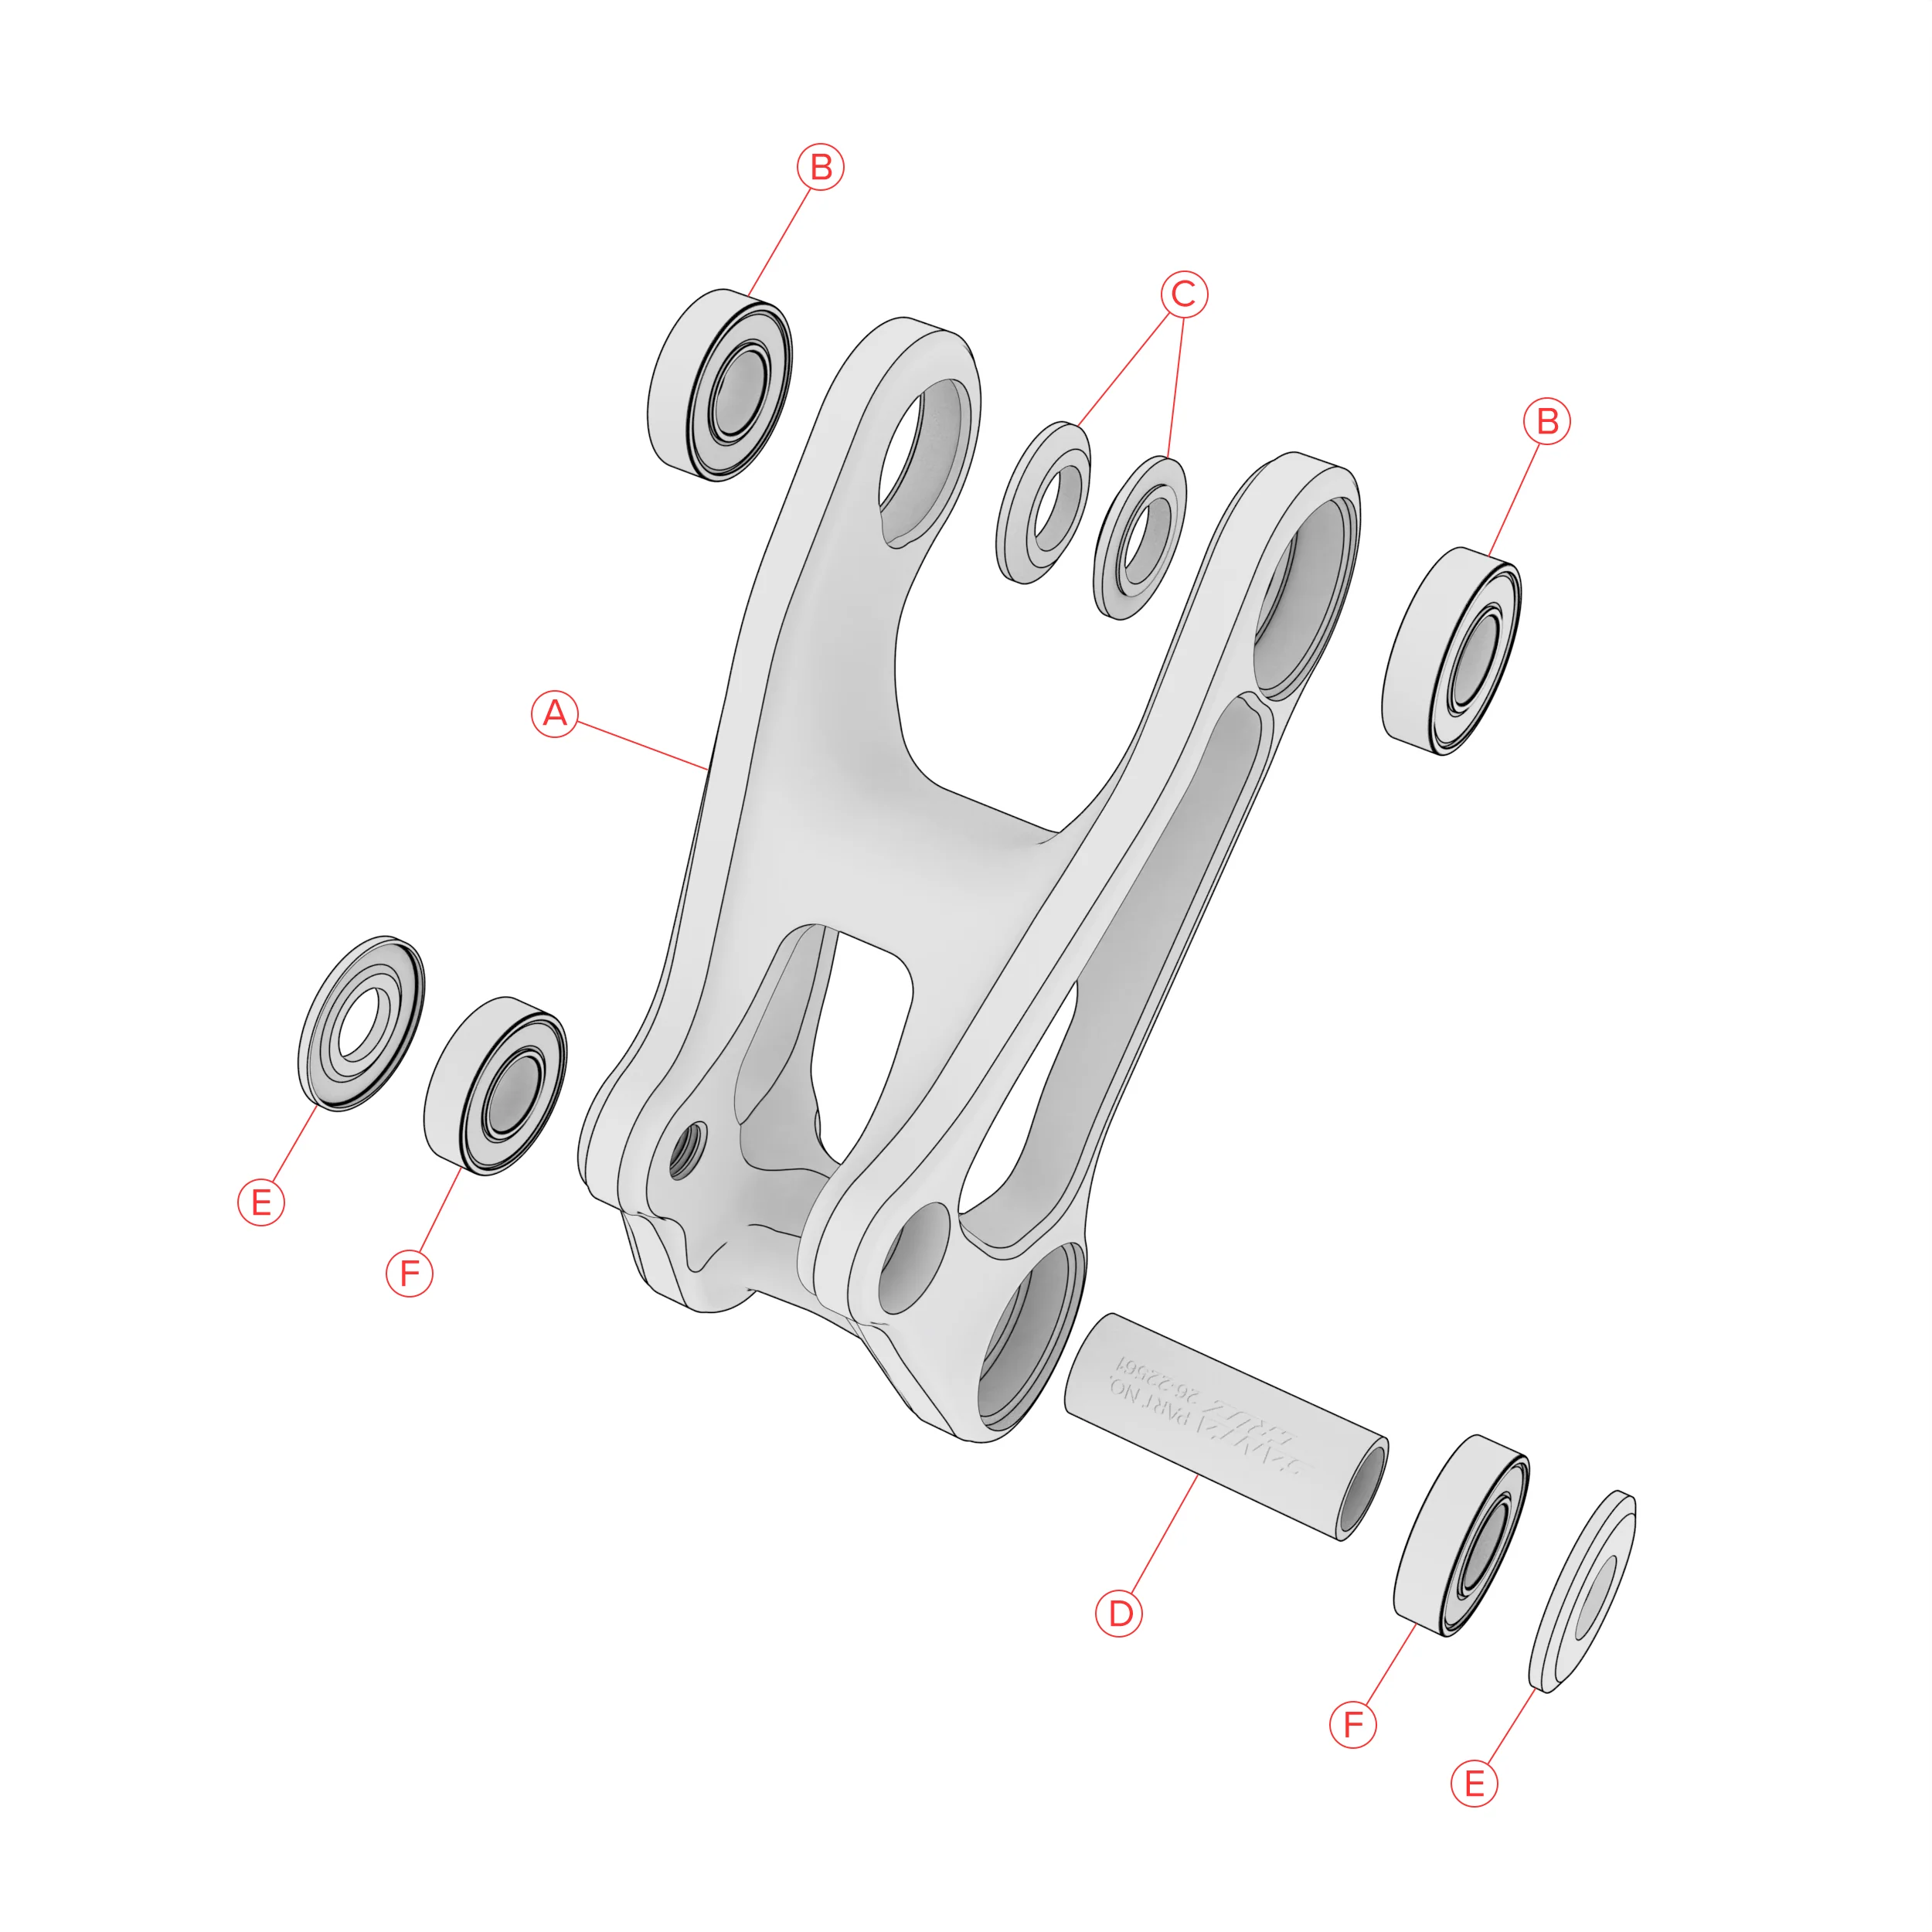
| label | part_number | quantity | name | blurb |
|---|---|---|---|---|
| A | 29-22532 | 1 | Upper Link | |
| B | 11-12681 | 2 | 6900-2RS Bearing | |
| C | 26-15533 | 2 | M10x3 Washer | Apply grease to inner surface |
| D | 26-22561 | 1 | 10x35.25 Bearing spacer | |
| E | 26-18690 | 2 | Bearing Dust Shield | Apply grease to inner surface |
| F | 11-12681 | 2 | 6900-2RS Bearing |
Loading

Manuals & Files
If you're looking for more information about your bike check our the Santa Cruz Bicycles Owner's Manual.