Blur


ARRIVAL OF THE FITTEST
We drew on everything we’ve learned from years of crafting the highest-quality carbon full-suspension bikes and added the super-efficient Superlight™ suspension to create a World Cup-winning XC race bike. While the Blur isn’t guaranteed to make you a race winner, being the lightest full-suspension carbon XC bike we’ve ever made might be the difference between contending for first place or just crossing the line.


A SUPERLIGHT™ FULL-SUSPENSION XC BIKE
Cross-country racing isn’t just a power lap around the park anymore. The courses are challenging, and the competition is fierce. Superlight™ provides traction to avoid wobbles while keeping overall weight down. By reducing the number of moving parts, bearings, and linkages, we saved 289g compared to the previous Blur.

A FAIR ADVANTAGE
Our priority with the Blur was to ensure that every kilojoule of a rider's energy is translated into forward thrust. That meant making something lightweight but also really efficient. This is the (super)lightest suspension we've ever made.


Blur XX AXS FA RSV
The future is now. Rockshox Flight Attendant electronically controlled suspension, the lightest CC carbon frame, full SRAM XX T-TYPE electronic drivetrain, plus legendary carbon Reserve wheels on DT Swiss 180 hubs.


Blur XX AXS Trail RSV
The future is now. The lightest CC carbon frame, full SRAM XX T-TYPE electronic drivetrain, plus legendary carbon Reserve wheels on DT Swiss 180 hubs.


Blur X0 AXS Trail RSV
Singletrack dominator. Lighter CC carbon frame, full SRAM X0 T-TYPE electronic drivetrain, top spec FOX suspension, 4-piston SRAM brakes, plus legendary carbon Reserve wheels on DT Swiss hubs.


Blur X0 AXS RSV
Record breaker. Lighter CC carbon frame, full SRAM X0 T-TYPE electronic drivetrain, top spec RockShox SID SL and SidLuxe suspension, 4-piston SRAM brakes, plus legendary carbon Reserve wheels on DT Swiss hubs.


Blur GX AXS Trail
Trail winner. Podium potential. Upgraded FOX suspension with more tuneability, full SRAM GX T-TYPE electronic drivetrain and SRAM 4-piston brakes.


Blur GX AXS
Podium potential. Upgraded RockShox suspension with more tuneability, full SRAM GX Eagle electronic Transmission and SRAM 4-piston brakes.


Blur 90 Trail
Big day ready trail-focused. Fast Maxxis Rekon Race tires, OneUp dropper post. FOX suspension, SRAM 90 T-Type cable-operated Transmission, and 4-piston SRAM brakes.


Blur 70 Trail
Base trail-focused model with fast Maxxis Rekon Race tires, 2-piston brakes, quality FOX Rhythm suspension, and SRAM 70 T-Type cable-operated Transmission.


Deals on Blur
Current OffersDesign Details


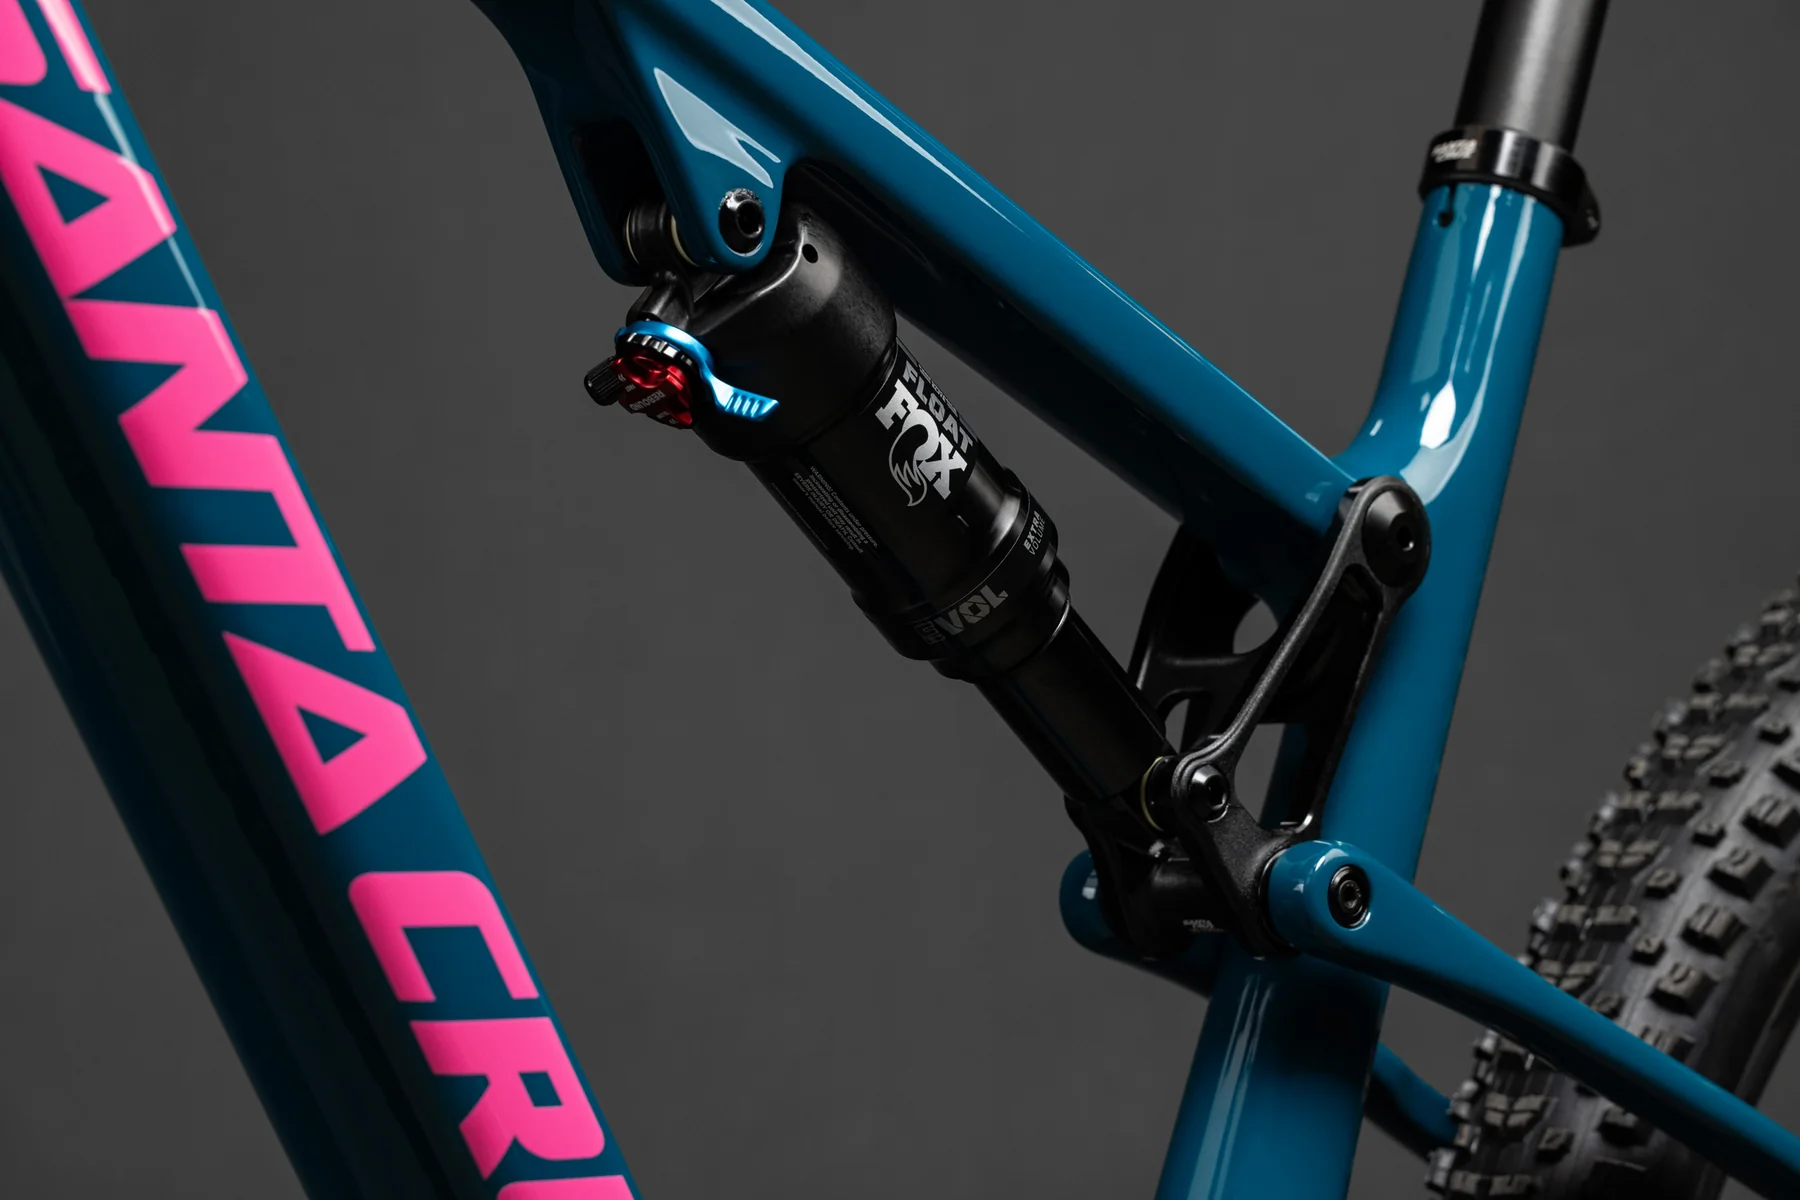
Superlight™ Suspension
Our lightest and most efficient suspension platform to date converts your watts into maximum thrust.

Carbon Mastery
Choose between our top-end, lightweight Carbon CC frame or the value-minded Carbon C frame. Both come with a lifetime warranty.

Two Water Bottles
Two bottle mounts within the front triangle provide enough juice (or whatever electrolytes you prefer) to keep the engine running. A third underneath for extreme thirst.

Blur Gallery


Blur
Sizing & Geometry
If you're on the cusp between the recommended height range of two sizes, the absolute best thing is to try to ride them both. At a minimum, check the stack/reach measurements on your current bike and compare it to the new model you are looking at to get an idea of a fit you are already comfortable with. If riding the bike is not an option, consider the following.
| S | M | L | XL | |
|---|---|---|---|---|
| Reach | 412 | 438 | 458 | 483 |
| Stack | 587 | 597 | 607 | 621 |
| Head tube angle | 67.1 | 67.1 | 67.1 | 67.1 |
| Head Tube Length | 90 | 100 | 110 | 125 |
| Seat Tube Angle | 75.1 | 75.0 | 74.9 | 74.8 |
| Seat Tube Length | 405 | 430 | 470 | 520 |
| Rear Center | 431 | 433 | 436 | 438 |
| Front Center | 695 | 724 | 747 | 778 |
| BB Height | 340 | 340 | 340 | 339 |
| BB Drop | 33 | 33 | 33 | 33 |
| Wheelbase | 1126 | 1157 | 1183 | 1216 |
| Top Tube Length | 568 | 597 | 621 | 652 |
| Standover Height | 744 | 746 | 745 | 750 |
Blur
Setup & Support
Whether you’re the proud owner of a Blur or are just digging deep into the details you’ll find it all here.

| Rider Weight (lbs) | Rider Weight (kgs) | Pressure (psi) | Sag | Rebound (from closed) |
|---|---|---|---|---|
| 100 | 45 | 95 | 28-30%, 12.5-13.5mm | 8 |
| 120 | 54 | 120 | 28-30%, 12.5-13.5mm | 7 |
| 140 | 64 | 140 | 28-30%, 12.5-13.5mm | 7 |
| 160 | 73 | 165 | 28-30%, 12.5-13.5mm | 6 |
| 180 | 82 | 190 | 28-30%, 12.5-13.5mm | 6 |
| 200 | 91 | 210 | 28-30%, 12.5-13.5mm | 6 |
| 220 | 100 | 235 | 28-30%, 12.5-13.5mm | 5 |
| 240 | 109 | 260 | 28-30%, 12.5-13.5mm | 5 |
| 260 | 118 | 280 | 28-30%, 12.5-13.5mm | 5 |
| Rider Weight (lbs) | Rider Weight (kgs) | Pressure (psi) | Rebound (from closed) |
|---|---|---|---|
| 100 | 45 | 40 | 12 |
| 120 | 54 | 52 | 11 |
| 140 | 64 | 63 | 10 |
| 160 | 73 | 75 | 8 |
| 180 | 82 | 87 | 7 |
| 200 | 91 | 98 | 6 |
| 220 | 100 | 110 | 5 |
| 240 | 109 | 122 | 3 |
| Rider Weight (lbs) | Rider Weight (kgs) | Pressure (psi) | Sag | Rebound (from closed) |
|---|---|---|---|---|
| 100 | 45 | 95 | 28-30%, 12.5-13.5mm | 8 |
| 120 | 54 | 120 | 28-30%, 12.5-13.5mm | 7 |
| 140 | 64 | 140 | 28-30%, 12.5-13.5mm | 7 |
| 160 | 73 | 165 | 28-30%, 12.5-13.5mm | 6 |
| 180 | 82 | 190 | 28-30%, 12.5-13.5mm | 6 |
| 200 | 91 | 210 | 28-30%, 12.5-13.5mm | 6 |
| 220 | 100 | 235 | 28-30%, 12.5-13.5mm | 5 |
| 240 | 109 | 260 | 28-30%, 12.5-13.5mm | 5 |
| 260 | 118 | 280 | 28-30%, 12.5-13.5mm | 5 |
| Rider Weight (lbs) | Rider Weight (kgs) | Pressure (psi) | Rebound (from closed) |
|---|---|---|---|
| 120 | 54 | 64 | 13 |
| 140 | 64 | 74 | 11 |
| 160 | 73 | 83 | 9 |
| 180 | 82 | 92 | 7 |
| 200 | 91 | 102 | 5 |
| 220 | 100 | 111 | 3 |
| 240 | 109 | 120 | 1 |
| Rider Weight (lbs) | Rider Weight (kgs) | Pressure (psi) | Sag | Rebound (from closed) |
|---|---|---|---|---|
| 100 | 45 | 95 | 28-30%, 12.5-13.5mm | 8 |
| 120 | 54 | 120 | 28-30%, 12.5-13.5mm | 7 |
| 140 | 64 | 140 | 28-30%, 12.5-13.5mm | 7 |
| 160 | 73 | 165 | 28-30%, 12.5-13.5mm | 6 |
| 180 | 82 | 190 | 28-30%, 12.5-13.5mm | 6 |
| 200 | 91 | 210 | 28-30%, 12.5-13.5mm | 6 |
| 220 | 100 | 235 | 28-30%, 12.5-13.5mm | 5 |
| 240 | 109 | 260 | 28-30%, 12.5-13.5mm | 5 |
| 260 | 118 | 280 | 28-30%, 12.5-13.5mm | 5 |
| Rider Weight (lbs) | Rider Weight (kgs) | Pressure (psi) | Rebound (from closed) |
|---|---|---|---|
| 100 | 45 | 49 | 15 |
| 120 | 54 | 58 | 13 |
| 140 | 64 | 68 | 11 |
| 160 | 73 | 77 | 9 |
| 180 | 82 | 86 | 7 |
| 200 | 91 | 96 | 5 |
| 220 | 100 | 105 | 3 |
| 240 | 109 | 114 | 1 |
| Rider Weight (lbs) | Rider Weight (kgs) | Pressure (psi) | Rebound (from closed) | Compression |
|---|---|---|---|---|
| 100 | 45 | 49 | 14 | 15 |
| 120 | 54 | 58 | 12 | 15 |
| 140 | 64 | 68 | 10 | 15 |
| 160 | 73 | 77 | 8 | 15 |
| 180 | 82 | 86 | 6 | 15 |
| 200 | 91 | 96 | 5 | 15 |
| 220 | 100 | 105 | 3 | 15 |
| 240 | 109 | 114 | 1 | 15 |
| Rider Weight (lbs) | Rider Weight (kgs) | Pressure (psi) | Sag | Rebound (from closed) |
|---|---|---|---|---|
| 100 | 45 | 95 | 28-30%, 12.5-13.5mm | 8 |
| 120 | 54 | 120 | 28-30%, 12.5-13.5mm | 7 |
| 140 | 64 | 140 | 28-30%, 12.5-13.5mm | 7 |
| 160 | 73 | 165 | 28-30%, 12.5-13.5mm | 6 |
| 180 | 82 | 190 | 28-30%, 12.5-13.5mm | 6 |
| 200 | 91 | 210 | 28-30%, 12.5-13.5mm | 6 |
| 220 | 100 | 235 | 28-30%, 12.5-13.5mm | 5 |
| 240 | 109 | 260 | 28-30%, 12.5-13.5mm | 5 |
| 260 | 118 | 280 | 28-30%, 12.5-13.5mm | 5 |
| Rider Weight (lbs) | Rider Weight (kgs) | Pressure (psi) | Sag | Rebound (from closed) |
|---|---|---|---|---|
| 100 | 45 | 105 | 28-30%, 11-12mm | 5 |
| 120 | 54 | 125 | 28-30%, 11-12mm | 5 |
| 140 | 64 | 150 | 28-30%, 11-12mm | 4 |
| 160 | 73 | 170 | 28-30%, 11-12mm | 4 |
| 180 | 82 | 195 | 28-30%, 11-12mm | 4 |
| 200 | 91 | 215 | 28-30%, 11-12mm | 3 |
| 220 | 100 | 240 | 28-30%, 11-12mm | 3 |
| 240 | 109 | 260 | 28-30%, 11-12mm | 3 |
| 260 | 118 | 285 | 28-30%, 11-12mm | 3 |
| Rider Weight (lbs) | Rider Weight (kgs) | Pressure (psi) | Rebound (from closed) |
|---|---|---|---|
| 100 | 45 | 40 | 12 |
| 120 | 54 | 52 | 11 |
| 140 | 64 | 63 | 10 |
| 160 | 73 | 75 | 8 |
| 180 | 82 | 87 | 7 |
| 200 | 91 | 98 | 6 |
| 220 | 100 | 110 | 5 |
| 240 | 109 | 122 | 3 |
| Rider Weight (lbs) | Rider Weight (kgs) | Pressure (psi) | Rebound (from closed) |
|---|---|---|---|
| 100 | 45 | 64 | 19 |
| 120 | 54 | 70 | 18 |
| 140 | 64 | 90 | 16 |
| 160 | 73 | 105 | 15 |
| 180 | 82 | 120 | 13 |
| 200 | 91 | 135 | 10 |
| 220 | 100 | 150 | 8 |
| 240 | 109 | 167 | 6 |
| 260 | 118 | 193 | 5 |
| Rider Weight (lbs) | Rider Weight (kgs) | Pressure (psi) | Sag | Rebound (from closed) |
|---|---|---|---|---|
| 100 | 45 | 105 | 28-30%, 11-12mm | 5 |
| 120 | 54 | 125 | 28-30%, 11-12mm | 5 |
| 140 | 64 | 150 | 28-30%, 11-12mm | 4 |
| 160 | 73 | 170 | 28-30%, 11-12mm | 4 |
| 180 | 82 | 195 | 28-30%, 11-12mm | 4 |
| 200 | 91 | 215 | 28-30%, 11-12mm | 3 |
| 220 | 100 | 240 | 28-30%, 11-12mm | 3 |
| 240 | 109 | 260 | 28-30%, 11-12mm | 3 |
| 260 | 118 | 285 | 28-30%, 11-12mm | 3 |
| Rider Weight (lbs) | Rider Weight (kgs) | Pressure (psi) | Sag | Rebound (from closed) |
|---|---|---|---|---|
| 100 | 45 | 95 | 28-30%, 12.5-13.5mm | 8 |
| 120 | 54 | 120 | 28-30%, 12.5-13.5mm | 7 |
| 140 | 64 | 140 | 28-30%, 12.5-13.5mm | 7 |
| 160 | 73 | 165 | 28-30%, 12.5-13.5mm | 6 |
| 180 | 82 | 190 | 28-30%, 12.5-13.5mm | 6 |
| 200 | 91 | 210 | 28-30%, 12.5-13.5mm | 6 |
| 220 | 100 | 235 | 28-30%, 12.5-13.5mm | 5 |
| 240 | 109 | 260 | 28-30%, 12.5-13.5mm | 5 |
| 260 | 118 | 280 | 28-30%, 12.5-13.5mm | 5 |
| Rider Weight (lbs) | Rider Weight (kgs) | Pressure (psi) | Rebound (from closed) |
|---|---|---|---|
| 100 | 45 | 49 | 15 |
| 120 | 54 | 58 | 13 |
| 140 | 64 | 68 | 11 |
| 160 | 73 | 77 | 9 |
| 180 | 82 | 86 | 7 |
| 200 | 91 | 96 | 5 |
| 220 | 100 | 105 | 3 |
| 240 | 109 | 114 | 1 |
| Rider Weight (lbs) | Rider Weight (kgs) | Pressure (psi) | Rebound (from closed) |
|---|---|---|---|
| 120 | 54 | 58 | 12 |
| 130 | 59 | 63 | 11 |
| 140 | 64 | 68 | 10 |
| 150 | 68 | 72 | 9 |
| 160 | 73 | 77 | 8 |
| 170 | 77 | 82 | 7 |
| 180 | 82 | 86 | 6 |
| 190 | 86 | 91 | 6 |
| 200 | 91 | 96 | 5 |
| 210 | 95 | 100 | 4 |
| 220 | 100 | 105 | 3 |
| 230 | 104 | 110 | 2 |
| Rider Weight (lbs) | Rider Weight (kgs) | Pressure (psi) | Sag | Rebound (from closed) |
|---|---|---|---|---|
| 100 | 45 | 95 | 28-30%, 12.5-13.5mm | 7 |
| 120 | 54 | 110 | 28-30%, 12.5-13.5mm | 6 |
| 140 | 64 | 125 | 28-30%, 12.5-13.5mm | 6 |
| 160 | 73 | 140 | 28-30%, 12.5-13.5mm | 5 |
| 180 | 82 | 155 | 28-30%, 12.5-13.5mm | 5 |
| 200 | 91 | 170 | 28-30%, 12.5-13.5mm | 4 |
| 220 | 100 | 190 | 28-30%, 12.5-13.5mm | 4 |
| 240 | 109 | 205 | 28-30%, 12.5-13.5mm | 3 |
| 260 | 118 | 225 | 28-30%, 12.5-13.5mm | 3 |
| Rider Weight (lbs) | Rider Weight (kgs) | Pressure (psi) | Sag | Rebound (from closed) |
|---|---|---|---|---|
| 100 | 45 | 105 | 28-30%, 11-12mm | 5 |
| 120 | 54 | 125 | 28-30%, 11-12mm | 5 |
| 140 | 64 | 150 | 28-30%, 11-12mm | 4 |
| 160 | 73 | 170 | 28-30%, 11-12mm | 4 |
| 180 | 82 | 195 | 28-30%, 11-12mm | 4 |
| 200 | 91 | 215 | 28-30%, 11-12mm | 3 |
| 220 | 100 | 240 | 28-30%, 11-12mm | 3 |
| 240 | 109 | 260 | 28-30%, 11-12mm | 3 |
| 260 | 118 | 285 | 28-30%, 11-12mm | 3 |
| Rider Weight (lbs) | Rider Weight (kgs) | Pressure (psi) | Rebound (from closed) |
|---|---|---|---|
| 100 | 45 | 40 | 12 |
| 120 | 54 | 52 | 11 |
| 140 | 64 | 63 | 10 |
| 160 | 73 | 75 | 8 |
| 180 | 82 | 87 | 7 |
| 200 | 91 | 98 | 6 |
| 220 | 100 | 110 | 5 |
| 240 | 109 | 122 | 3 |
| Rider Weight (lbs) | Rider Weight (kgs) | Pressure (psi) | Rebound (from closed) |
|---|---|---|---|
| 100 | 45 | 64 | 19 |
| 120 | 54 | 70 | 18 |
| 140 | 64 | 90 | 16 |
| 160 | 73 | 105 | 15 |
| 180 | 82 | 120 | 13 |
| 200 | 91 | 135 | 10 |
| 220 | 100 | 150 | 8 |
| 240 | 109 | 167 | 6 |
| 260 | 118 | 193 | 5 |
| Rider Weight (lbs) | Rider Weight (kgs) | Pressure (psi) | Sag | Rebound (from closed) |
|---|---|---|---|---|
| 100 | 45 | 105 | 28-30%, 11-12mm | 5 |
| 120 | 54 | 125 | 28-30%, 11-12mm | 5 |
| 140 | 64 | 150 | 28-30%, 11-12mm | 4 |
| 160 | 73 | 170 | 28-30%, 11-12mm | 4 |
| 180 | 82 | 195 | 28-30%, 11-12mm | 4 |
| 200 | 91 | 215 | 28-30%, 11-12mm | 3 |
| 220 | 100 | 240 | 28-30%, 11-12mm | 3 |
| 240 | 109 | 260 | 28-30%, 11-12mm | 3 |
| 260 | 118 | 285 | 28-30%, 11-12mm | 3 |
| Rider Weight (lbs) | Rider Weight (kgs) | Pressure (psi) | Sag | Rebound (from closed) |
|---|---|---|---|---|
| 100 | 45 | 105 | 28-30%, 11-12mm | 5 |
| 120 | 54 | 125 | 28-30%, 11-12mm | 5 |
| 140 | 64 | 150 | 28-30%, 11-12mm | 4 |
| 160 | 73 | 170 | 28-30%, 11-12mm | 4 |
| 180 | 82 | 195 | 28-30%, 11-12mm | 4 |
| 200 | 91 | 215 | 28-30%, 11-12mm | 3 |
| 220 | 100 | 240 | 28-30%, 11-12mm | 3 |
| 240 | 109 | 260 | 28-30%, 11-12mm | 3 |
| 260 | 118 | 285 | 28-30%, 11-12mm | 3 |
| Rider Weight (lbs) | Rider Weight (kgs) | Pressure (psi) | Rebound (from closed) |
|---|---|---|---|
| 100 | 45 | 40 | 12 |
| 120 | 54 | 52 | 11 |
| 140 | 64 | 63 | 10 |
| 160 | 73 | 75 | 8 |
| 180 | 82 | 87 | 7 |
| 200 | 91 | 98 | 6 |
| 220 | 100 | 110 | 5 |
| 240 | 109 | 122 | 3 |
| Rider Weight (lbs) | Rider Weight (kgs) | Pressure (psi) | Sag | Rebound (from closed) |
|---|---|---|---|---|
| 100 | 45 | 95 | 28-30%, 12.5-13.5mm | 8 |
| 120 | 54 | 120 | 28-30%, 12.5-13.5mm | 7 |
| 140 | 64 | 140 | 28-30%, 12.5-13.5mm | 7 |
| 160 | 73 | 165 | 28-30%, 12.5-13.5mm | 6 |
| 180 | 82 | 190 | 28-30%, 12.5-13.5mm | 6 |
| 200 | 91 | 210 | 28-30%, 12.5-13.5mm | 6 |
| 220 | 100 | 235 | 28-30%, 12.5-13.5mm | 5 |
| 240 | 109 | 260 | 28-30%, 12.5-13.5mm | 5 |
| 260 | 118 | 280 | 28-30%, 12.5-13.5mm | 5 |
| Rider Weight (lbs) | Rider Weight (kgs) | Pressure (psi) | Rebound (from closed) |
|---|---|---|---|
| 100 | 45 | 49 | 15 |
| 120 | 54 | 58 | 13 |
| 140 | 64 | 68 | 11 |
| 160 | 73 | 77 | 9 |
| 180 | 82 | 86 | 7 |
| 200 | 91 | 96 | 5 |
| 220 | 100 | 105 | 3 |
| 240 | 109 | 114 | 1 |
| Rider Weight (lbs) | Rider Weight (kgs) | Pressure (psi) | Rebound (from closed) | Compression |
|---|---|---|---|---|
| 100 | 45 | 49 | 14 | 15 |
| 120 | 54 | 58 | 12 | 15 |
| 140 | 64 | 68 | 10 | 15 |
| 160 | 73 | 77 | 8 | 15 |
| 180 | 82 | 86 | 6 | 15 |
| 200 | 91 | 96 | 5 | 15 |
| 220 | 100 | 105 | 3 | 15 |
| 240 | 109 | 114 | 1 | 15 |
| Rider Weight (lbs) | Rider Weight (kgs) | Pressure (psi) | Sag | Rebound (from closed) |
|---|---|---|---|---|
| 100 | 45 | 95 | 28-30%, 12.5-13.5mm | 8 |
| 120 | 54 | 120 | 28-30%, 12.5-13.5mm | 7 |
| 140 | 64 | 140 | 28-30%, 12.5-13.5mm | 7 |
| 160 | 73 | 165 | 28-30%, 12.5-13.5mm | 6 |
| 180 | 82 | 190 | 28-30%, 12.5-13.5mm | 6 |
| 200 | 91 | 210 | 28-30%, 12.5-13.5mm | 6 |
| 220 | 100 | 235 | 28-30%, 12.5-13.5mm | 5 |
| 240 | 109 | 260 | 28-30%, 12.5-13.5mm | 5 |
| 260 | 118 | 280 | 28-30%, 12.5-13.5mm | 5 |
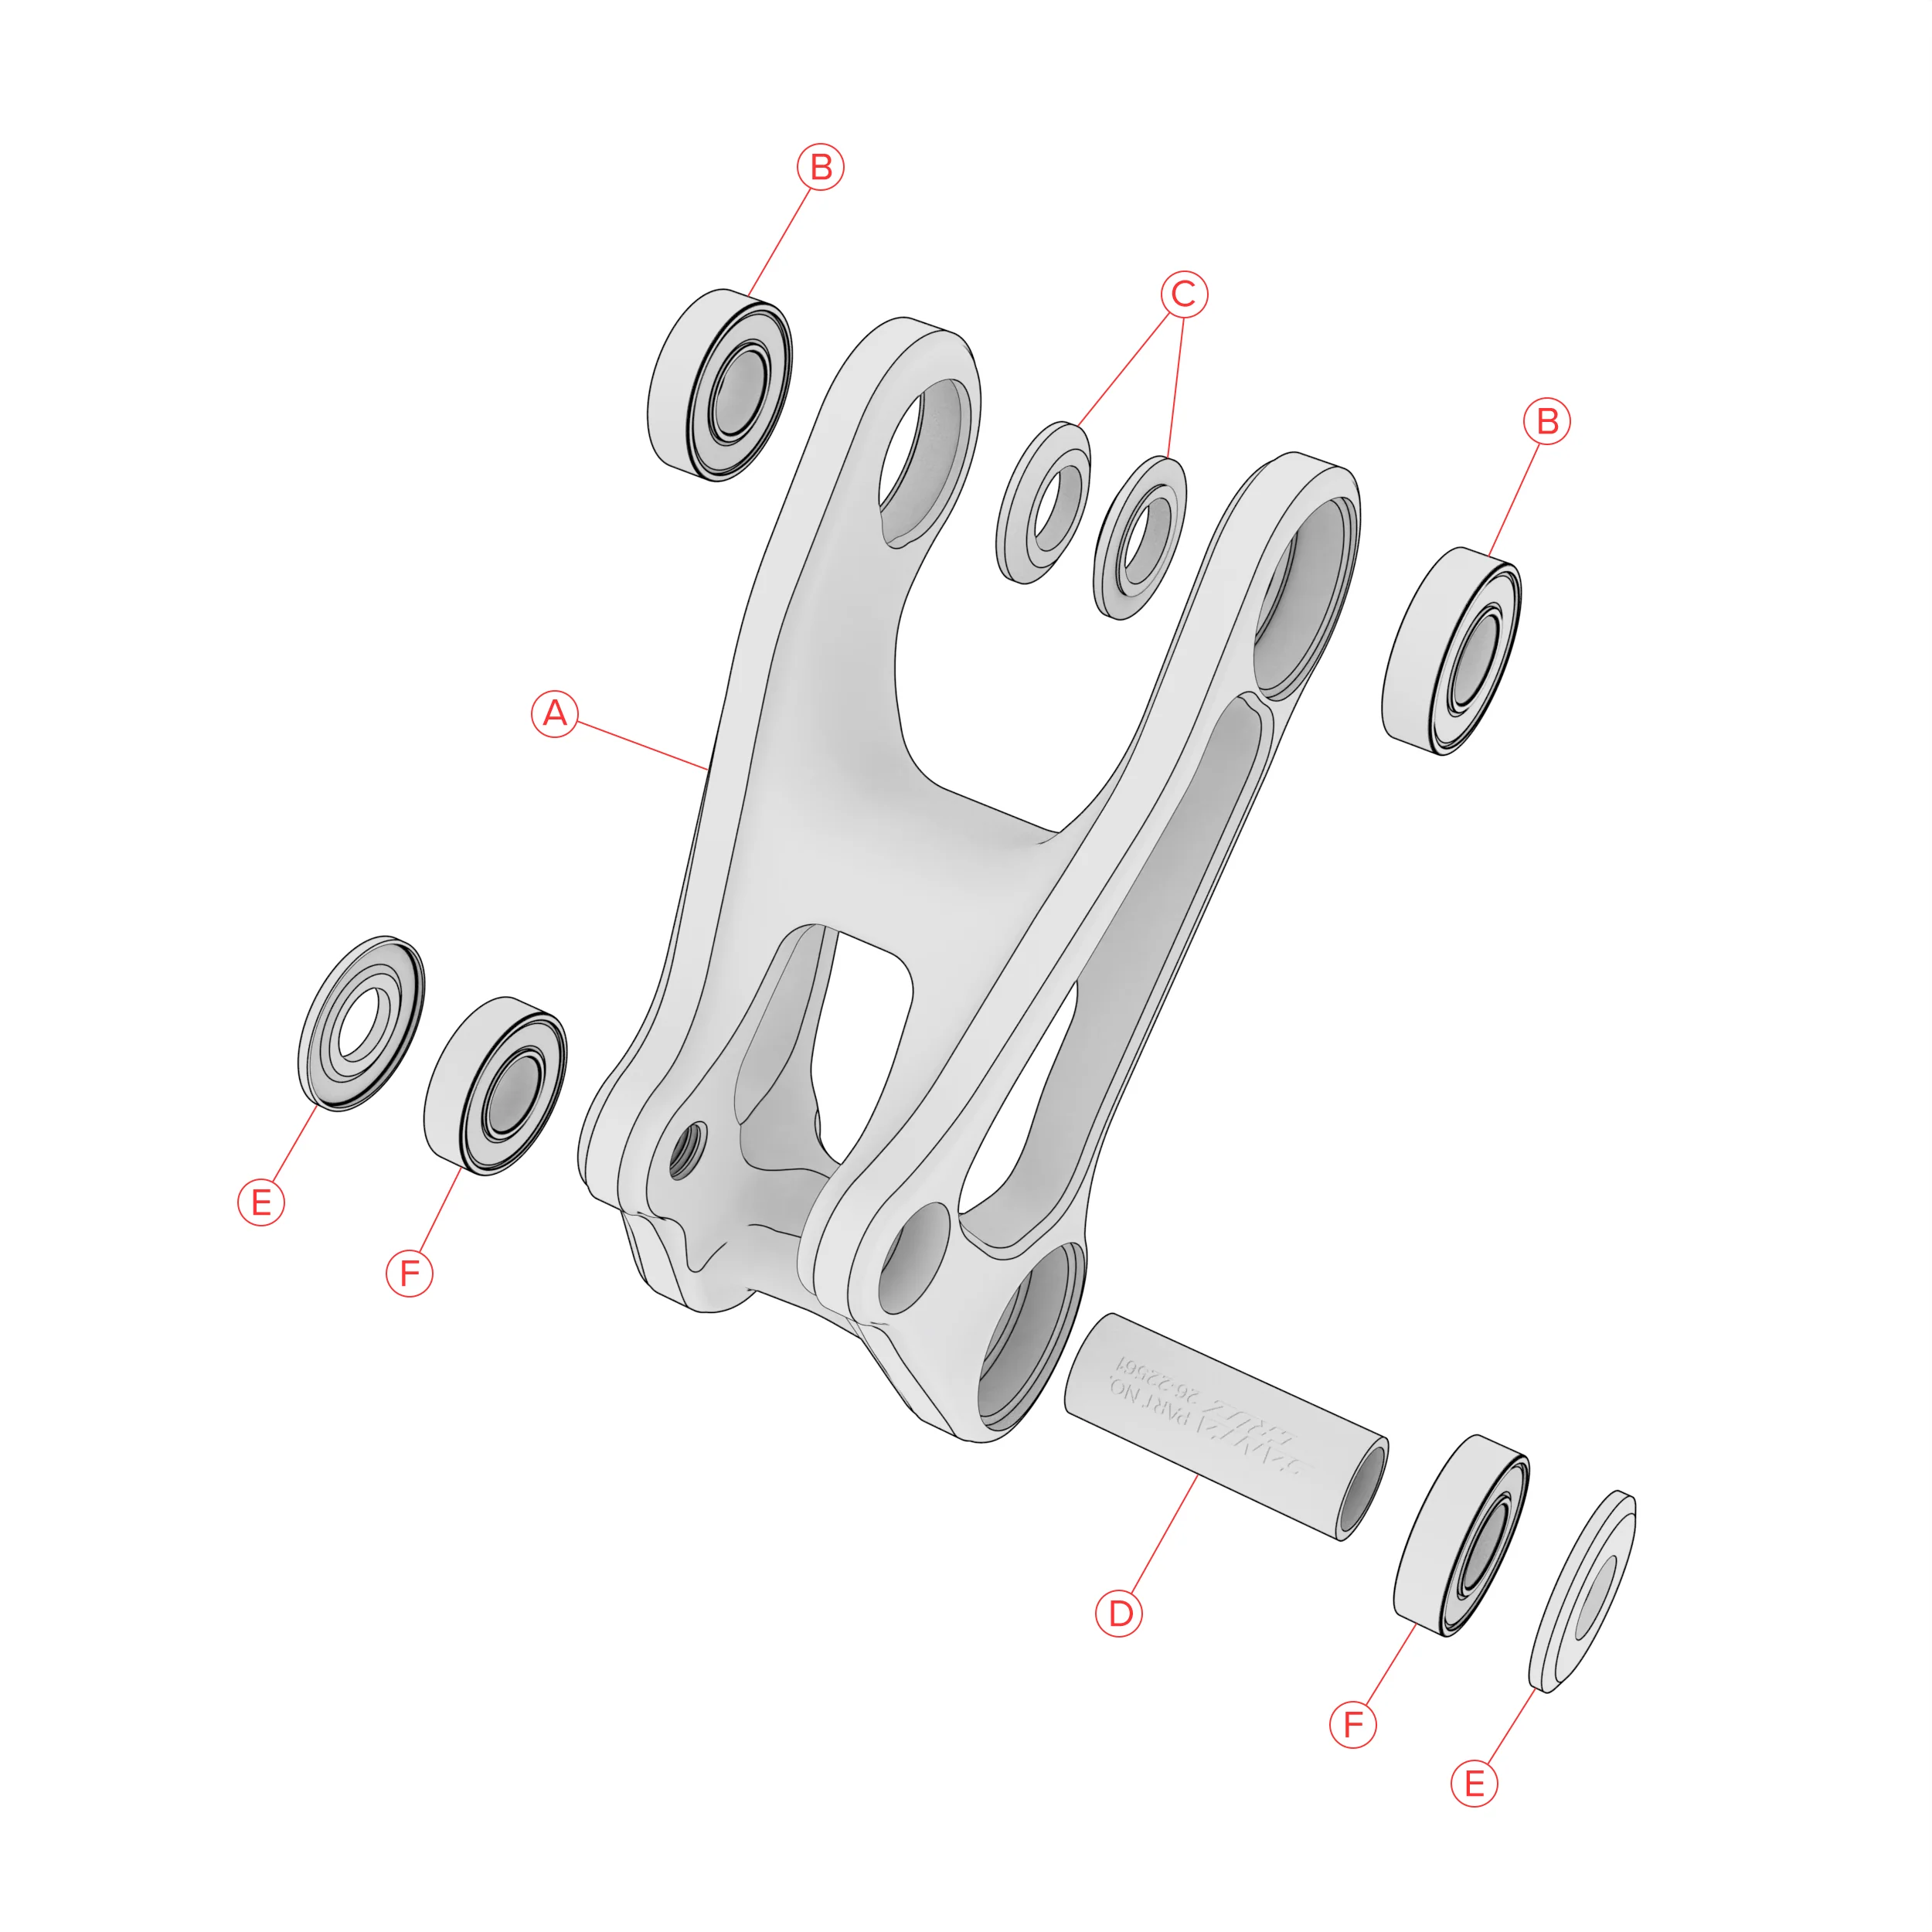
| label | part_number | quantity | name | blurb |
|---|---|---|---|---|
| A | 29-22532 | 1 | Upper Link | |
| B | 11-12681 | 2 | 6900-2RS Bearing | |
| C | 26-15533 | 2 | M10x3 Washer | Apply grease to inner surface |
| D | 26-22561 | 1 | 10x35.25 Bearing spacer | |
| E | 26-18690 | 2 | Bearing Dust Shield | Apply grease to inner surface |
| F | 11-12681 | 2 | 6900-2RS Bearing |
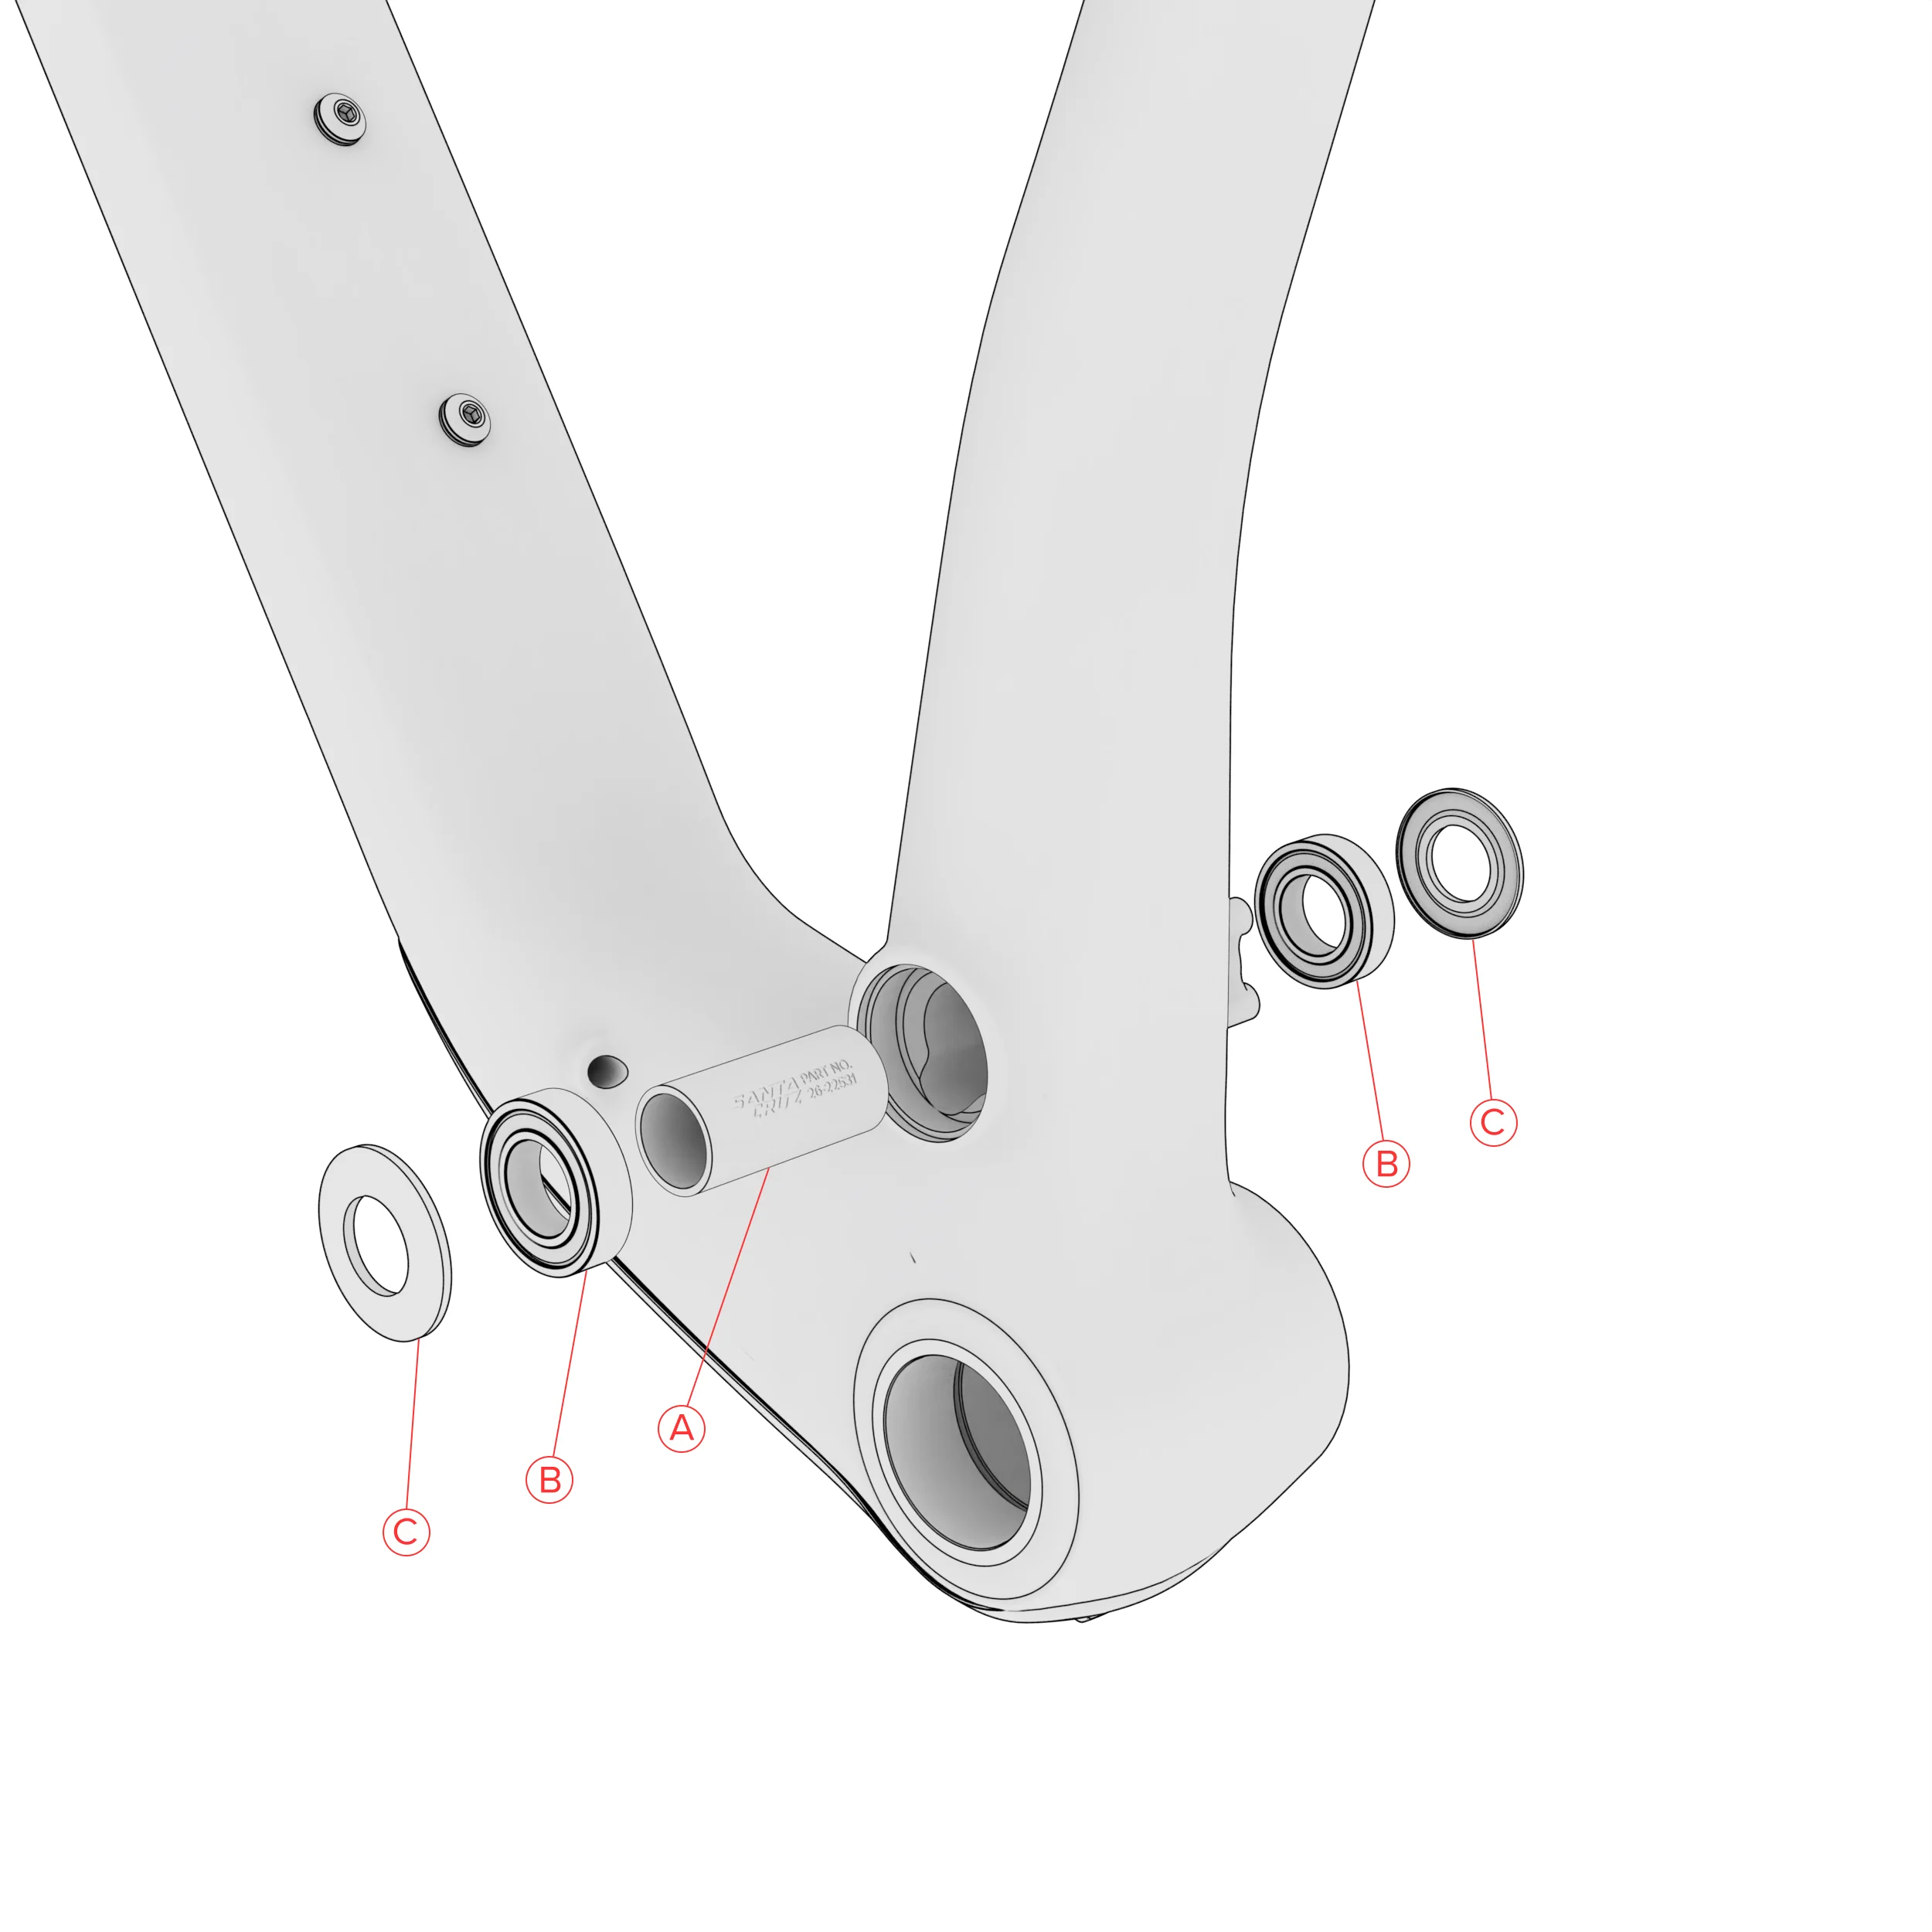
| label | part_number | quantity | name | blurb |
|---|---|---|---|---|
| A | 26-22531 | 1 | 15x38.25 Bearing spacer | |
| B | 11-12218 | 2 | 6902-2RS Max Bearing | |
| C | 26-11612 | 2 | Bearing Dust Shield | Apply grease to inner surface |
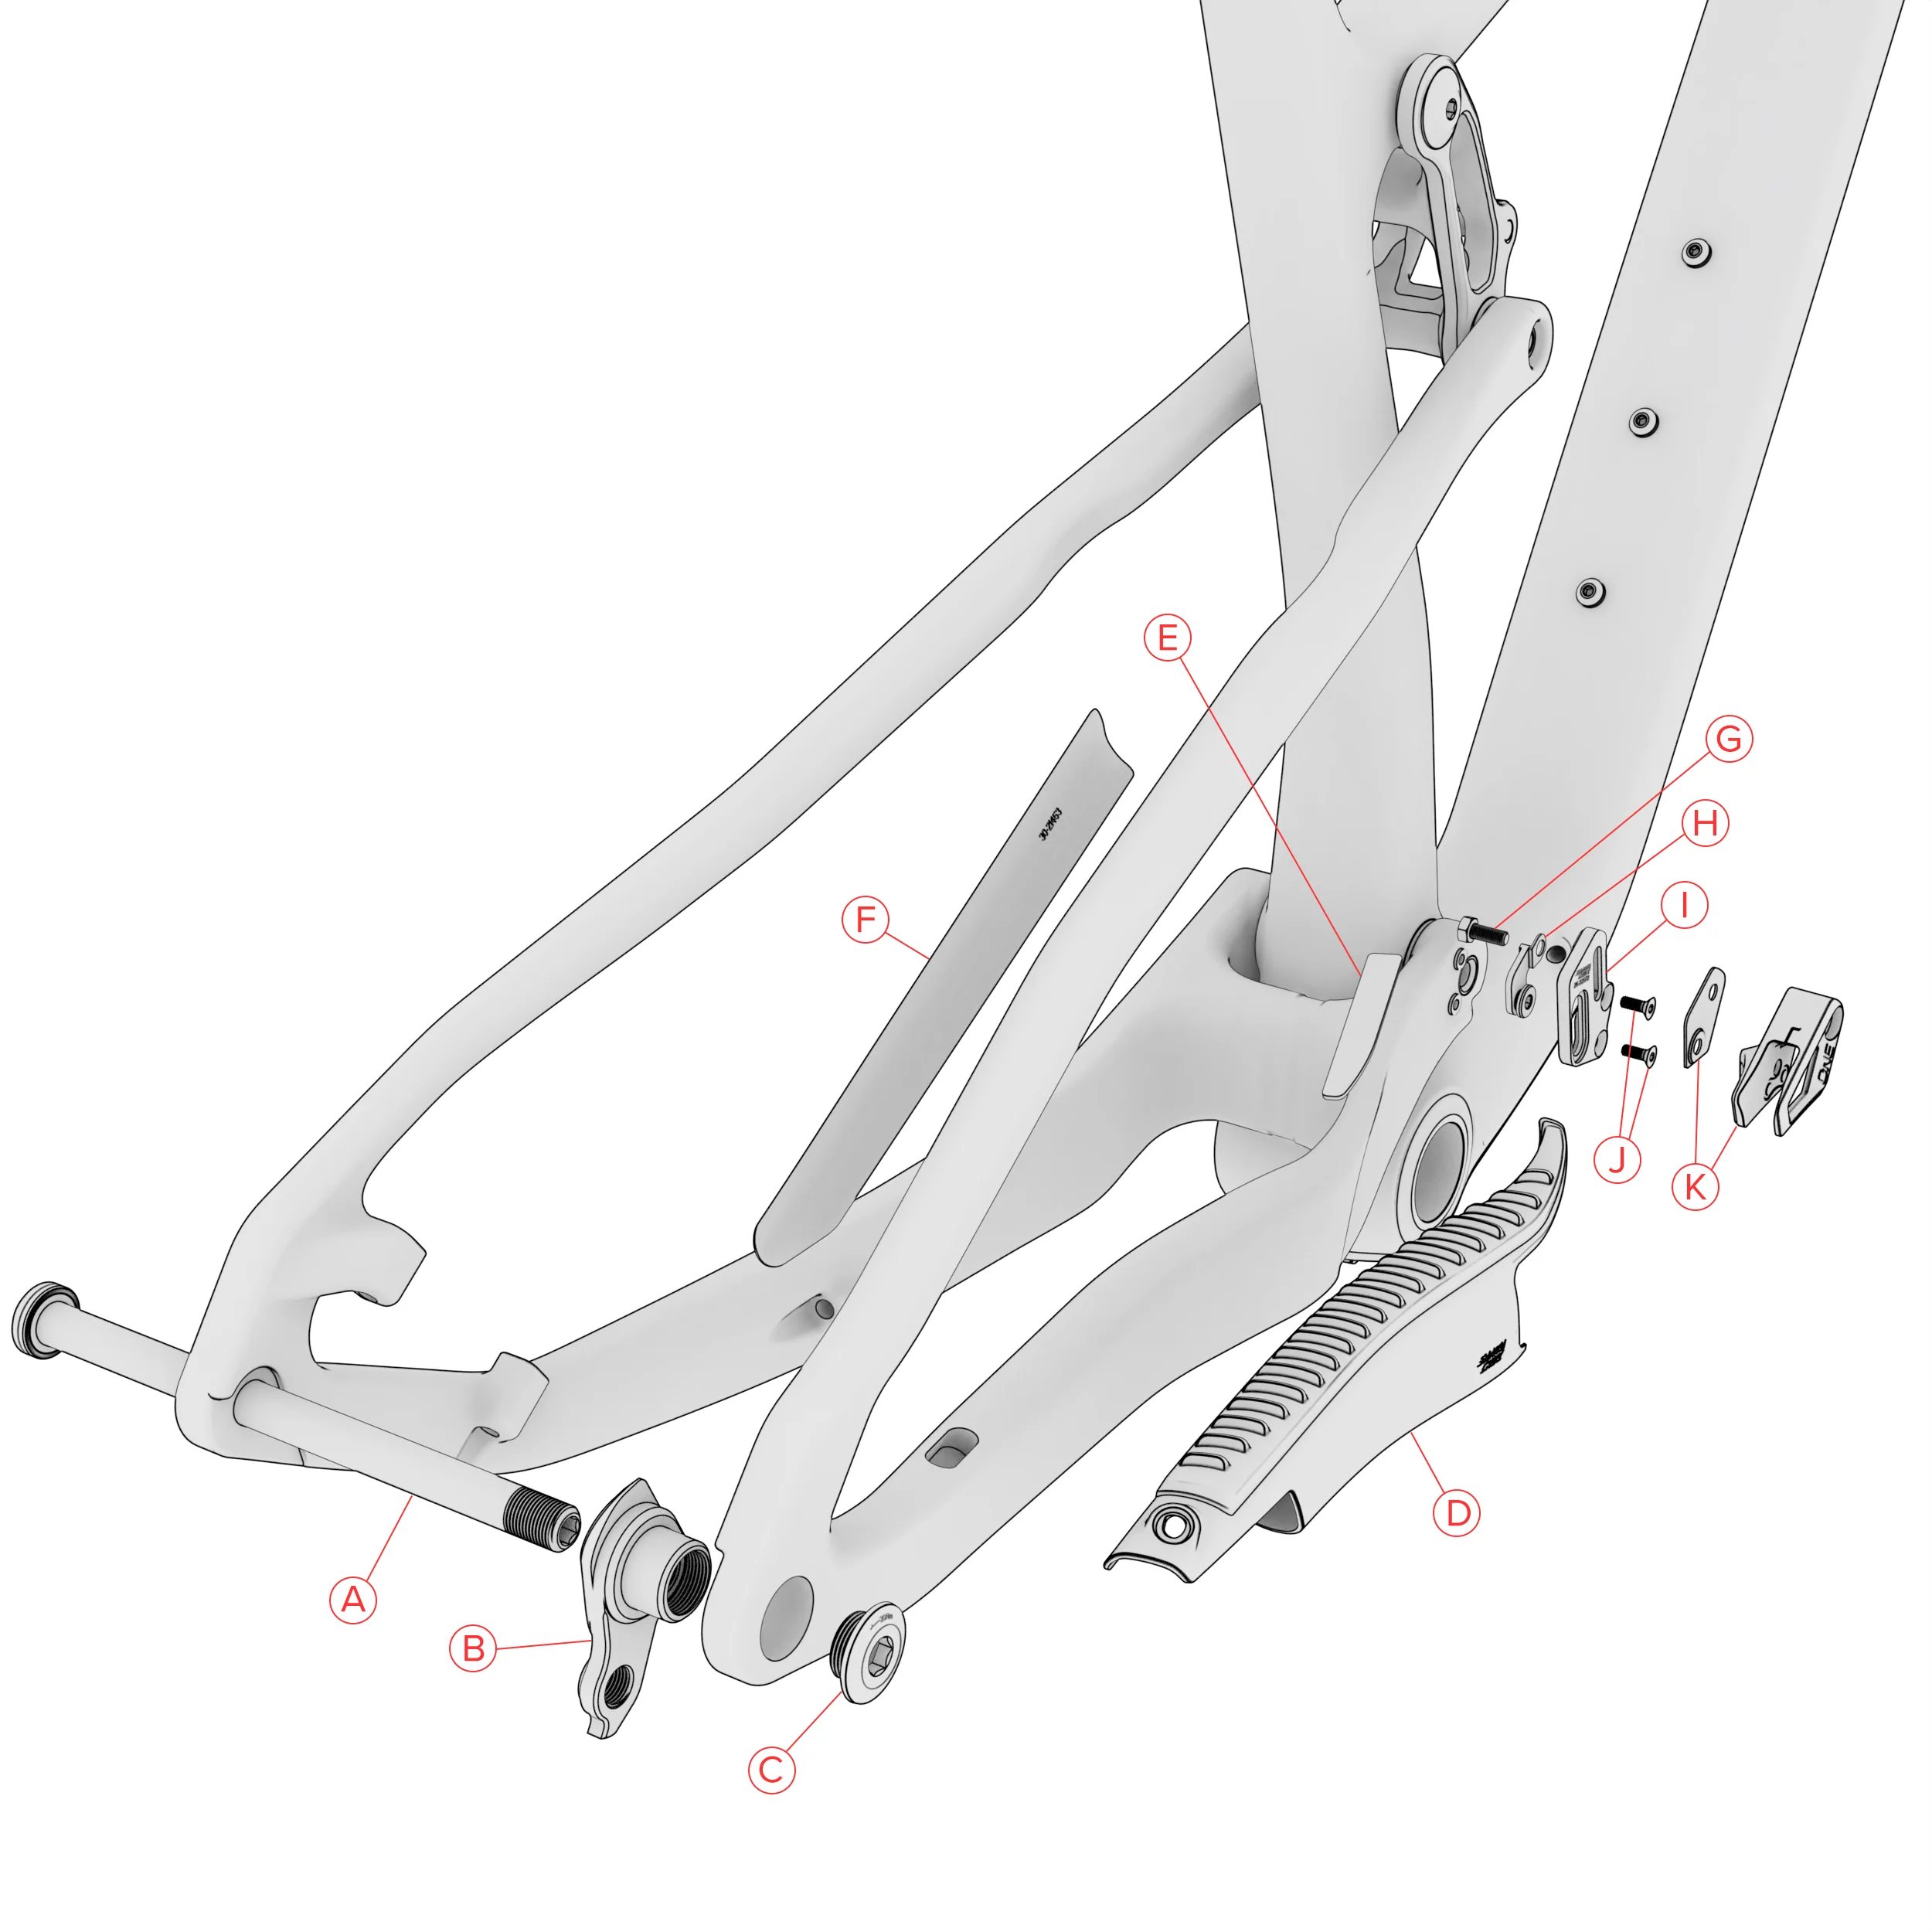
| label | part_number | quantity | name | blurb | torque |
|---|---|---|---|---|---|
| A | 08-22209 | 1 | Rear axle 12x173.7 | Apply grease to shaft and threads | |
| B | 23-23491 | 1 | SCB UDH | Interchangeable with Sram UDH | |
| C | 26-23492 | 1 | SCB UDH screw | Reverse thread | 20 Nm |
| D | 30-20189 | 1 | Chainstay Protector | ||
| E | 30-20189 | 1 | Chainstay Protector | ||
| F | 30-21453 | 1 | Seatstay Protector | ||
| G | 26-22570 | 1 | M5x12 HHS | Apply Loctite 242 to threads | 2 Nm |
| H | 26-22571 | 1 | OneUp chainguide back plate | ||
| I | 26-22572 | 1 | OneUp chainguide mount | ||
| J | 26-22938 | 2 | M4x10 FHCS | Apply Loctite 242 to threads | 0.65 Nm |
| K | 19-22609 | 1 | OneUp chainguide |
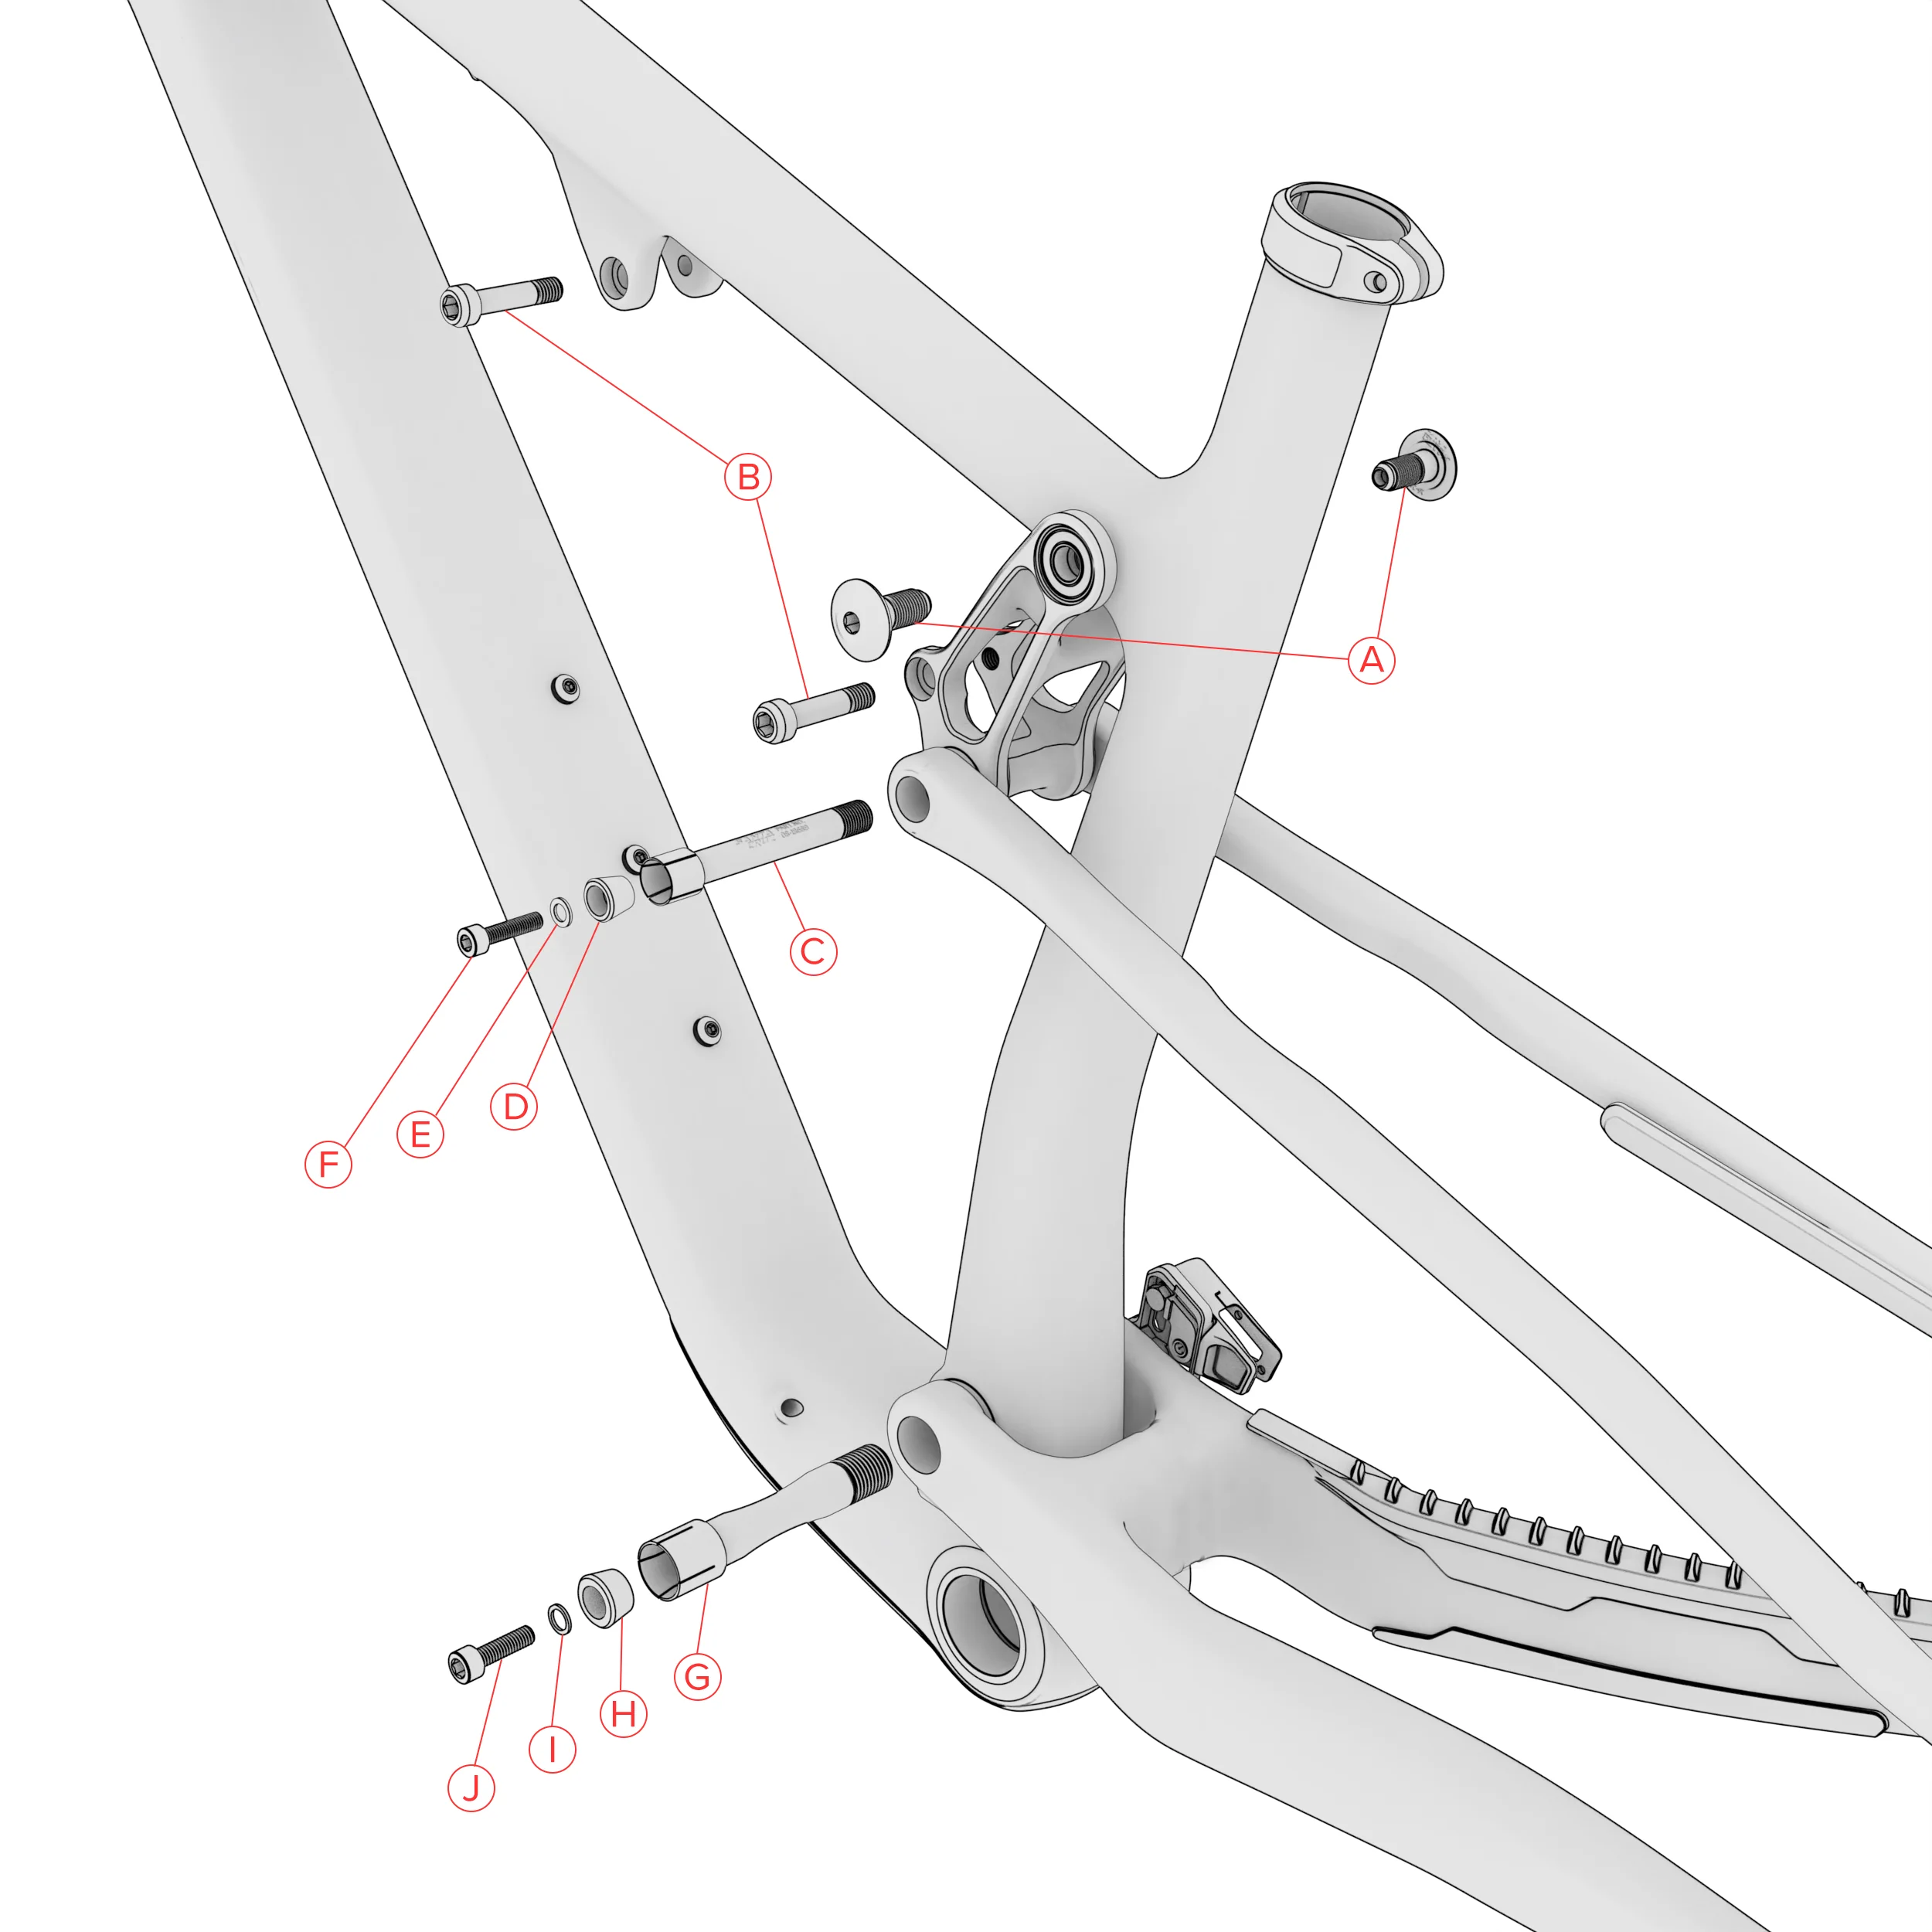
| label | part_number | quantity | torque | name | blurb |
|---|---|---|---|---|---|
| A | 26-20122 | 2 | 16 Nm | M10x23 Screw | Apply Loctite 242 to threads only, apply grease to shaft only |
| B | 26-22662 | 2 | 20 Nm | M8x35 Shock Bolt | Apply Loctite 242 to threads |
| C | 08-23720 | 1 | 13.6 Nm | Pivot Axle M10x81 | Apply Loctite 242 to threads only, apply grease to shaft only |
| D | 26-15632 | 1 | M5 Tapered Washer | Apply grease to surface | |
| E | 26-12652 | 1 | M5 Washer | ||
| F | 26-15946 | 1 | 5.6 Nm | M5x20 SHCS | Apply Loctite 242 to threads |
| G | 08-22530 | 1 | 20 Nm | Pivot axle M15x90.75 | Apply Loctite 242 to threads only, apply grease to shaft only |
| H | 26-15633 | 1 | M6 Tapered Washer | Apply grease to surface | |
| I | 26-11817 | 1 | M6 Washer | ||
| J | 26-15947 | 1 | 9 Nm | M6x20 SHCS | Apply Loctite 242 to threads |
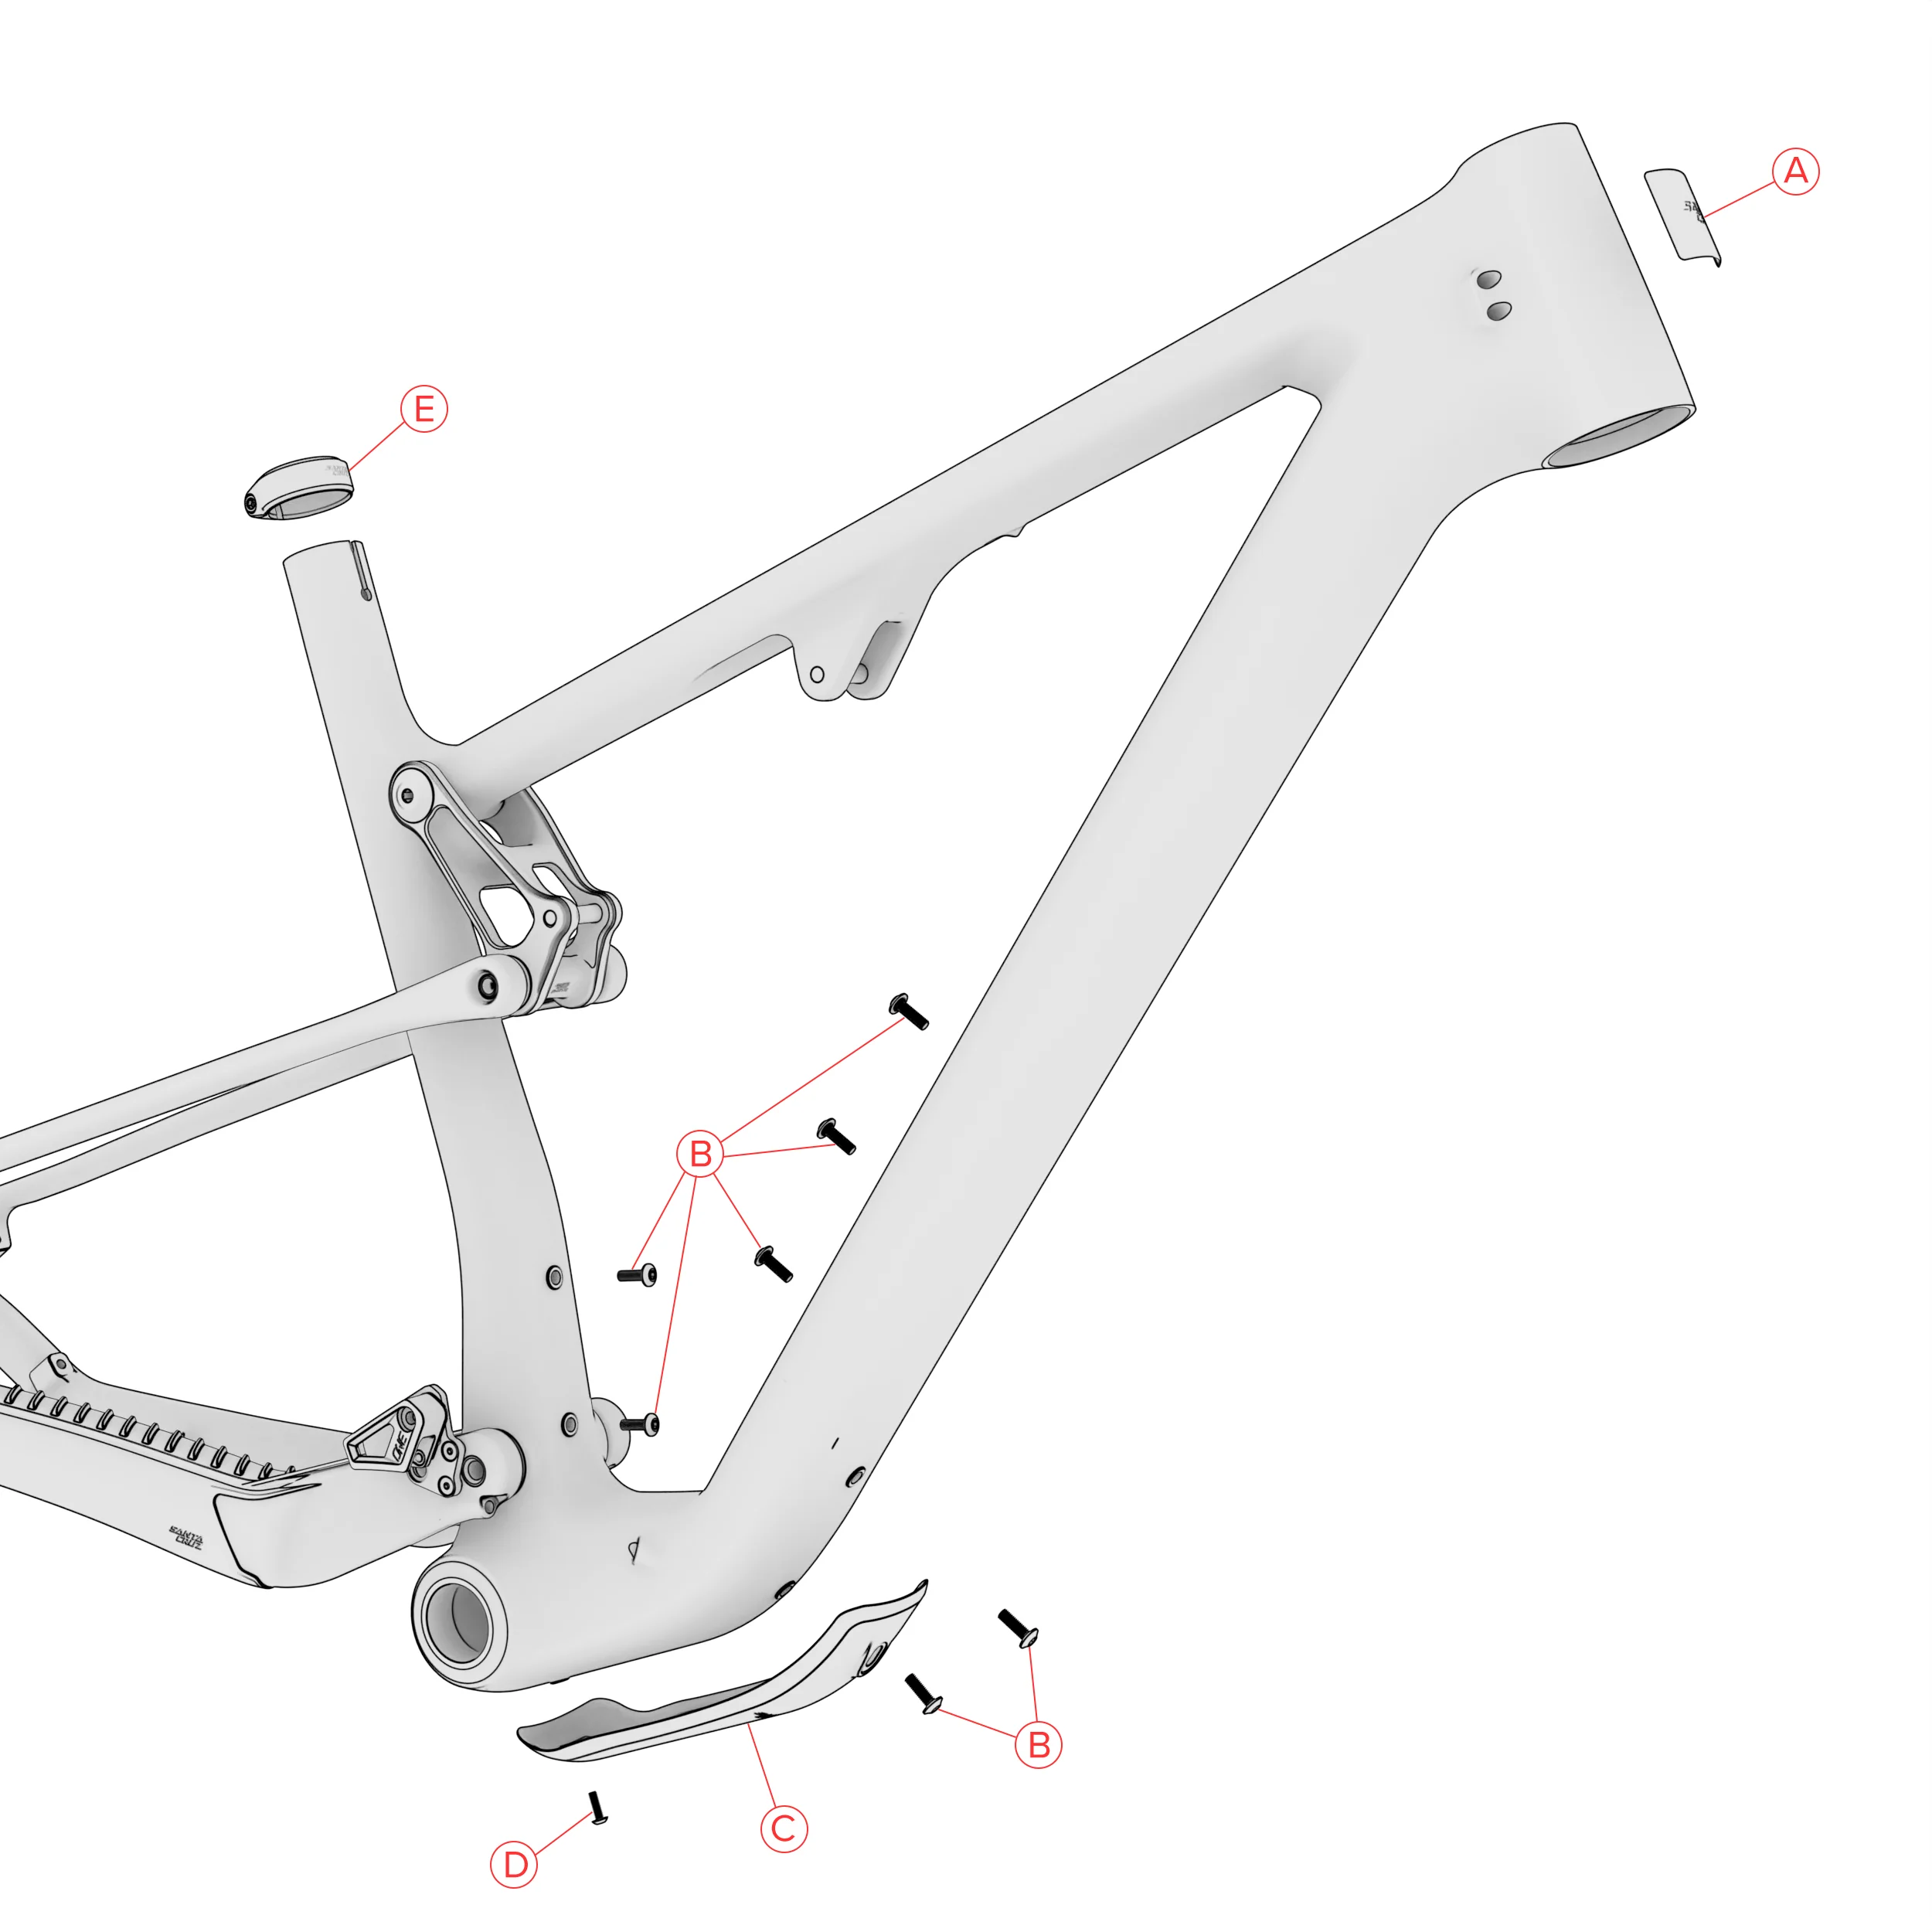
| label | part_number | quantity | name | blurb | torque |
|---|---|---|---|---|---|
| A | 67-19217 | 1 | Head Tube Badge | Clean frame surface, center on headtube | |
| B | 26-20124 | 7 | M5x16 Water Bottle screw | Apply grease to threads | |
| C | 30-22562 | 1 | Downtube Protector | ||
| D | 26-18382 | 1 | M4x12 BHC | Apply grease to treads | 0.65 Nm |
| E | 34-20201 | 1 | 36.4 Seat Collar |
| Blur 4 xc | |||||
|---|---|---|---|---|---|
| Frame Size | Setup Key | Setup Cog | 32T | 34T | 36T |
| Small | B | 7 | 116 | 116 | 118 |
| Medium | B | 7 | 116 | 118 | 118 |
| Large | B | 7 | 116 | 118 | 118 |
| XLarge | B | 7 | 116 | 118 | 118 |
| Blur 4 TR | |||||
| Frame Size | Setup Key | Setup Cog | 32T | 34T | 36T |
| Small | B | 7 | 116 | 116 | 118 |
| Medium | B | 7 | 116 | 118 | 118 |
| Large | B | 7 | 116 | 118 | 118 |
| XLarge | B | 7 | 116 | 118 | 118 |
Dig Deep
Sizing and support for the Blur.

Geometry& Sizing
Setup& Support
AN ORIGINAL ORIGIN STORY
AN ORIGINAL ORIGIN STORY
THE BLUR GREW UP AS AN XC-OBSESSED OUTCAST, BUT IT BLOSSOMED...
Also Consider...
WIDE OPEN, DAWN 'TIL DUSK
See the Highball